
For the latest Release Notes, please refer to the items in the Biznews Hub.
-
How do I invite a Client?
Adviser informationHow to Invite a New Client
Step 1: Access the Dashboard
To invite a new client, you must be logged in as an administrator or adviser. Clients cannot invite other clients. Once logged in, navigate to your dashboard and click the 'INVITE NEW USER' button.

Step 2: Complete the Invitation Form
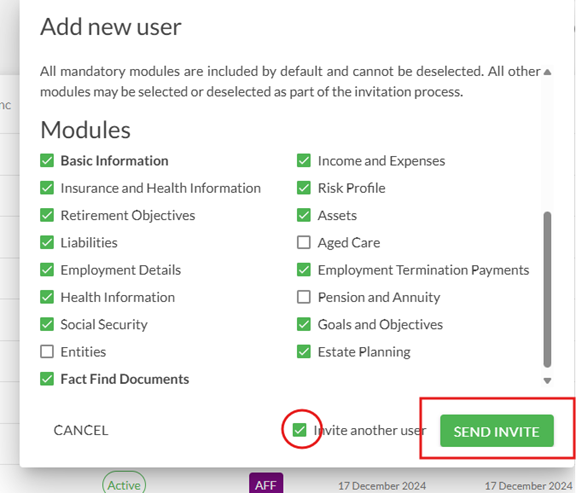
You will be prompted to fill out the required fields. If multiple product types are available, select the appropriate product pathway for your client (e.g., 'Cash Flow Pro'). If you choose to activate the Fact-Find feature, scroll down to select/deselect required modules.
(Note: Import of data is not covered in this FAQ, refer to ‘Integrations’ on the Moneysoft website homepage for this information)
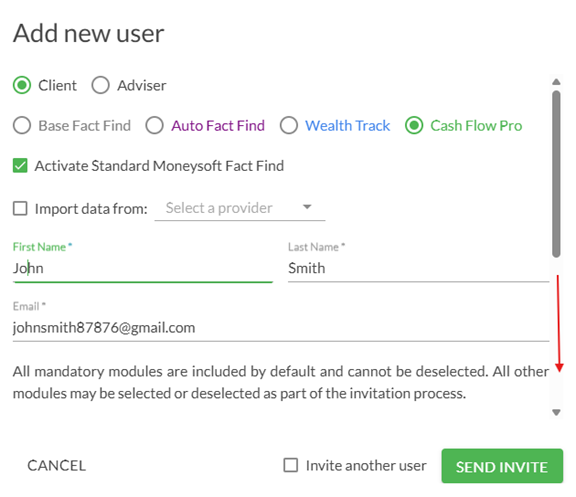
If you want to invite more than one user, check the ‘Invite another user’, which will leave a new form after each invitation is completed. After completing the form, click 'SEND INVITE'.
Step 3: Client Registration and Status
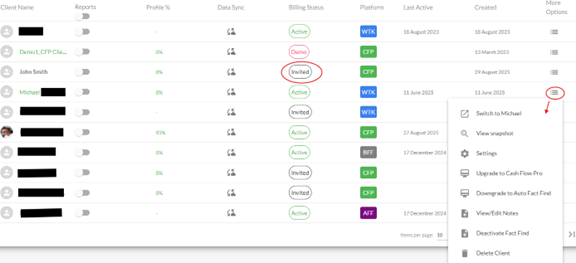
The invited client will receive an email with a registration link. Once registration is complete, the client's status will update accordingly. Possible statuses include:
- 'Invited': The client has received the invitation.
- 'Registered': The client has completed the registration.
- 'Active': The client has created their account and data is available.To modify the client's details, status, or product selection, go to the administration adviser portal. Click the menu icon next to the client's status to open a pop-up menu with available options.
Troubleshooting and Support
If the client does not receive the invitation email, ask them to check their spam folder or contact support. For any issues during registration or product selection, reach out to the support team at support@moneysoft.com.au
-
Create a Budget
BudgetHow to Create and Manage Your Budget Effectively
Creating a budget in the system involves a mix of automated tools and manual adjustments to ensure your financial plan reflects your actual spending habits and goals. Here's a step-by-step guide with detailed explanations:
1. Accessing Your Budget
To begin, navigate to the 'Your Goals & Budget' section located at the top of the screen. This is your central hub for viewing and managing your budget.

2. Understanding the Initial Auto-Budget
When you first link your financial accounts, Moneysoft automatically generates a budget based on your last 90 days of transactions. While this can be a helpful starting point, it’s strongly recommended to disregard this initial auto-budget. Instead, focus on:
- Categorising all transactions accurately so they reflect your actual spending.
- Creating rules to automate future categorisation (e.g., recurring bills or subscriptions).
- Verifying transfers between accounts to ensure they’re not misclassified as expenses or income.
Once these steps are complete, you’ll have a cleaner and more reliable foundation to build your budget.
3. Manually Creating or Editing Your Budget
If you prefer a hands-on approach or need to fine-tune your budget:
- Click the pencil icon next to any category group to expand it.
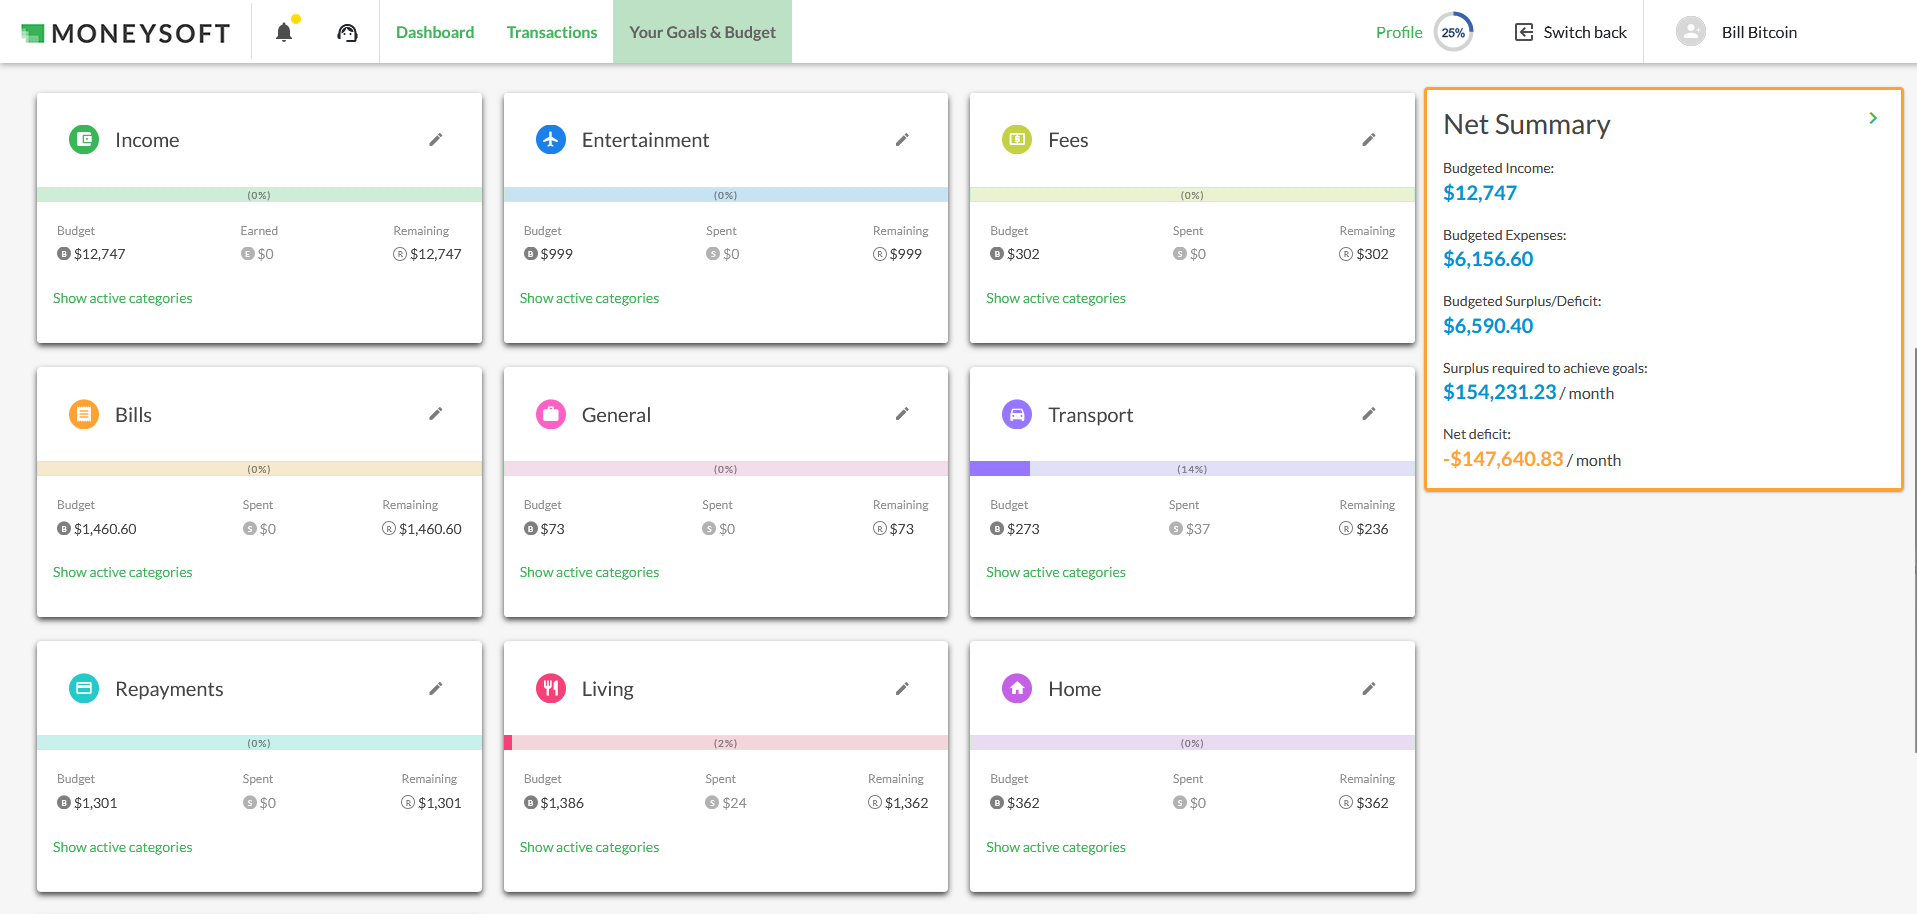
You’ll see individual categories where you can enter:
- Budgeted amounts
- Frequency (e.g., monthly, weekly)
As you input values, Moneysoft will dynamically update the budget and remaining figures to show how changes affect your totals—before you save.
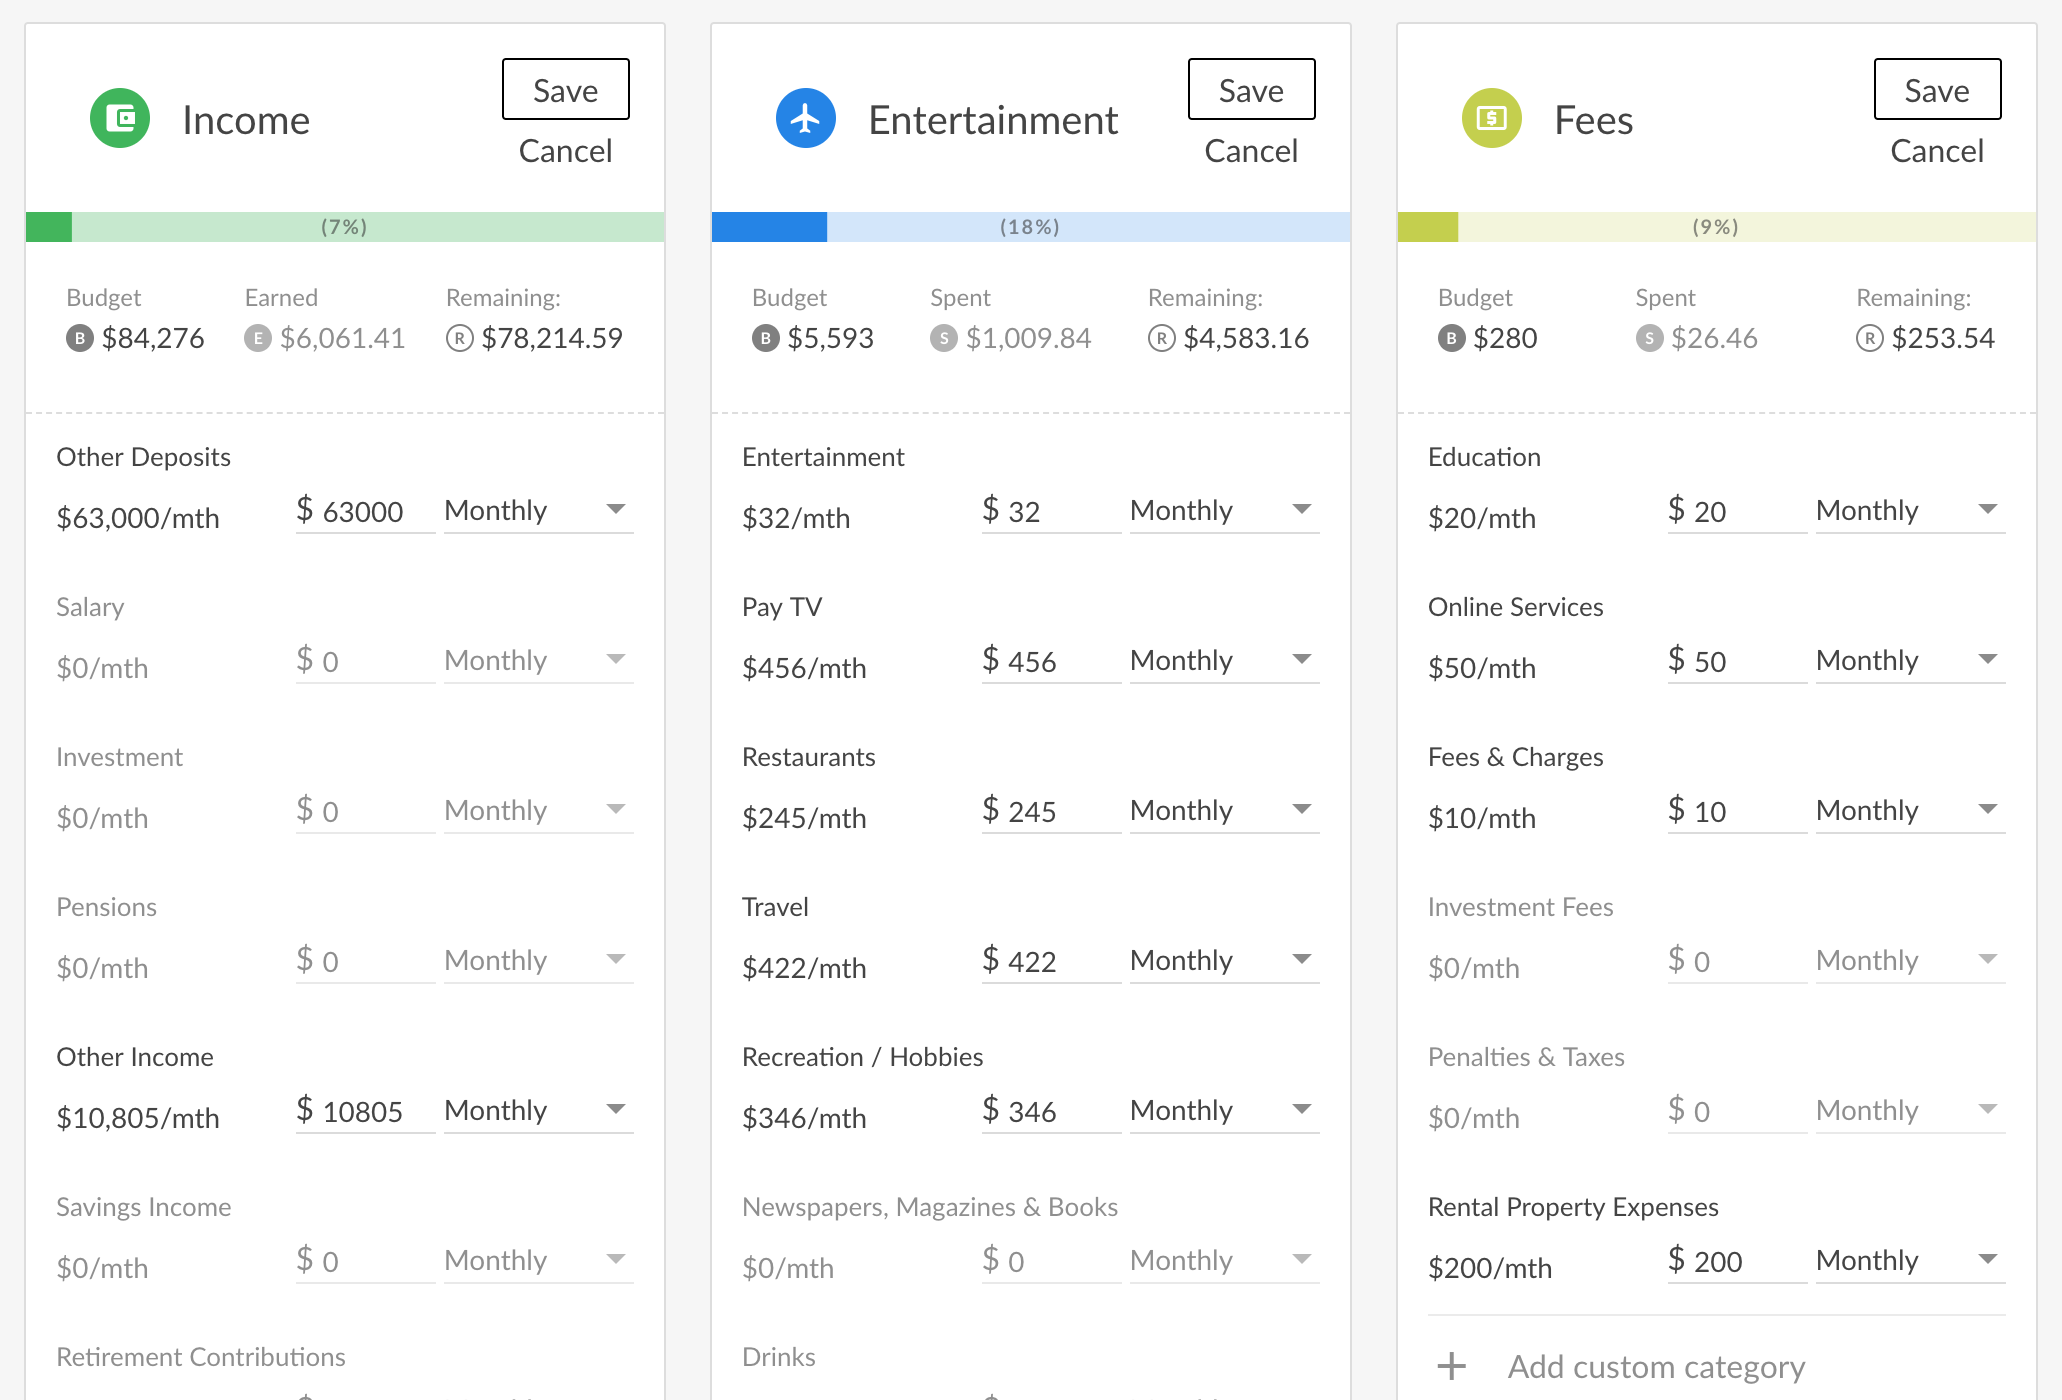
- Click ‘Save’ to apply changes or ‘Cancel’ to discard them.
This method gives you full control over how much you allocate to each category.
4. Automatically Recalculating Your Budget
If you want Moneysoft to help you build a budget based on your actual spending history:
- Open the ‘Budget Options’ menu and select ‘Recalculate’.
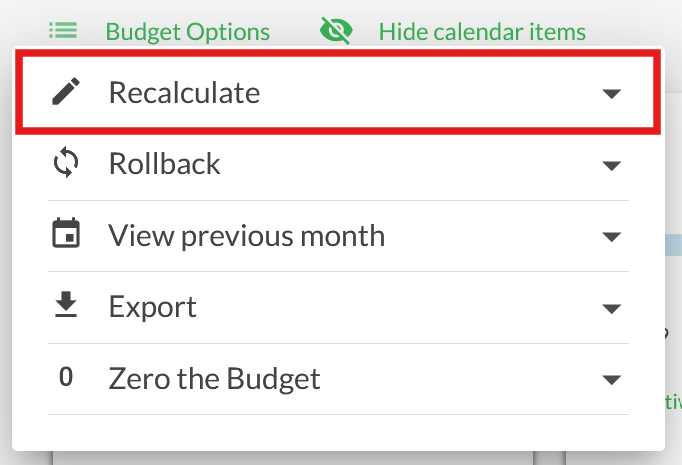
- Choose how many months of past transactions you want to use as the basis (e.g., 3, 6, or 12 months).
- Click ‘Recalculate’ again to generate a new budget.
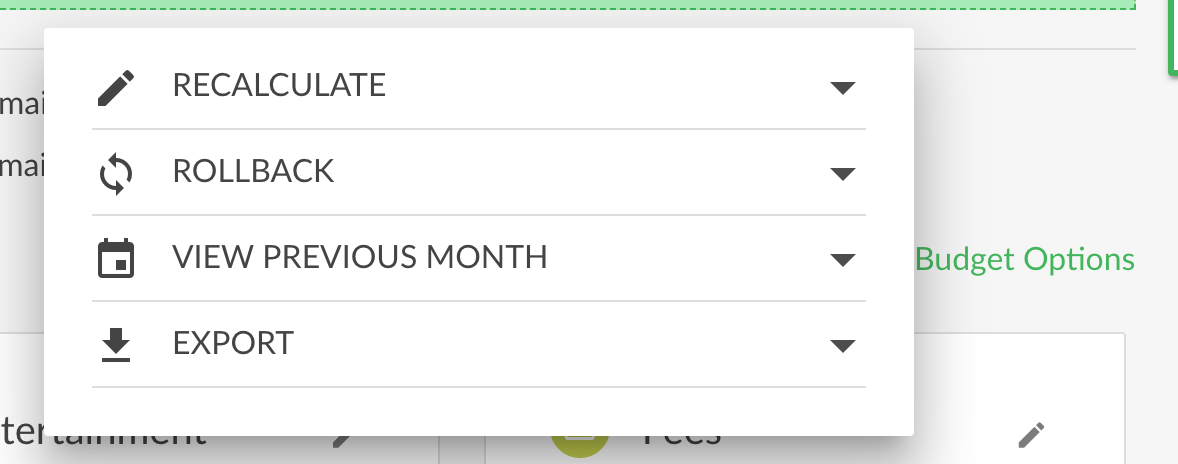
This feature is useful for identifying patterns in your spending and setting realistic budget targets.
5. Reviewing and Validating Your Budget
After recalculating or manually editing your budget, take time to review each category:
- Look for anomalies such as unusually high or low amounts.
- Ensure that each category aligns with your financial goals and lifestyle.
- Adjust any figures that don’t make sense or reflect temporary spikes in spending.
Tip: Regular reviews help keep your budget accurate and relevant.
-
How do I add a new Adviser to a business partner account?
Partner administration1. To invite a new adviser, you must have administrator access to your business account.
Once you are logged in as an administrator, from the main dashboard, click on the 'Invite New User' button.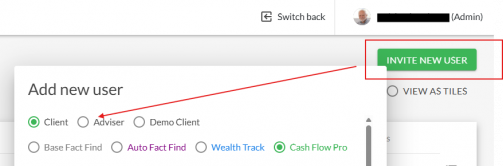
2. Select 'Adviser' and complete the fields. Then click 'Send Invite'
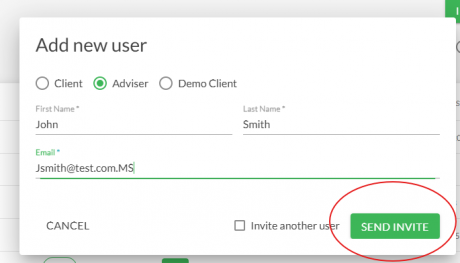
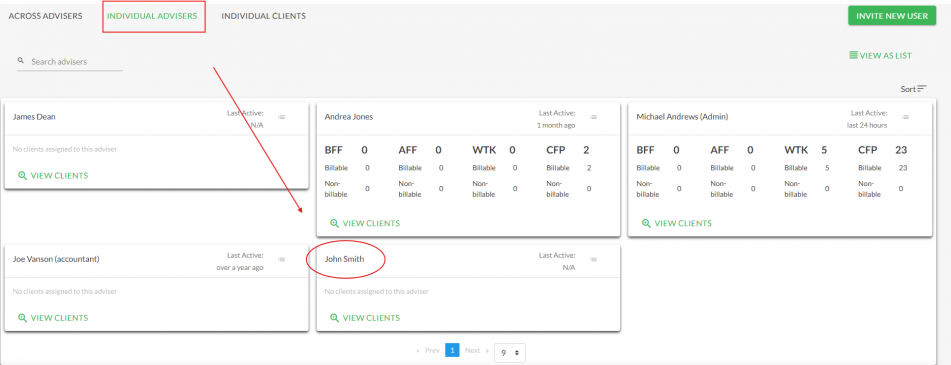
3. The adviser to be added will receive an invitation email containing a link, with a request to activate. Once this is completed, the new adviser will appear in the administration dashboard under 'Individual Advisers'.
-
How do I view the Client's Dashboard?
Adviser information1. To ‘switch to’ the client dashboard, simply click on the ‘Client Name’ from the administrator or adviser portal screen (alternatively, you may ‘switch to’ a client via the ‘More Options’ menu icon). Adviser access allows for editing, changing, and administering of the client’s account i.e., “read, write access”.
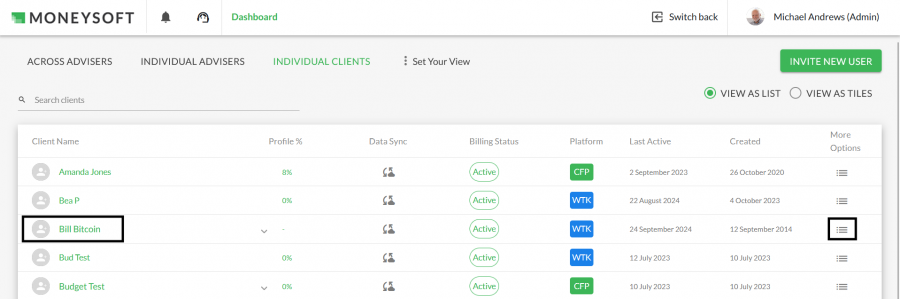
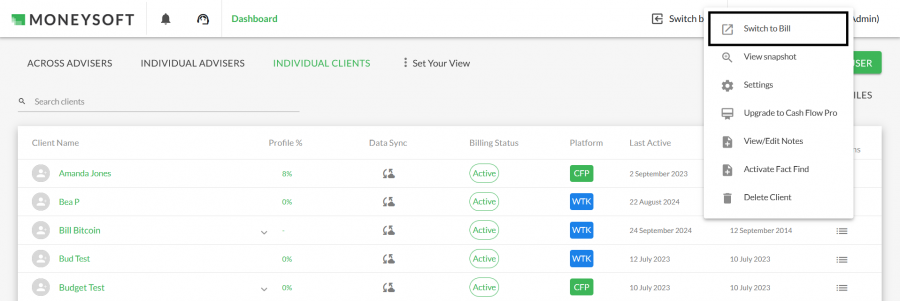
2. To go back to your Admin dashboard, click on the ‘Switch Back’ button at the top right of the screen.

-
How do I view my Adviser Management and Client Reports
Adviser informationAccessing Management Reports
Administrators and advisers can access a range of management reports that provide insights into client activity, exposure, and notifications. These reports are available via the Main Dashboard.
To access these reports, follow these steps:
1.Log in to the platform and navigate to the Main Dashboard.
2.Click on 'Across Advisers' (pic 1).
3.Select from the following report options:
- Client List Summary: Provides an overview of all clients managed by advisers.
- Institutional Exposure: Displays the exposure levels across various institutions.
- Client Notifications: Lists of recent alerts and updates related to client accounts.
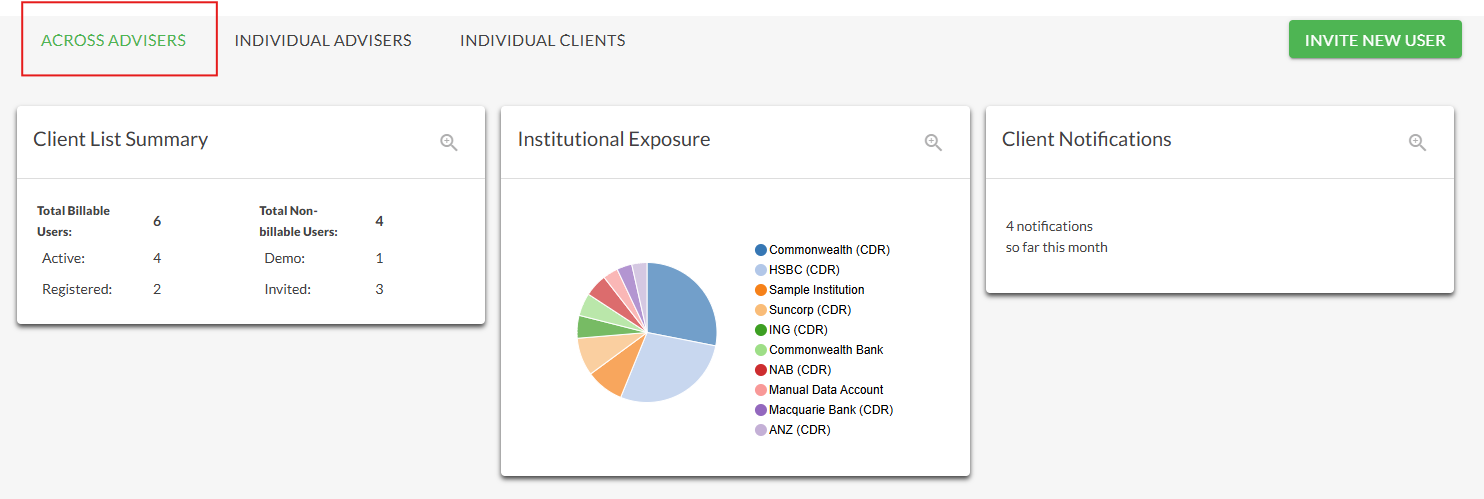
pic 1Note: As of August 2025, new reports are scheduled for release. These will include enhanced data on client data feed health and detailed tracking of changes in net worth per client.
Accessing Individual Client Reports
Individual client reports offer detailed insights into a specific client’s financial activities, goals, and scheduled tasks. These reports are essential for advisers and administrators to provide personalized support and planning.
To view these reports:
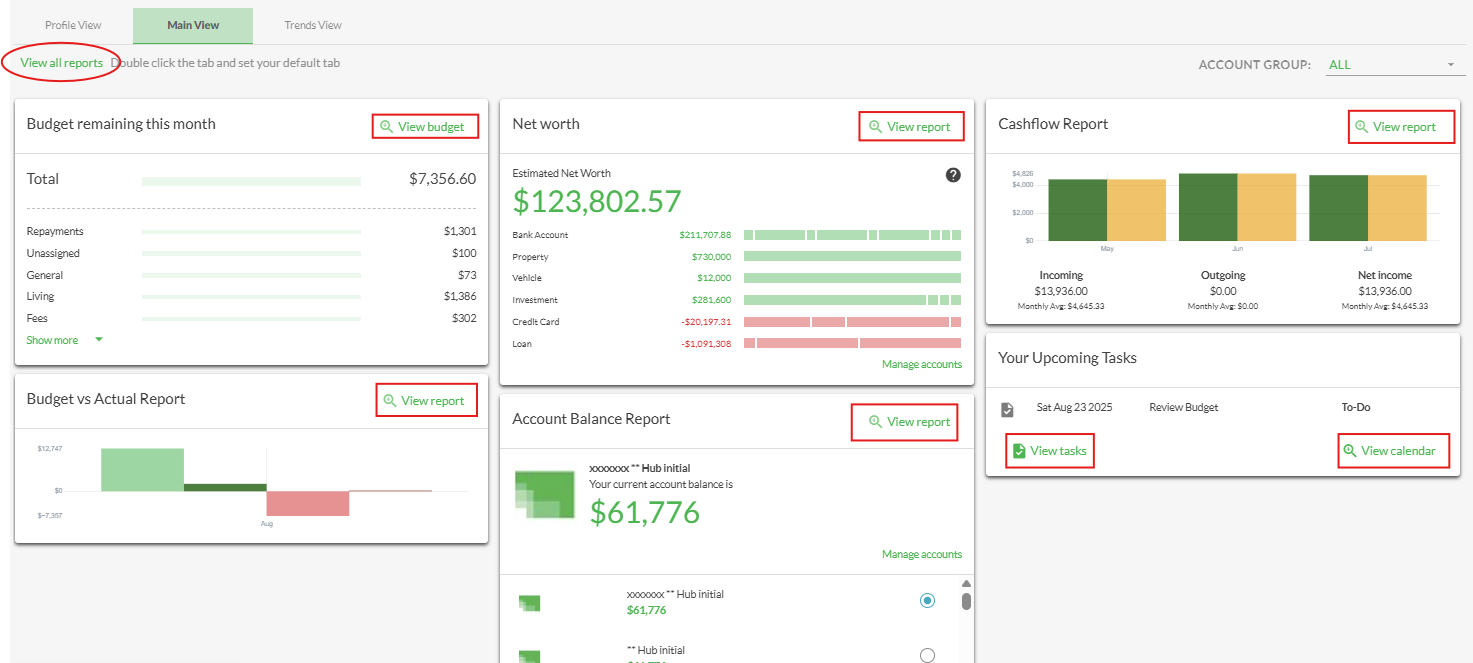
1. Switch to the client user’s 'Main View' dashboard (pic 2)
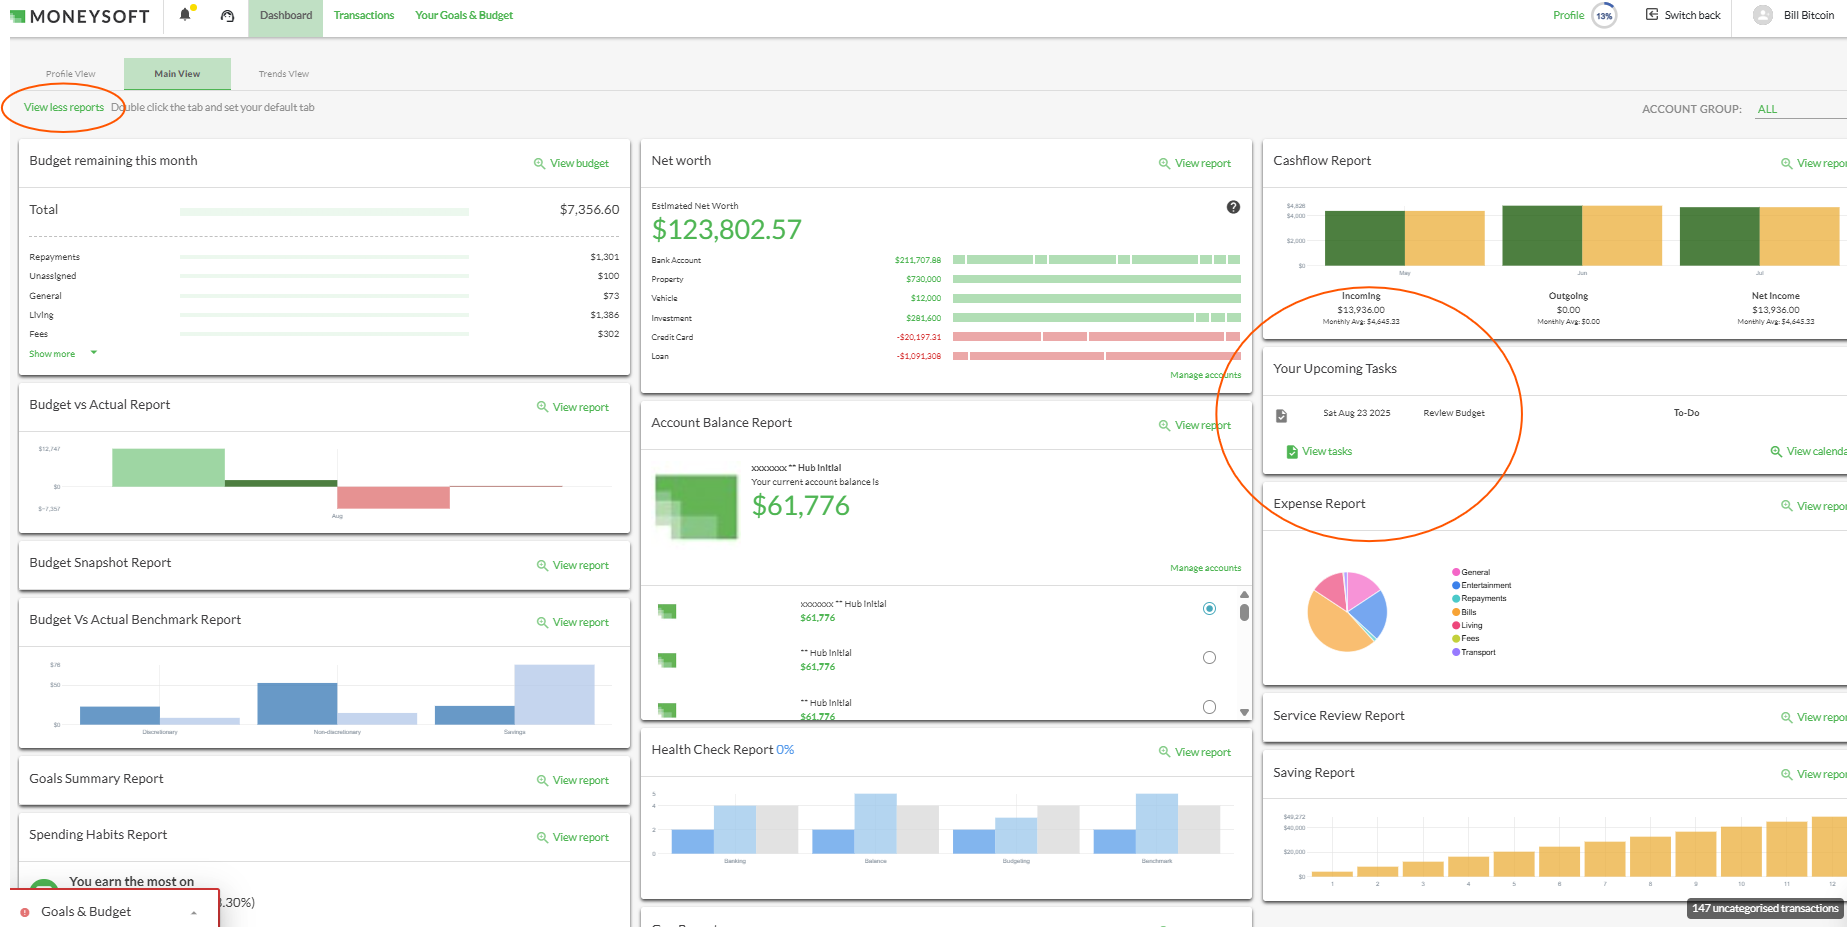
2. Click 'View All Reports' to access the complete suite of client-specific reports (pic 3)
This suite includes all reports available to client users. Additionally, administrators can access the client’s upcoming tasks and calendar
pic 2
pic 3
-
How do I change the Adviser linked to a Client?
Adviser information1. At times, business circumstances may change and thus a client may need to be associated to a different adviser within the practice or business. To change the associated adviser of a client, locate the client in question from the adviser or admin dashboard, click the menu icon under ‘More Options’ and select the “settings” from the drop-down list. A new window will appear with the client details.
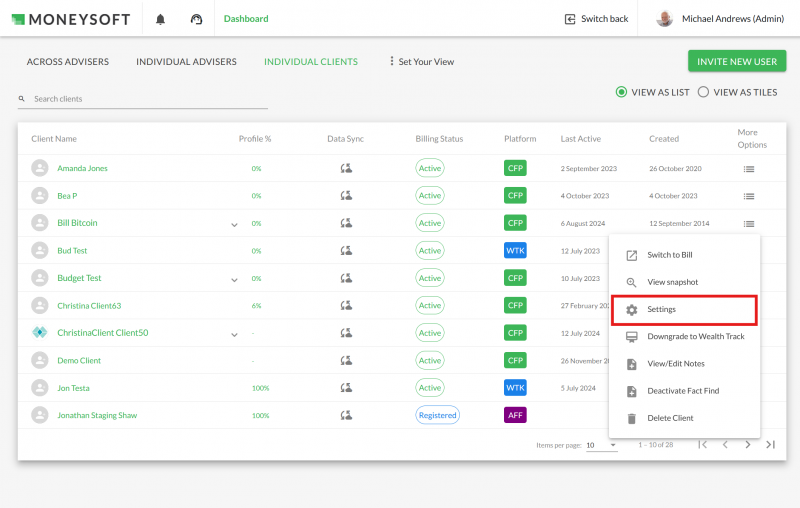
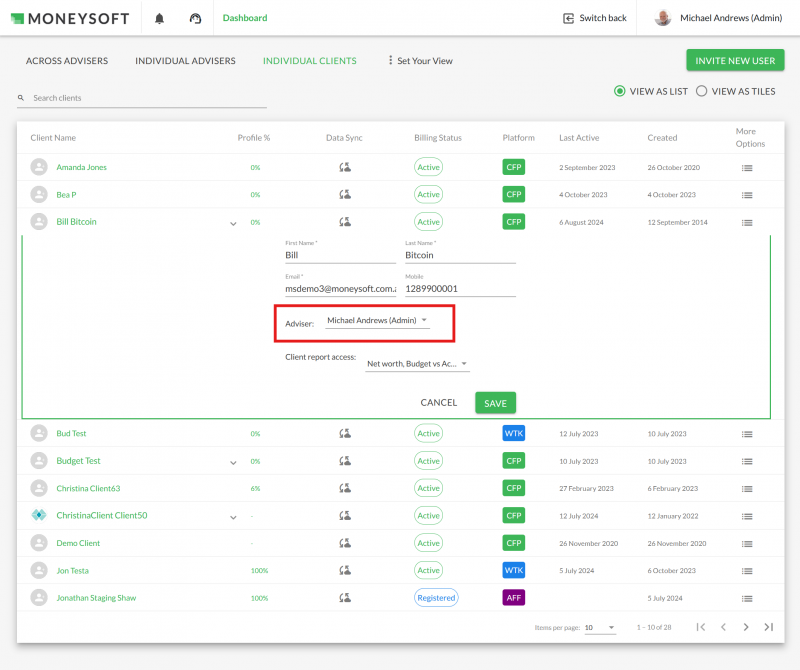
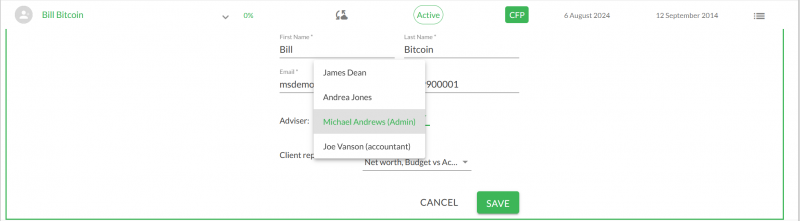
2. Click on the drop- down menu labelled “Adviser” and a list of advisers will appear. Select the new adviser and click ‘SAVE’.
-
What Financial institutions are available via ‘Open Banking’ in Moneysoft?
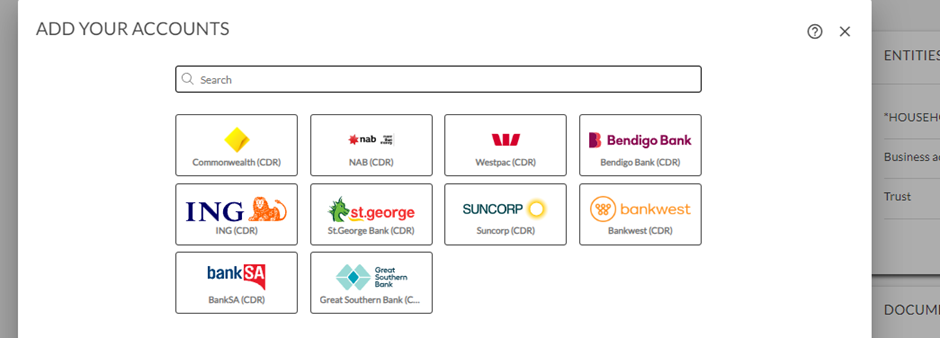
Financial accountsAll deposit taking financial institutions, excluding Superannuation companies, in Australia are covered under the Consumer Data Right and so are required to provide data sharing.
You will find that Moneysoft’s data provider will support of these most institutions although a definitive list is not supplied, as the number of participants being added to the scheme is evolving. You will find all major banks, most other banks and several building societies are available
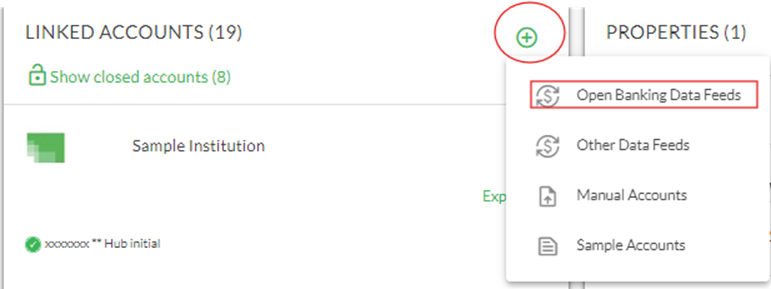
Simply search for the institution name with the letters ‘CDR’ in brackets, in the search box when adding accounts, after the selecting the ‘Open Banking data feeds’ option.
If you are unable to find a particular institution and wish to know why, you are welcome to email us at suppport@moneysoft.com.au and we will seek to get the latest information available from our data provider.
-
What Financial Institutions are supported via Digital Data Capture (non-CDR) in Moneysoft?
Financial accountsMoneysoft still provides an avenue to link your account data via Digital Data Capture (DDC or 'non-CDR') for many financial institutions, including non-deposit taking institutions and some superannuation companies.
You will find some institutions are no longer supported under DDC, as Open Banking is the more manageable alternative. Other non-CDR feeds are prevented by the institution itself, such as certain superannuation companies and banks.
The advantages of Digital Data Capture account linking include:
-
being able to access data when Open Banking is not available for the institution
-
being able to access accounts that an institution does not provide via Open Banking, such as investment or business accounts.
Some disadvantages are:
-
the data may not be as comprehensive as what can be provided under Open Banking
-
feeds can break down if the robotic screen scraping system is affected by changes to the bank’s website page or other tasks that are required to be completed by the customer.
-
the data retrieval can also sometimes be actively blocked by the institution themselves.
For Moneysoft Business Partners, a Trusted Adviser registration is not required for client users to be able to link Digital Data Capture accounts.
A definitive list of institutions covered by DDC is not supplied, as the availability of this type of data feed is changing.
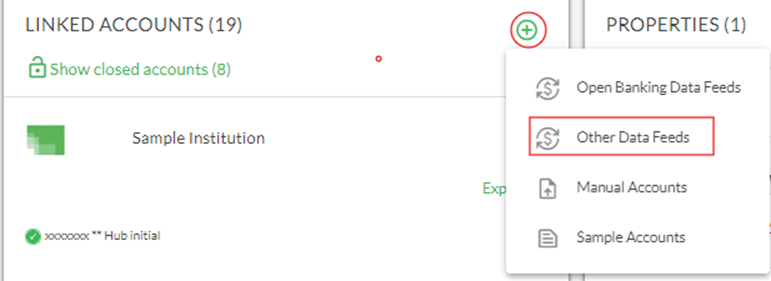
Simply search for the institution name in the search box, after selecting the 'Other Data Feeds' option
-
-
How do I link my financial accounts to Moneysoft?
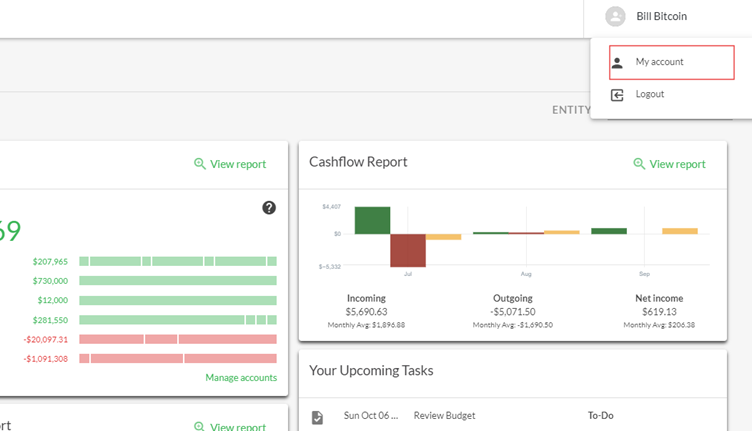
Financial accounts1.Click on your account name at the top right of the screen and select ‘My Account’
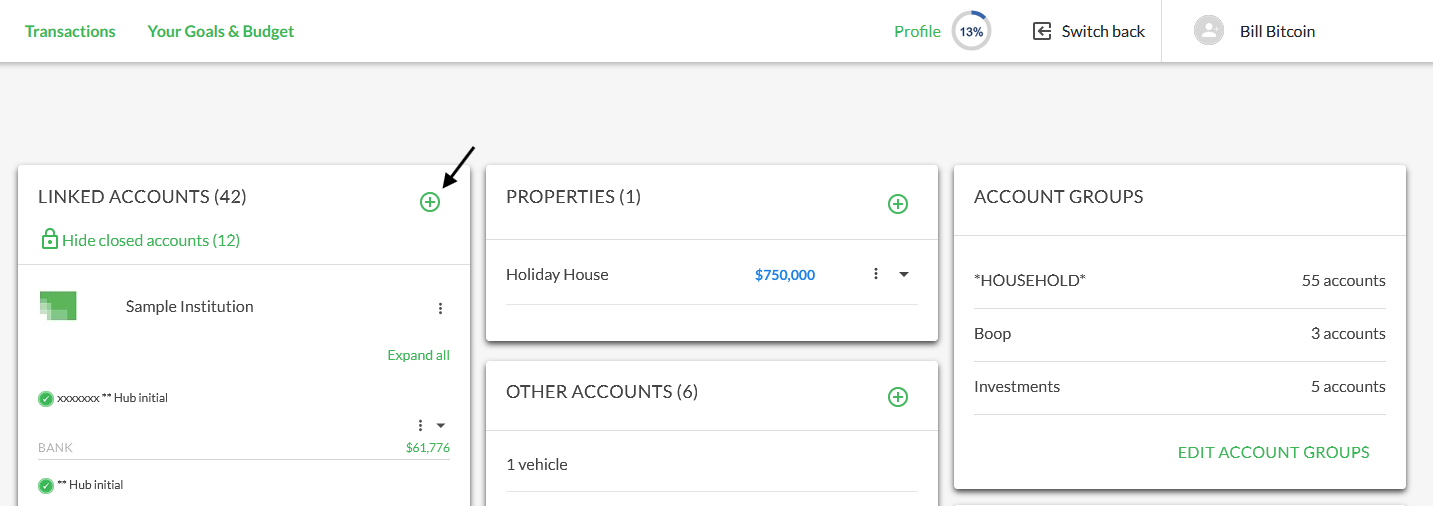
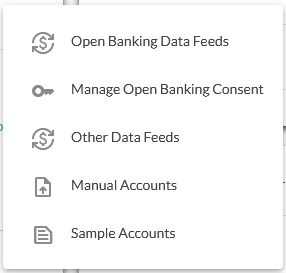
2.Click on the green ‘+’ button at the top right of the Linked Accounts tile. Select either ‘Open Banking Data Feeds’ (if linking under Consumer Data Right consent) or ‘Other Data Feeds’ (if linking via Digital Data Capture). Open Banking is recommended in first instance. If this is not available for an institution, attempt to link via Digital Data Capture.
-
How do I add and/or switch accounts to Open Banking (CDR)
Financial accountsThere are three basic steps required to switch an existing account to an Open Banking data feed:
- Add accounts again using the CDR Data Feed option
- Mark any old accounts as 'Closed'
- Delete duplicate transactions from the new CDR account
To learn how to link an Open Banking account using the CDR Data Feed option, watch this video
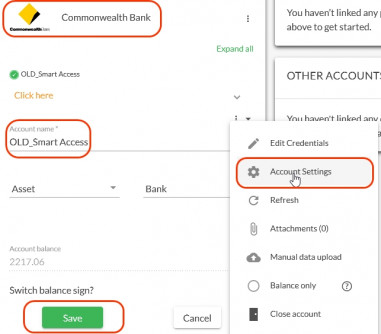
- The first thing to do is decide which institution and accounts to switch to Open Banking (CDR), then rename those pre-existing accounts with an “OLD_” prefix. This will help to identify them later in the process:
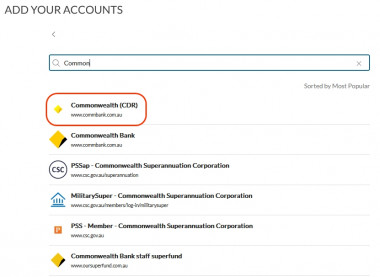
- After the re-naming is done, add the accounts again by adding Linked Financial Accounts, and choosing the “CDR” option for the relevant bank or institution - for example: “Commonwealth (CDR)”:
-
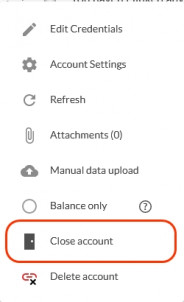
When the CDR accounts appear in the LINKED ACCOUNTS list, the pre-existing “OLD_” accounts should be marked as “Closed” (via the account options menu). This will not delete or remove any transactions - it will simply stop the “OLD_” accounts from refreshing or collecting any new data. All existing data will remain in place, and the CDR accounts will collect new data going forward.
-
At this point, the Transactions list may have a significant number of duplicate transactions - both from the pre-existing "OLD_" accounts and from the new CDR accounts, and as pre-existing transactions from the pre-existing “OLD_” accounts will have been coded already, it is desirable to keep all of these transactions, and remove any duplicate transactions from the new CDR accounts
-
To do this, go to the Transactions list and Filter by one of the “OLD_” accounts. Make a careful note of the most recent transaction date (for example, 11 December 2023)
-
Now Filter the Transactions list by the corresponding new CDR account
-
In this example, select any transactions belonging to the new CDR account from 11 December 2023 and earlier (ensure anything with a more recent date is not selected) and then bulk delete the selected transactions, thus removing any duplicates - make sure you get them all, CDR transaction data goes back for up to 12 months or more.
-
-
NOTE: Deleted transactions can always be un-deleted later, if an accidental mistake is made
That's all that needs to be done to migrate to Open Banking, and a much better experience with financial account data feeds!
-
How do I link my non-CDR financial accounts?
Financial accountsSome accounts that are not available via Open Banking, may be available via Digital Data Capture (DDC) methods with Moneysoft. Please note we cannot guarantee linking of all institutions via this method, even if the accounts and/or institutions are not covered for by the Consumer Data Right (CDR).
1. Click on your account name in the top right and select 'My Account'
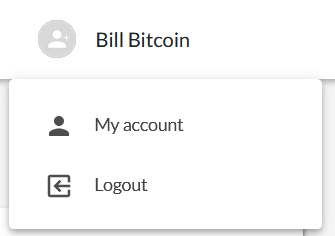
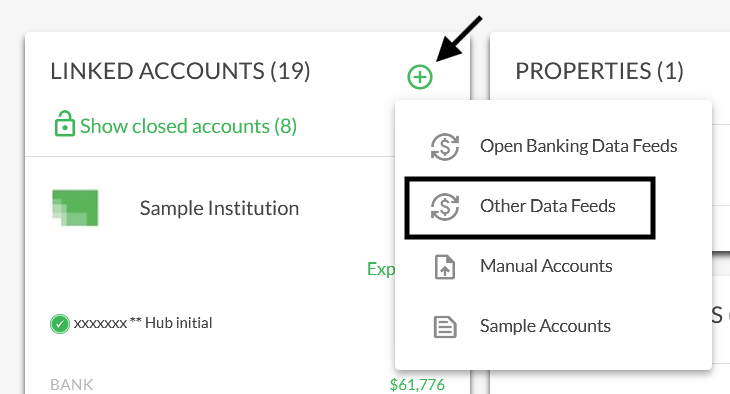
2. Click on the green + button in the 'Linked Accounts' tile. Select 'Other data feeds' from the drop-down menu.
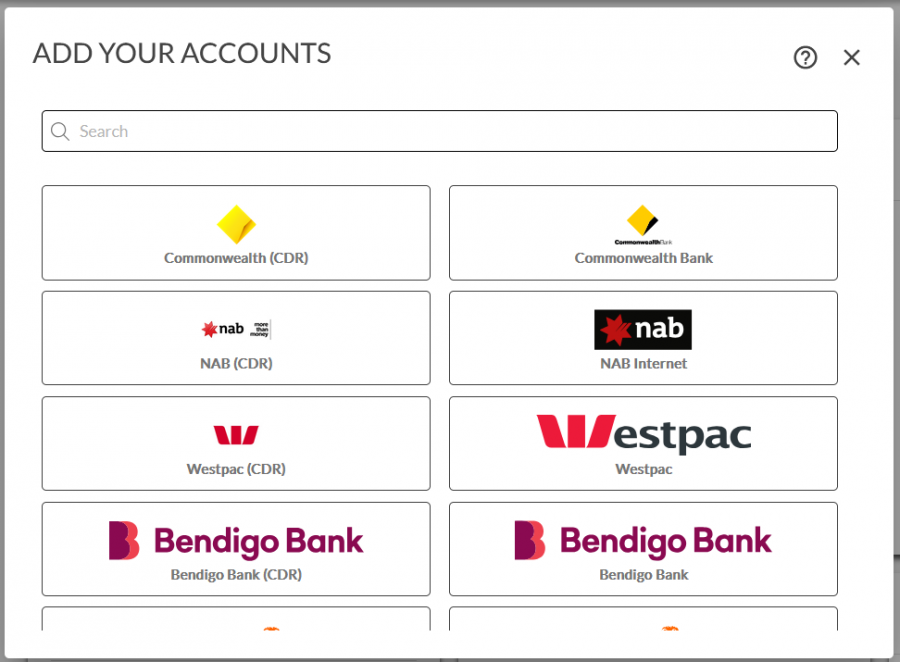
3. Enter the name of the financial institution you wish to link accounts from, or if you are looking for a popular institution, select one of the tiles displayed.
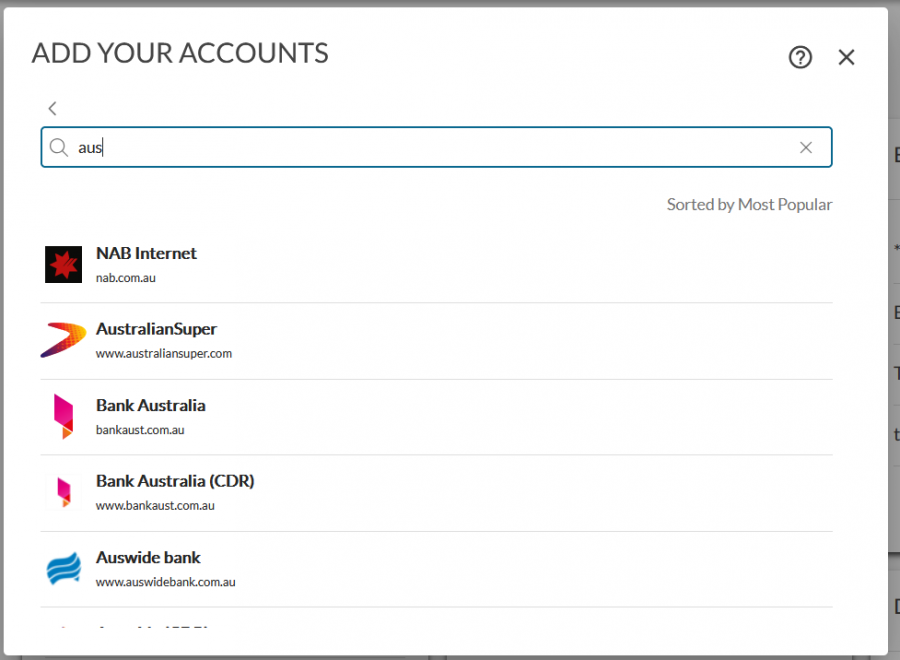
For example, you may wish to add a superannuation account that is available.
4. Enter your financial account login credentials and click Login.
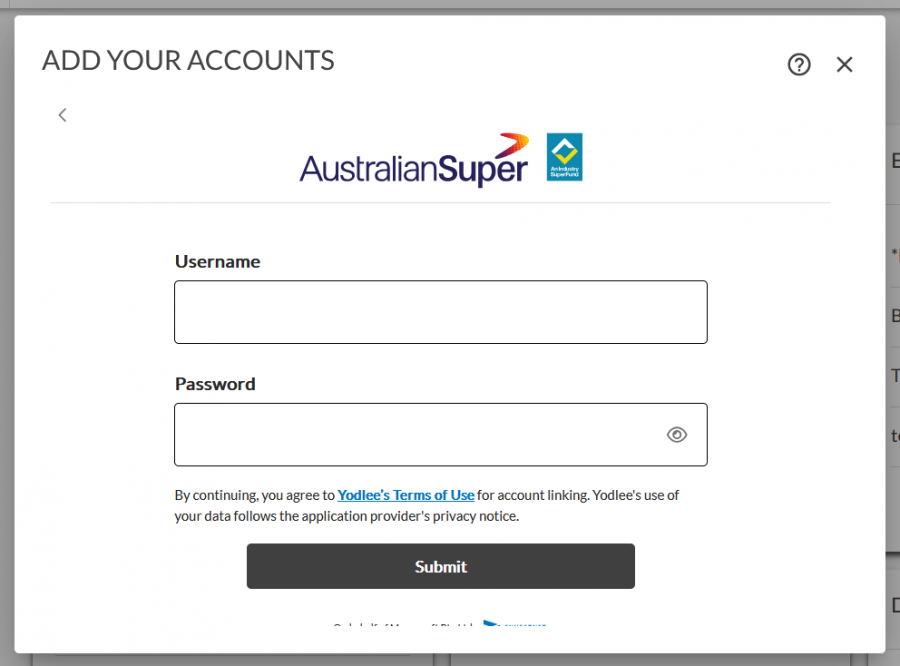
Note: This must be done as if you were logging into the account via the financial institution's portal. Entering the incorrect login credentials will result in an account linking failure.
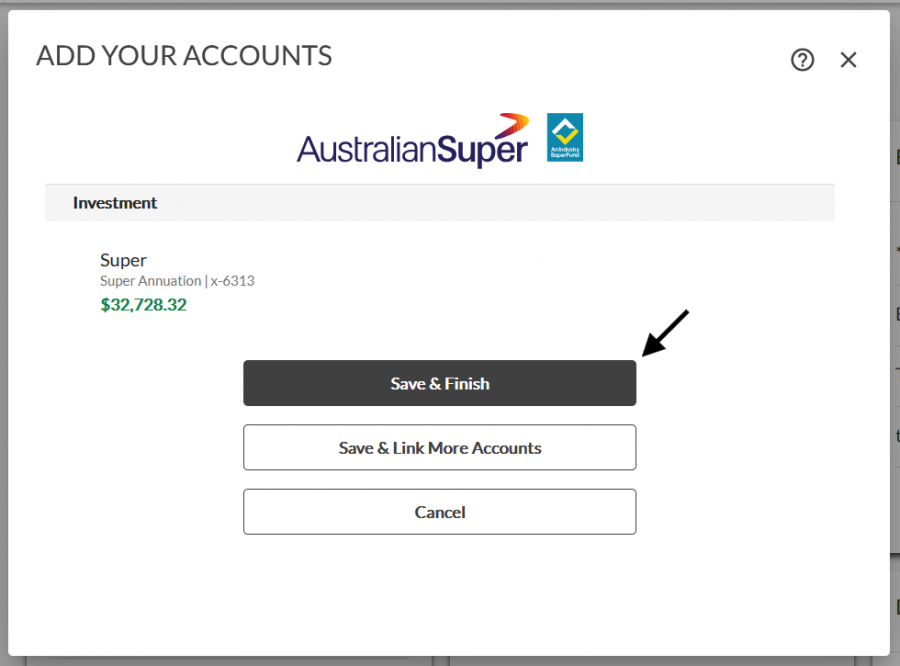
5. Once you have linked all your non-CDR financial institutions, click on the 'Save & Finish' button to return to the My Account Page
-
How do I renew my data sharing consent for financial accounts in Moneysoft?
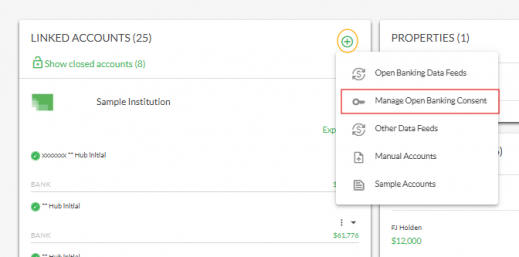
Financial accounts1. Go to the 'My Accounts' page. Click on the green ‘+’ button next to Linked Accounts. Select ‘Manage Open Banking Consent’.
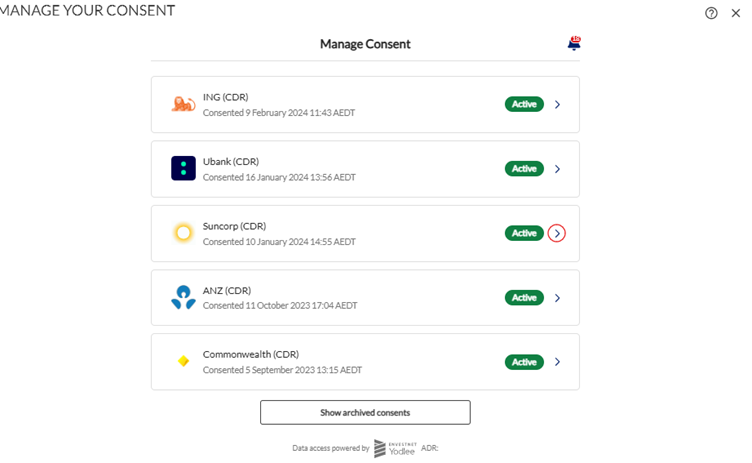
2. Select the arrow next to the account for which consent is to be renewed. In this example, Suncorp Bank is selected.
 3. The user’s personal data share information will be provided. Click on ‘Renew My Consent’ and follow the steps as provided by the institution, to renew the data sharing period.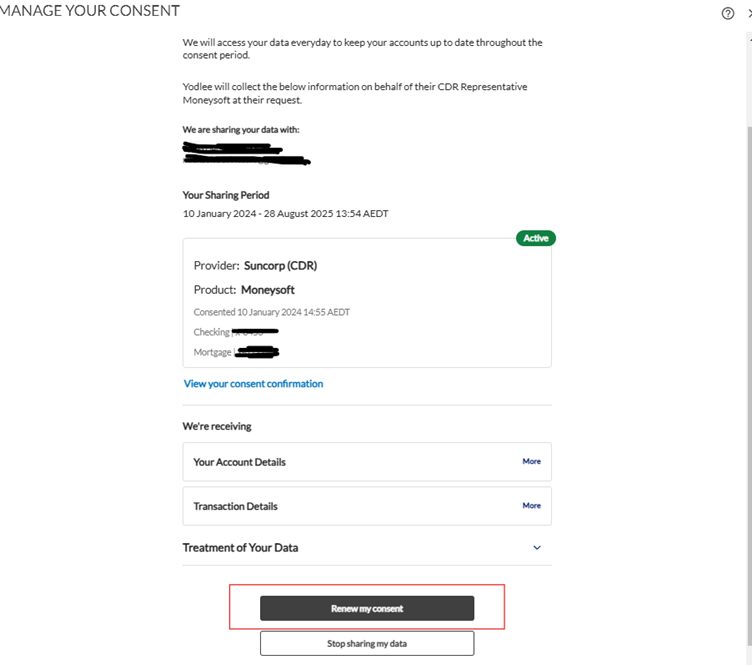
-
How do I re-consent to an Open Banking Data feed, if my consent has expired?
Financial accountsIf account data is unable to be refreshed (results in an error message) for accounts that were linked via Open Banking (CDR), this may be because the previous period of data share consent has expired. In this case, a user will have to re-consent to a new period of data sharing.
-
How do I update my login details for my non-CDR account?
Financial accounts1. Click on your account name at the top right of the screen and select 'My Account'.
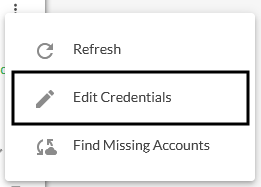
2. Click on the three dots to the right of the financial institution you wish to edit the credentials for and select 'Edit Credentials'.

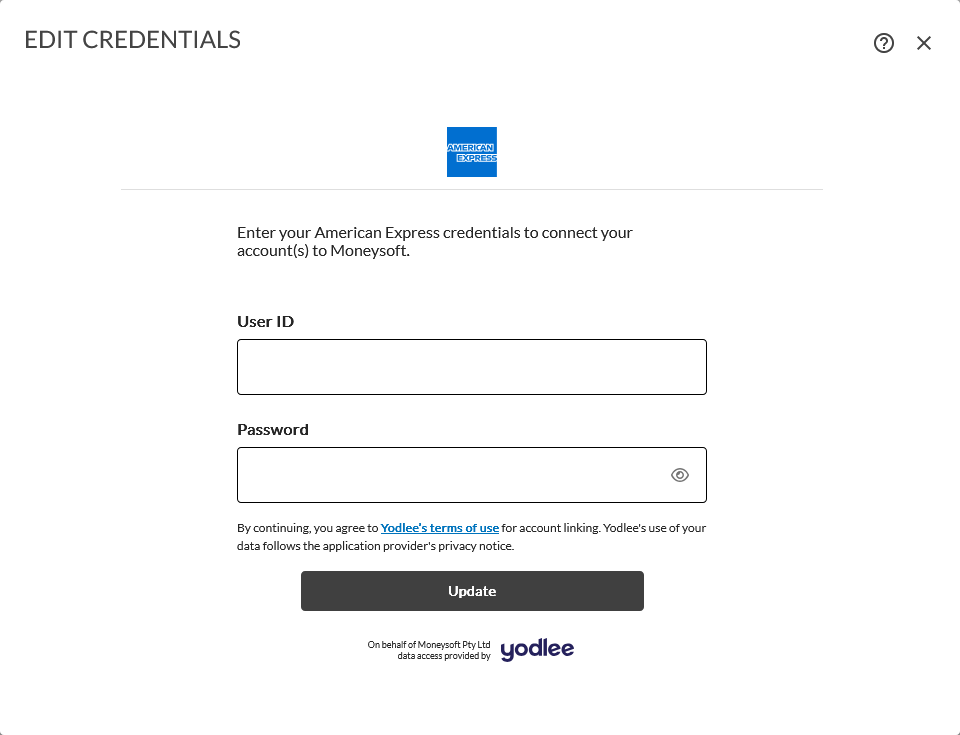
3. Enter the financial account log in credentials, then click Submit.
- This must be done exactly as if logging into the internet banking site for this account
- Entering the incorrect log in credentials will result in account linking failure
4. Wait for the account to complete the linking process. It may take a couple of minutes to complete
-
How do I manually refresh my financial accounts?
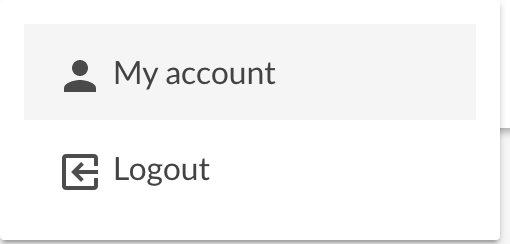
Financial accounts1. Click on ‘My Account’ from your profile icon
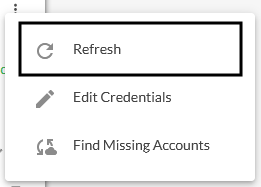
2. Scroll down to Linked Accounts tile, and click on the three dots next to the Institution Name and select ‘Refresh’

3. Once refresh has been selected the account refresh action will commence. When the account has successfully refreshed the “Last Refresh” date will be updated.
Note: This action should only be taken when an error message appears, your account refresh date is not up to date or there are recent transactions at your institution site which do not appear in Moneysoft.
-
How do I delete or close a financial account in Moneysoft?
Financial accountsWe strongly recommend against deleting accounts, as this will remove all account data in Moneysoft including transactions and balance history.
To delete your account:
1. Click on your account name at the top right of the screen and select 'My Account'.
2. Locate the financial account you wish to unlink, click on the three dots to the right of the account name to open the options menu and select ‘Delete Account’.
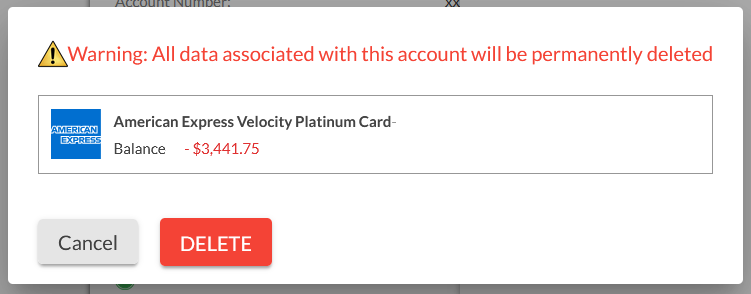
A confirmation window will appear, click 'Delete' to remove the financial account from your Moneysoft account.
Deleting will stop the account from refreshing and cause all past transactions and data to be deleted.
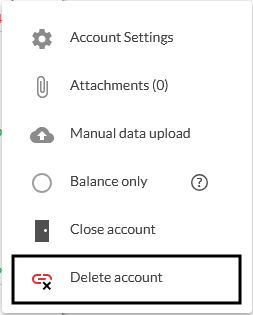
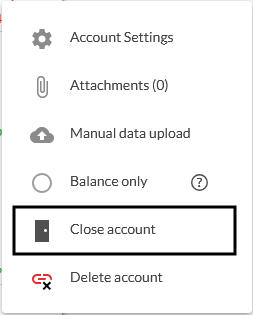
As a recommended alternative, select ‘Close Account’ to stop data feeds only, without losing all past transactions associated with the account.
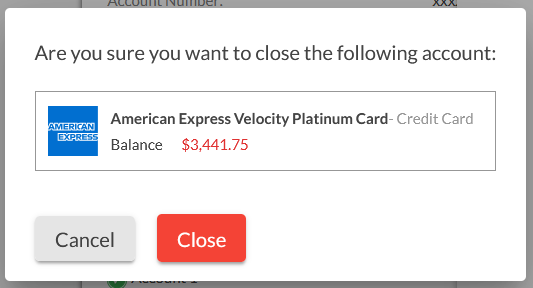
Confirm that you wish to go ahead. This will disconnect the data feed.
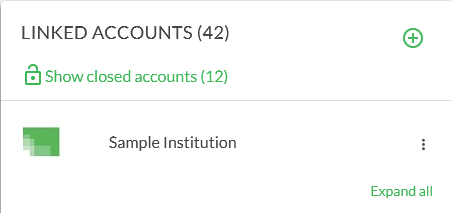
To remove your closed accounts from being visible on the accounts list, click 'Hide Closed Accounts'.
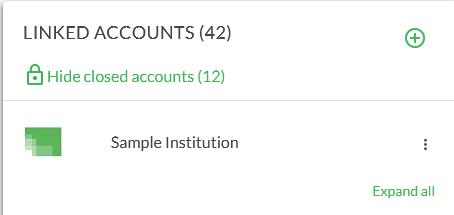
To display them, click "Show Closed Accounts'
-
Setting Bill Amounts in a Budget
BudgetA guide to calculating and entering recurring expenses in Moneysoft.
Step-by-Step Instructions
1. Access Your Budget:
To begin managing your budget, navigate to the dashboard in Moneysoft. Click on 'Your Goals & Budget' located at the top of the screen. This page provides an overview of your financial goals and categorized budget groups. Scroll down to view the budget category group tiles containing various categories such as utilities, subscriptions, food and groceries, and more.
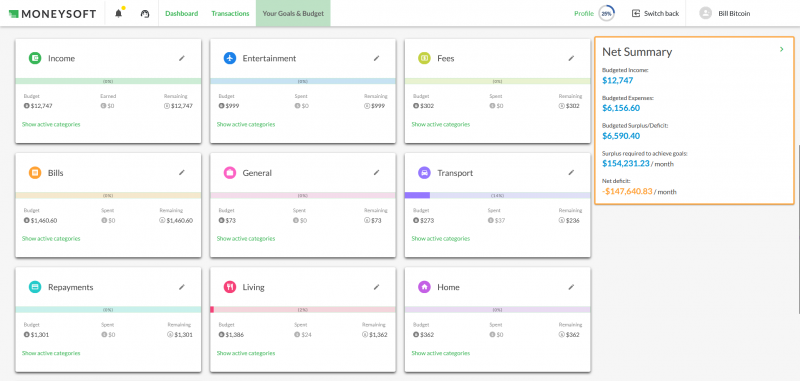
2. Set a Bill Amount:
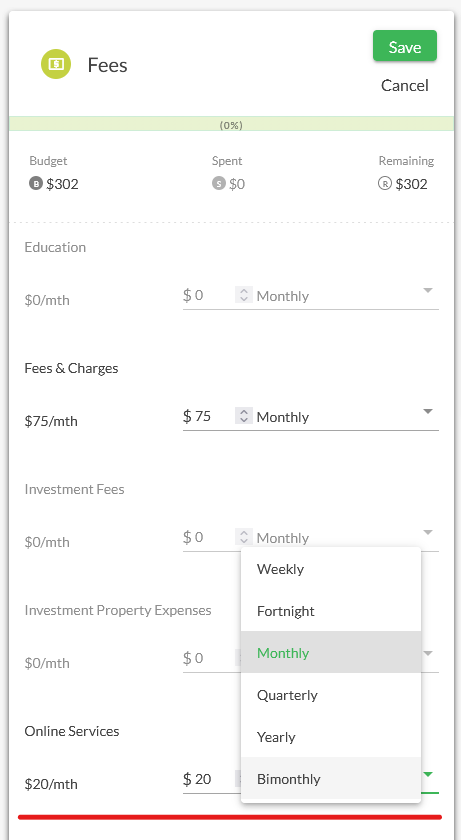
Once you identify the category group you want to update, click the edit icon (represented by a pencil). This action will open a detailed view of the categories within that group. Locate the specific category, such as 'Online Services', and enter the bill amount in the designated field. You must also specify the frequency of the payment—whether it's monthly, quarterly, or annually. If there is already an amount present, add the new bill amount to the existing value to ensure all expenses are accounted for. Click 'Save' to confirm your changes.
In the example image below, Fees and Charges are set at $75 per month on the ‘Fees’ category group tile
3. Setting Bill Amounts for Future Months:
Planning for future expenses is crucial for maintaining a balanced budget. There are two primary methods to set bill amounts for upcoming months, especially for bills that recur quarterly, annually, or periodically:
a) Manual Calculation:
This method involves manually calculating the monthly equivalent of a larger bill and entering it into your budget. This ensures that your budget reflects the upcoming expense gradually, rather than as a lump sum.
- Example 1: Quarterly Bill
Suppose you have a quarterly council rates bill of $600. If it is currently May and the next payment is due in July, you should budget $300 per month for June and July. This spreads the cost evenly over the two months leading up to the payment. After July, reset the monthly budget to $200, which is the monthly equivalent of the $600 quarterly bill. This approach helps maintain consistency and avoids sudden budget spikes.
- Example 2: Annual Bill
Consider an annual membership fee of $1,200 due in January. If it is May, you have nine months until the payment is due. To prepare, budget $133 per month ($1,200 ÷ 9). Once the payment is made in January, adjust your monthly budget to $100 ($1,200 ÷ 12) for the following year. This method ensures that your budget remains accurate and anticipates future expenses.
b) Calendar Setup:
An alternative and often more efficient method is to use the calendar feature within your budgeting tool. This allows you to schedule future bill amounts without manually adjusting the budget each month. By entering the expected expenses into the calendar, the tool can automatically update your budget when the time comes. Note that these amounts are not added directly into the budget tiles but are reflected on them when the scheduled date arrives. Refer to FAQ ‘Create scheduled budget items using the calendar’ for more information.
4.Save Your Changes:
After entering or updating the bill amounts, click 'Save' to apply the changes. If you decide not to proceed, click 'Cancel' to exit without saving. Once saved, the budget figures and remaining expenditure balances for each category will update accordingly.
Tips for Accurate Budgeting
- Regularly review your bill schedule to stay ahead of upcoming payments and avoid surprises.
- Utilise the calendar feature to automate future entries and reduce manual updates.
- After each payment cycle, reassess and adjust your budget to reflect actual expenses and changes in billing amounts.
- Consider setting up calendar reminders for large or infrequent bills to ensure they are properly accounted for in your monthly planning.
-
Edit a Budget
Budget1. How do I access and edit my budget?
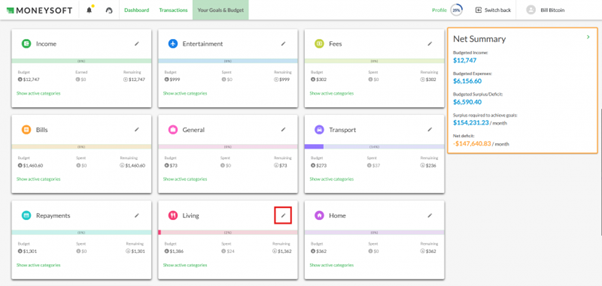
Click on 'Your Goals & Budget' at the top of the screen. Scroll down to find the budget category group you want to edit. Click the edit (pencil) icon to view subcategories (e.g., Living).
2. How do I set or change a budget amount for a subcategory?
Enter the desired budget amount in the field next to the subcategory (e.g., Food and Groceries). Select the frequency of the expense (e.g., weekly, monthly). Click 'Save' to confirm or 'Cancel' to discard changes.
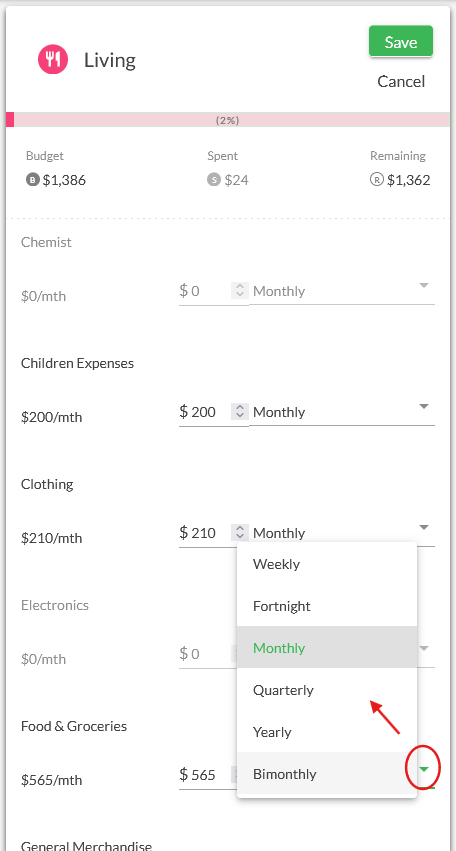
Note: Changes only apply to the current and future months. Past months remain unchanged.3. Can I see which transactions are included in a category’s spending?
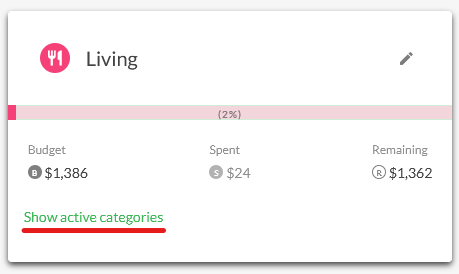
Yes. Click 'Show active categories', then click the magnifying glass icon next to the category group (e.g., Food & Groceries).
4. What will I see in the transactions view?
You’ll see a filtered list of transactions that contribute to the selected category’s spending. If there’s no spending or only scheduled items, the list may be empty.
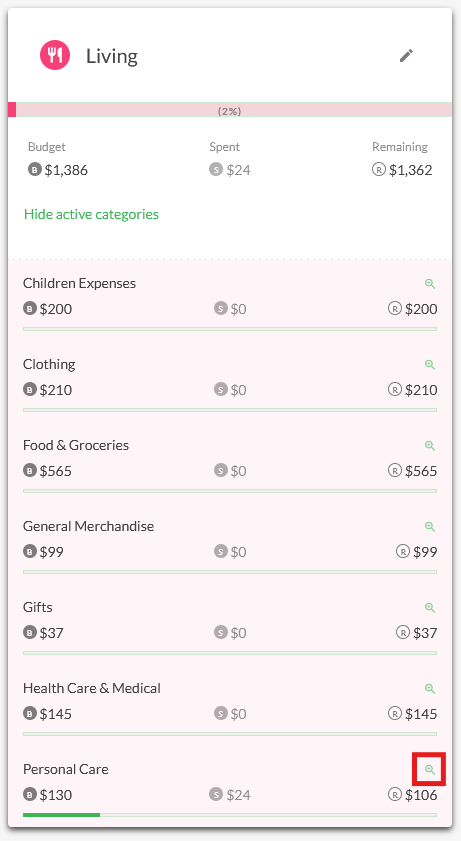
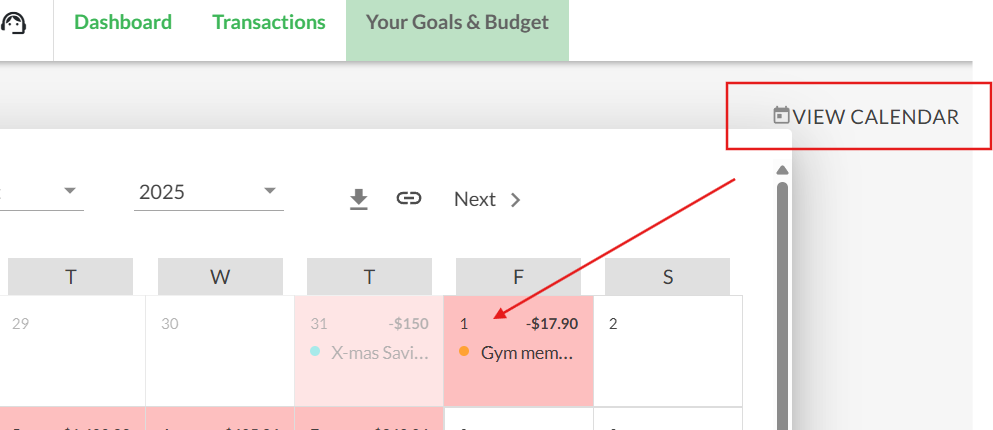
To return to the budget screen, click 'Go Back' at the top left.5. Can I edit calendar budget entries?
Yes. Click ‘View Calendar', then the calendar entry you wish to edit
-
Export a Budget
BudgetHow to Export Your Budget
To export your budget data for reporting or analysis, follow these steps:
1. Navigate to the Your Goals & Budget section located at the top of the screen.
2. Click on the Budget Options menu.
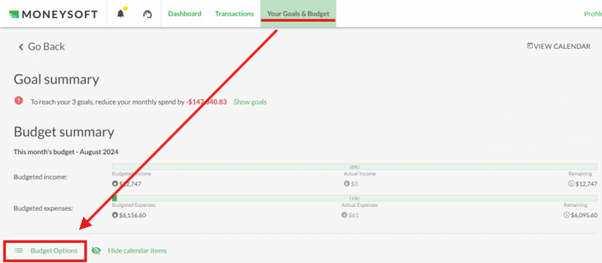
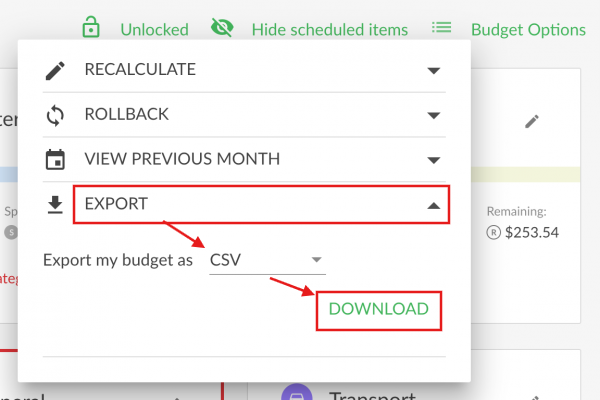
3. Select Export from the dropdown list.
4. Choose your preferred file format: CSV, PDF, or Excel.
5. Click Download to save the file to your device.
-
Create Scheduled Budget Items using the Calendar
BudgetCreating Scheduled Budget Items Using the Calendar
Managing your budget effectively requires planning for both regular and occasional expenses. The calendar feature in your budgeting tool allows you to schedule budget items that occur in specific months, helping you stay financially prepared, such as car registration, insurance premiums, or annual subscriptions. For instance, if you pay your car registration every six months, you can schedule this expense in advance for the appropriate month.
It is also just as useful for accounting for regular ongoing expenses such as rent and fortnightly subscriptions.
Accessing Your Budget
To begin scheduling budget items, you first need to access your budget interface. This is where all your financial planning tools are located.
- Click on 'Your Goals & Budget' at the top of the screen.
- Select 'View Calendar' to open the calendar interface where you can manage scheduled items.
Navigating the Calendar
The calendar interface allows you to view and manage budget items by month. You can easily navigate through different months to plan ahead.
- Use the 'Prev' and 'Next' buttons or the drop-down options to move between months.
- To return to the current month, click 'Go to Today'.
- Click on the specific date you want to schedule a budget item for (e.g., 21 November). This helps you pinpoint when the expense will occur.
Creating a Budget Item
Once you've selected a date, you can create a budget item that will be reflected in your financial plan for that month.
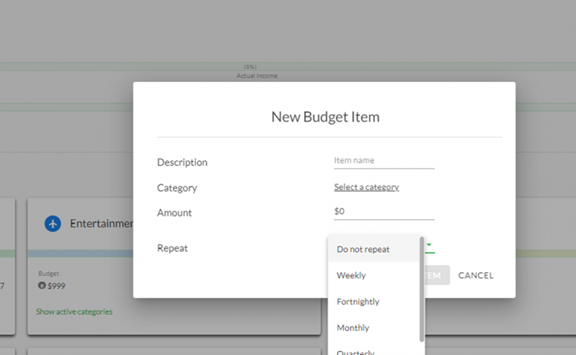
1. Click 'Create', then select 'Budget Item' to begin entering the details.
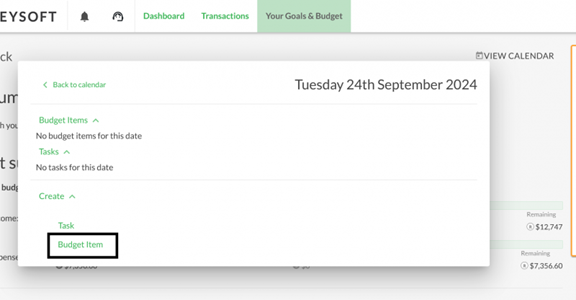
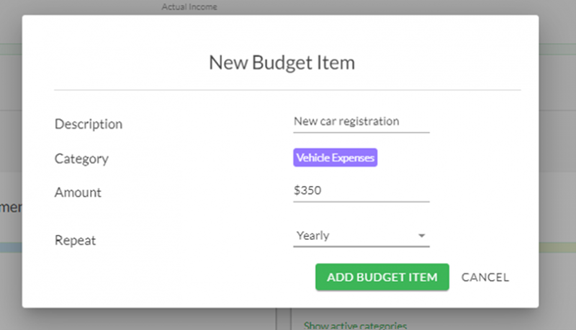
2. Fill in the fields with the following information:
- Description: Provide a clear name for the item (e.g., Car Registration) so it's easily identifiable.
- Category: Select the appropriate category from the drop-down list to ensure the item is grouped correctly in your budget.
- Amount: Enter the amount of the expense. If it's an expense, the system will automatically apply a negative sign, so you don't need to enter it manually.
- Repeat: Choose how often this item should repeat (e.g., monthly, yearly) or select 'Do not repeat' for one-time expenses. This helps automate recurring expenses.
3. Click 'Add Budget Item' to save your entry, or 'Cancel' to discard changes. The item will now appear in the selected month's budget overview.
Creating Budget Items from Transactions
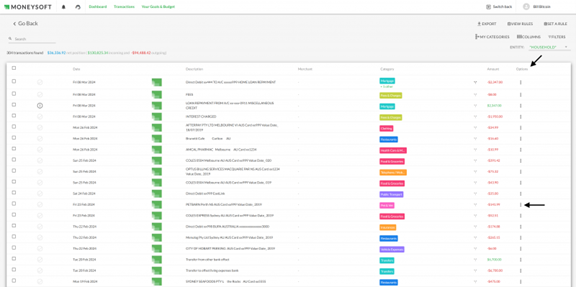
In addition to scheduling items manually, you can also create budget entries directly from your transaction history. This is useful for tracking unexpected or irregular expenses.
- Select the transaction you want to add to your budget.
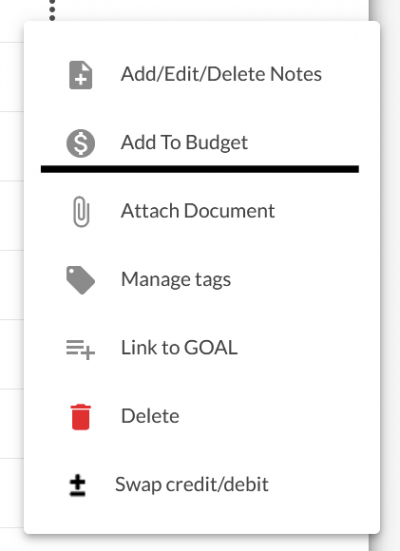
- Click the 'Options' menu next to the transaction.
3. Choose 'Add to Budget' and follow the same steps as above to categorise and schedule the item.
-
Export Calendar Events
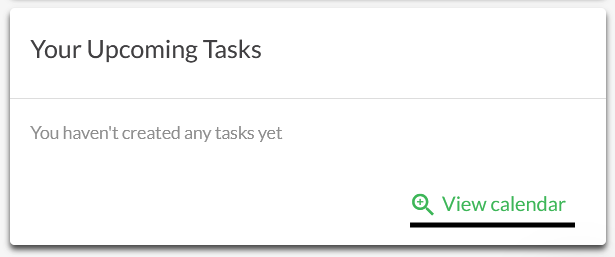
Calendar1. To export your calendar events, click on the “View Calendar” tab in the ‘Your Upcoming Tasks’ dashboard tile (or from the ‘Your Goals and Budget’ screen) . This will expand the calendar.
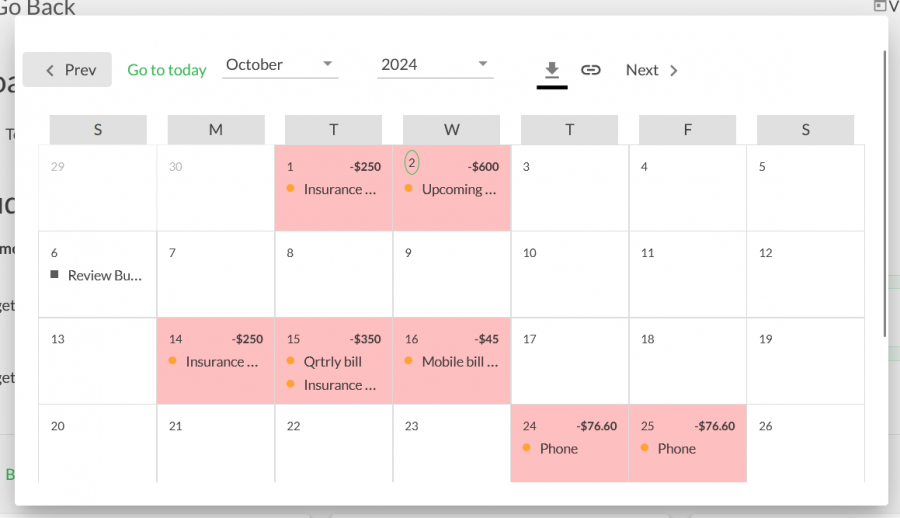
2. Click on the “down arrow” next to the MM/YYYY drop down menu
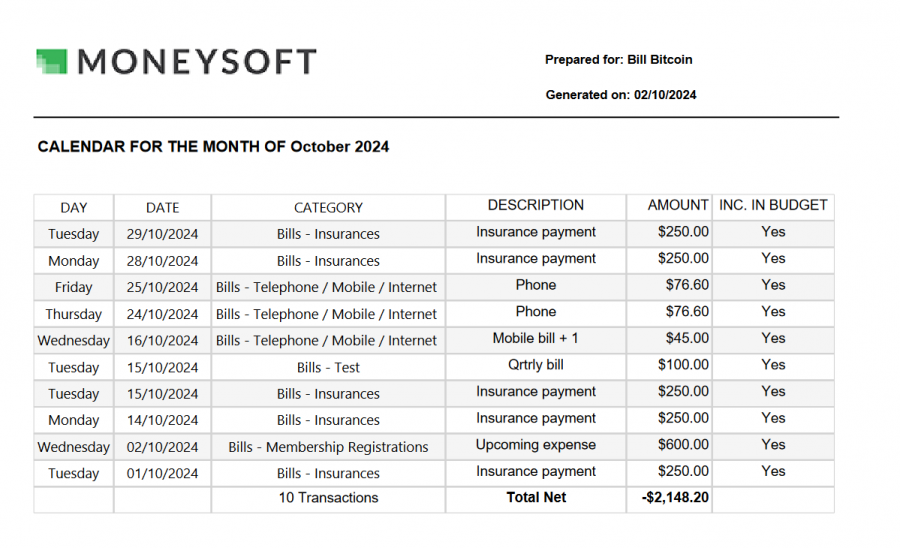
3. A PDF export format will be downloaded. Tip: Make sure your browser ‘allows downloads’ from Moneysoft.
-
What is the Account Groups feature and how is it used?
Account GroupsAccount Groups is a feature within the Moneysoft platform, which allows users to group and apportion assets and liabilities into distinct groupings. This could be across members or a household, or by separating personal and business/es to make for easier accounting, monitoring, and reviewing of account related information.
Financial Accounts, Properties and Other Accounts (items) can all be assigned to an Account Group.
The percentage value of that item can then be apportioned to allow for an account to be either wholly assigned to one Account Group (100%) or, shared across two or more Account Groups (split portions totalling up to a maximum of 100%).
-
How do I create/change an Account Group and how is it reported?
Account GroupsAccount Groups are managed from the Account Groups tile on your 'My Account' page.
Follow these steps to create an account group:
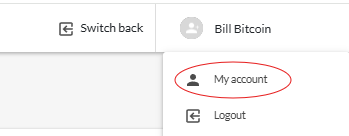
1. Click on your account name at the top right of the screen and select ‘My Account’. Then click on 'Edit Account Groups' to start creating your new entities.
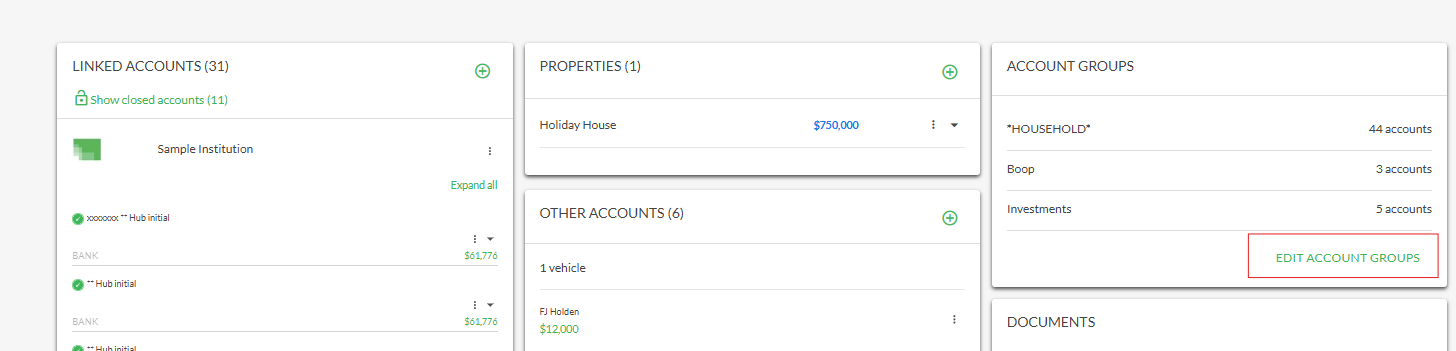
2. Enter the name you wish to call the new group. For example, it could be a Trust or Business name, the name of a family member or something else that will allow you to quickly recognise the relevance of the items associated with it. Click the 'tick' to save the new entity or the 'bin' icon to cancel.
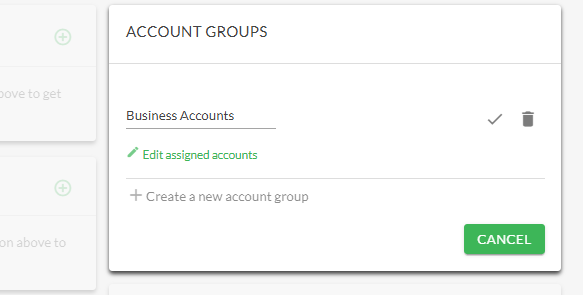
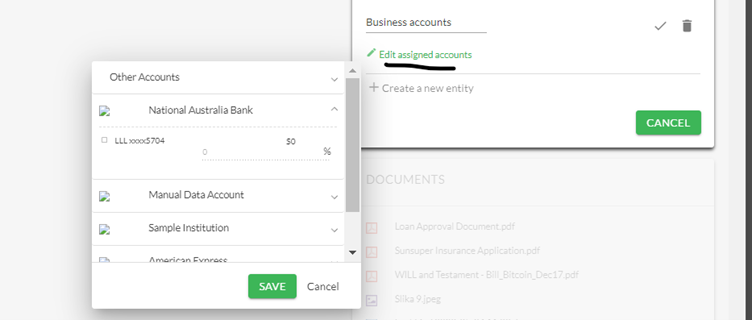
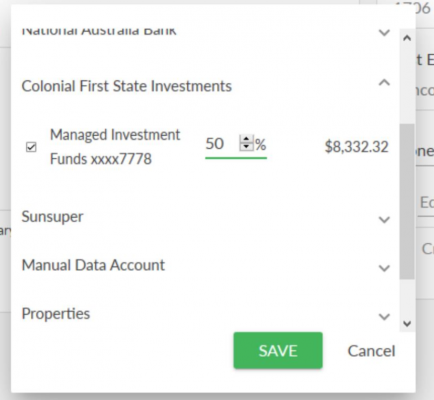
3. To add items to an entity, click on the pencil icon and from the ‘Edit assigned accounts’ drop-down list choose the financial account or property container and then the required item.
4. Set the percentage you wish to assign to this account group and click ‘Save’ to add the item to it or ‘Cancel’ to return to the edit screen. In this example the full percentage of the item (a NAB business account is to be added to the group’s asset list). Perhaps if you were adding a property to make up a Trust account group, you might select a percentage to be included.
Remember the total percentage value for the item cannot exceed 100%, so you may need to reduce a percentage elsewhere before increasing it.
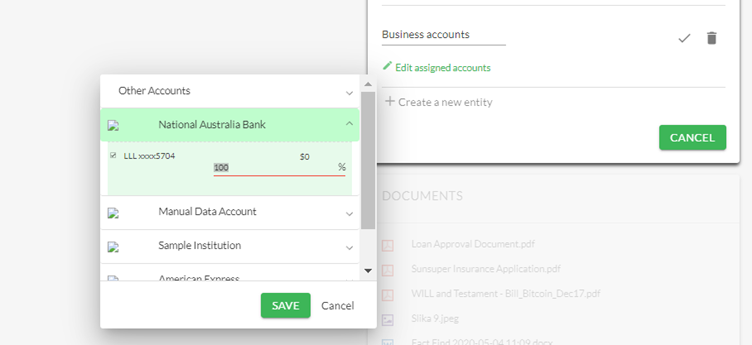
Please note: You can continue to add more items using this same process. It is also possible to change the name of the group at this stage if you wish to.
When you have finished creating or editing all your Account Groups, click on SAVE.
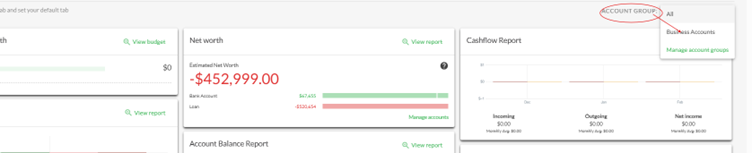
5. To view your Account Group net worth and associated reports in the main dashboard, click on the ACCOUNT GROUPS dropdown list where you see ACCOUNT GROUP ALL in the top right of screen. Select the group you wish to report for, from the list. Wait a few seconds for the page to refresh and return the appropriate filtered view.
6. The percentage values within an Account Group can be changed at any time, by selecting the pencil icon and selecting the Edit Accounts option again.
From here return to the appropriate financial account or property container and edit the percentage value.
Remember the total percentage value for the item cannot exceed 100%, so you may need to reduce the percentage elsewhere before increasing it.
If an Account Group is no longer required, it can be easily deleted by clicking on trash can icon next to it at the ACCOUNT GROUPS tile in the ‘My Account’ screen.
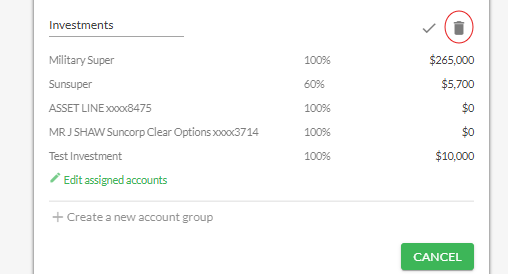
Please note: The items within the deleted entity will remain within Moneysoft, but the percentage value that was previously apportioned to that entity will now be available for reassignment.
-
How do I update two-factor authentication for my non-CDR account?
Financial accounts1. Click on your account name at the top right of the screen and select My Account.
2. Click on the three dots to the right of the financial institution you wish to edit the credentials for. Click 'Edit Credentials'.

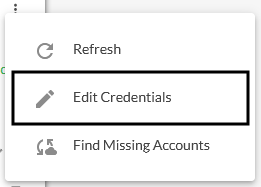
3. Enter the financial account log in credentials, select the correct response from the drop-down option menu at the bottom then click ‘Login’.
- This must be done exactly as if logging into your internet banking / online access site for this financial institution.
- Entering the incorrect log in credentials will result in account linking failure.
- Some financial institutions have an option for secondary authentication. Only select yes if you use this feature to log into your internet banking site
Note: Some financial institutions use more than one form of secondary authentication.
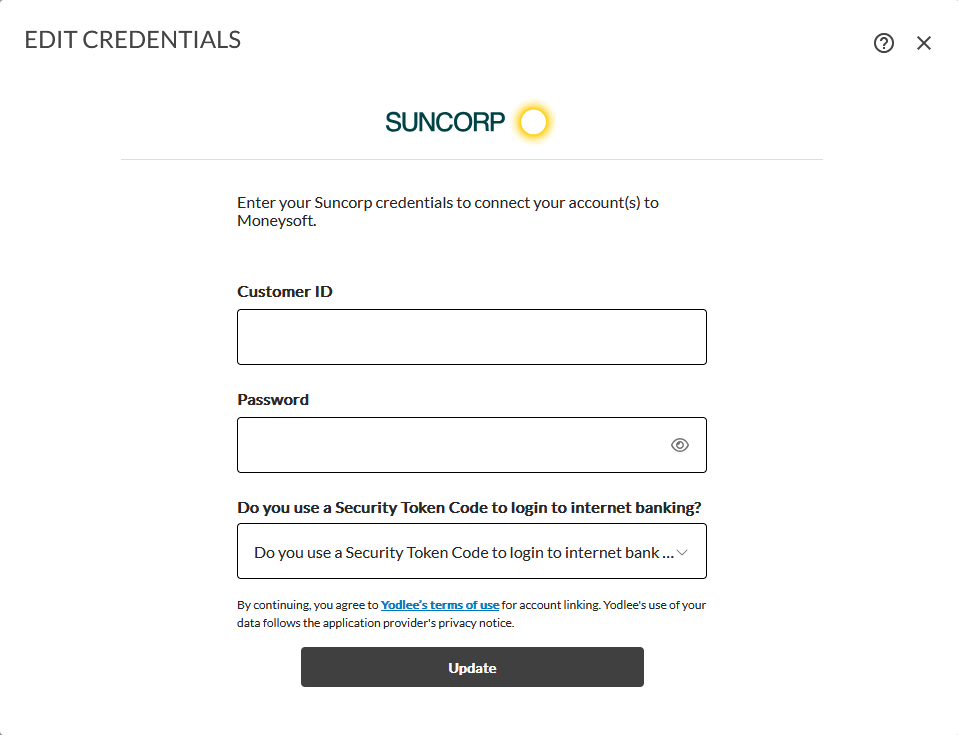
4. Wait for the token field to appear.
- Before the token code will appear, the system must first confirm that the correct internet banking / online access log in details have been entered. If these are incorrect the account linking will fail and no request to enter the secondary authentication will be presented
- This process may take a couple of minutes to complete
5. When the Secondary Authentication window opens, enter your secondary information into the field and click Submit
- Secondary authentication could be a token or SMS code, password or answer to a security question
- Enter your secondary authentication within the first 8 - 10 seconds to allow sufficient time for it to be received and processed by the financial institution before the timer runs out
6. Wait for the account to complete the linking process.
- If the secondary authentication is not entered quickly enough the account linking may fail
- Slow internet speeds, interruption to the connection or entering the incorrect details will also cause the account linking to fail
- This process may take a couple of minutes to complete
-
How do I setup a manual financial account (CSV upload)?
Financial accounts1. Click on your account name at the top right of the screen and select My Account.
2. Click on the green '+' button at the top of the 'Linked Accounts' tile. Select 'Manual CSV Upload Accounts' from the drop-down menu.
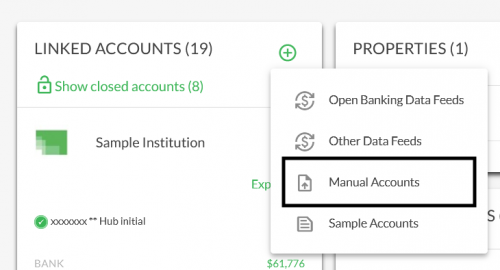
3. On the Manual Data Account tile:
- Enter the name you wish to call the account
- Set the account type (Banking, Credit Card or Loan)
- Upload or drop the CSV file containing the transaction data (see below)
- Click 'Save' to create the manual account or 'Cancel' to return to the accounts page
- The CSV file used to create the manual account, must follow the standard format. Click here for the template.
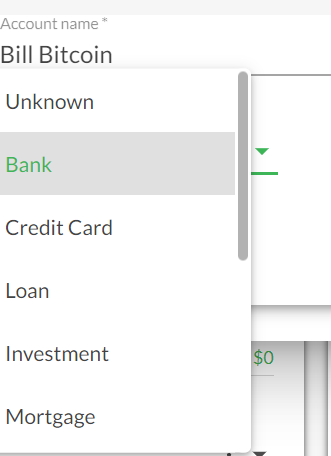
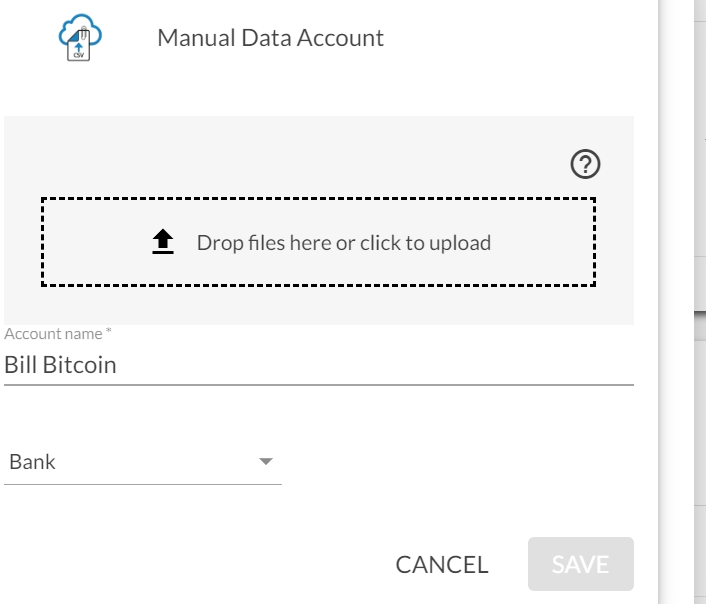
NOTE: Common problems associated with CSV files include:
- Using or saving the file as the wrong format, e.g. changing the format from CSV to an Excel file (XLS)
- Not entering the data into the CSV template in the same format or order, e.g. placing the credit and debit values in the incorrect columns, or changing the date format from d/mm/yyyy to d/mm/yy, mm/d/yy, d-mm-yyyy or some other combination different from the template
To set the account balance:
- Click on the three dots opposite the account name and select 'Account Settings'
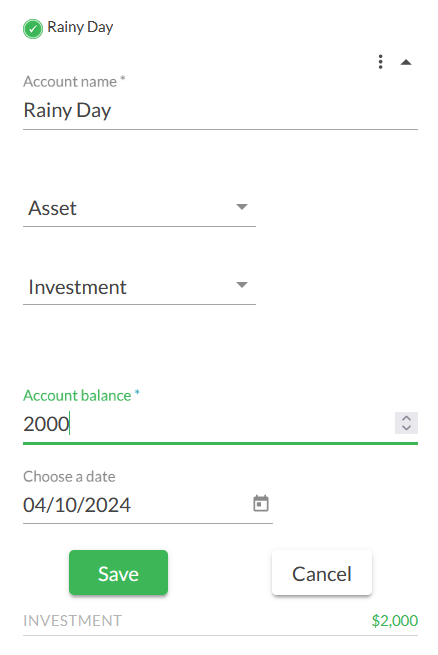
- Type the balance into the Account Balance field, and select a date. If you don't select a date it will default to today.
- Click 'Save'
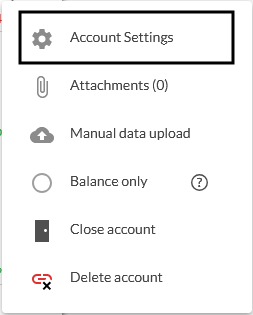
-
How do I edit my other accounts?
Financial accounts1.Click on your account name at the top right of the screen and select 'My Account'.
2. From the 'Other Accounts' tile, click on the three dots to the right of the account you wish to edit and select 'Edit Account'.
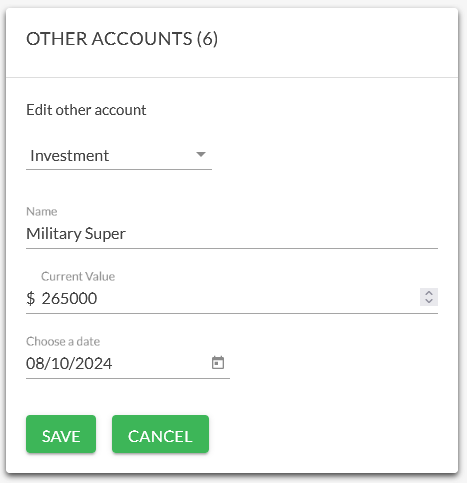
In the pop-up window, you can edit:
- Account Type
- Name
- Current Value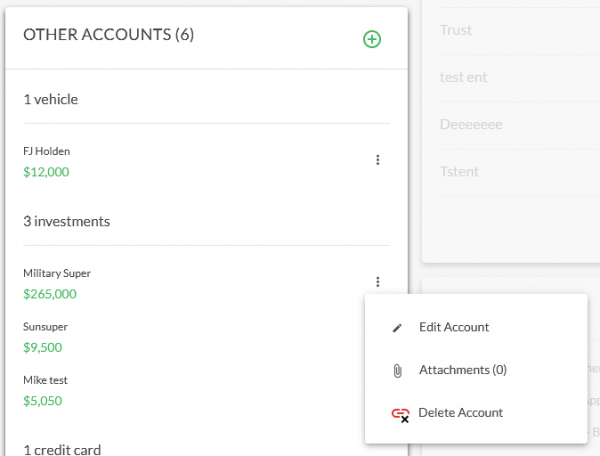
3. Click 'Save' to update the account, or 'Cancel' to close the window without saving the changes.
-
How do I set a financial account to balance only?
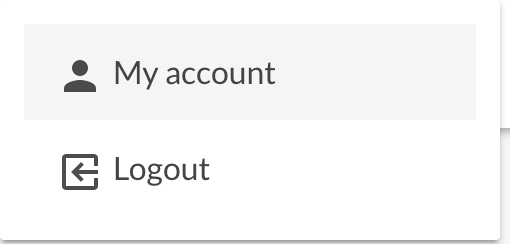
Financial accounts1. Click on the My Account from your profile icon
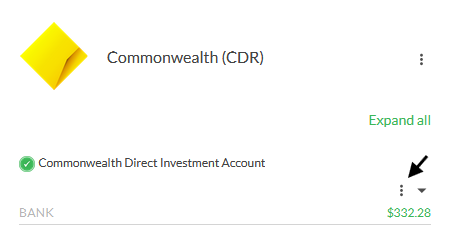
4. Find the account you wish to edit and click on the three dots to the right
5. Click on “Balance Only” from the menu list. Balance only is used where you want to track the balance of an account but do not want to display or manage the transactions. If ever required, your transactions can be made visible on a balance only account by de-selecting balance only.
CAUTION: All transactions from previous balance only account will now appear in your Transactions page list. Reporting will also be affected by these new visible transactions and alerts may be triggered.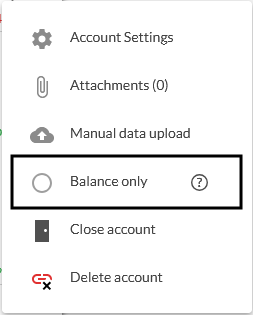
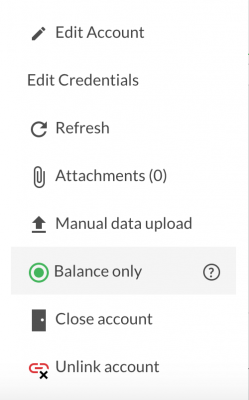
6. Once you select Balance Only your account will automatically be converted to balance only. A success message will appear at the top of you screen and when you hover over the “three dots” options list you will note the balance only option is highlighted. To reverse or undo this action follow the same steps in reverse order.

-
How do I change an account name?
Financial accounts1. Click on the My Account from your profile icon
2. Find the account you wish to edit the name of and click on the three dots to the right of the account name
3. Click on 'Account Settings' from the menu list
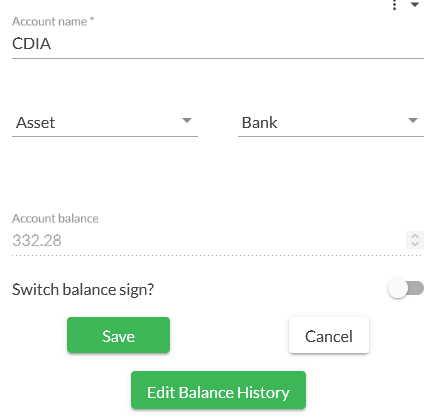
4. This will show all the account settings you can edit
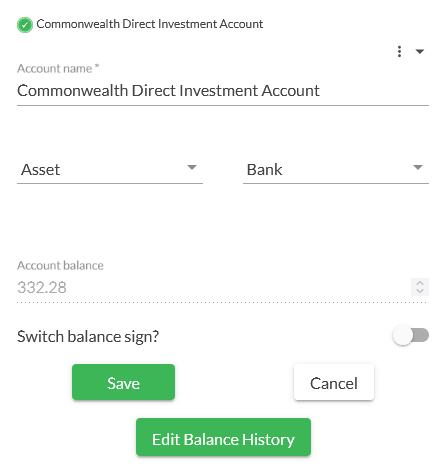
5. Type in your new account name and click Save to save any changes.
-
How do I upload attachments to a financial account?
Financial accounts1. Click on the 'My Account' from your profile icon
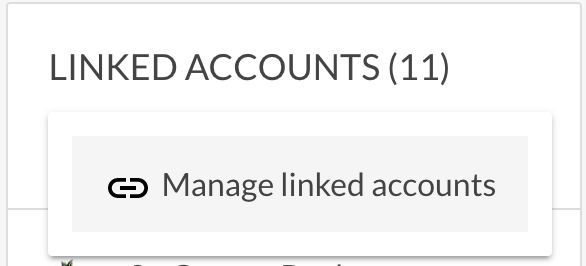
2. Scroll down to 'Linked Accounts' tile, and click on the Options Menu “Three dots” and select 'Manage Linked Accounts'
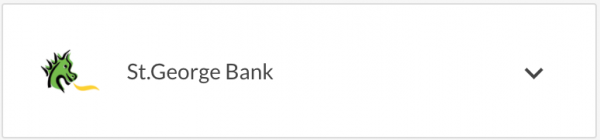
3. Select the institution in which the account is organised by and click on the expanded menu icon
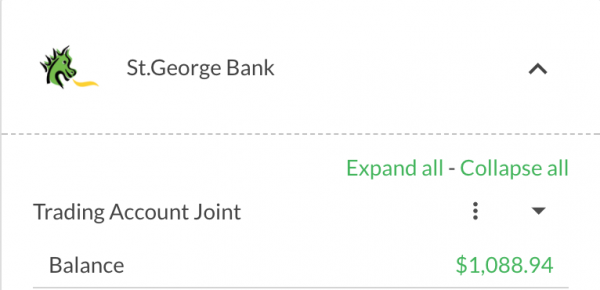
4. Find the account you wish to edit and click on the 'three dots' Options Menu
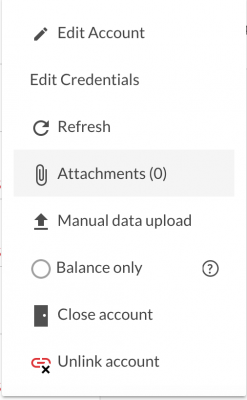
5. Click on “Attachments” from the menu list once and a pop up will appear.
Drag and drop in the file or click to upload it.
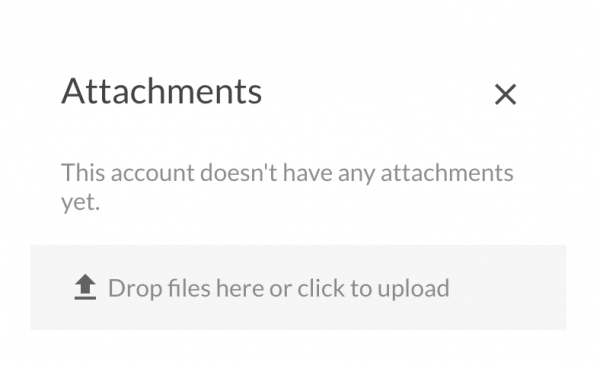
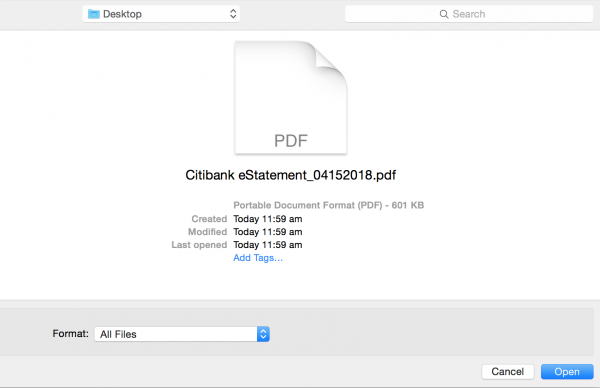
6. Select the file you want to associate or upload to the account from the location on your computer desktop computer. For example, the file might be a bank statement. Choose to upload the file. Once complete, a message will appear with the new attachment. If you select the wrong attachment or change your mind, select the “bin” image to clear otherwise click on the “X” to complete the action.
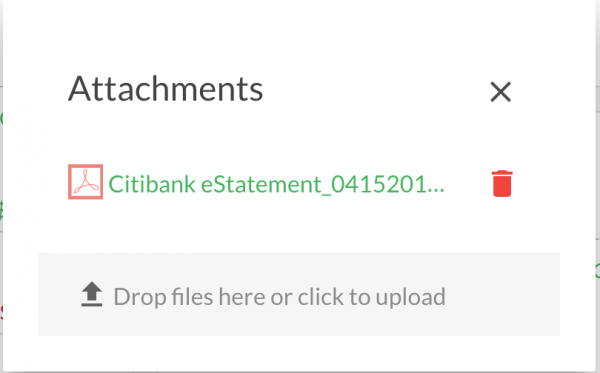
7. Successful attachment upload is verified by the attachment link symbol increasing by 1 or by however many attachments you have uploaded.
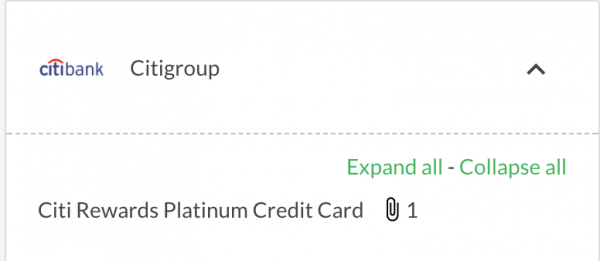
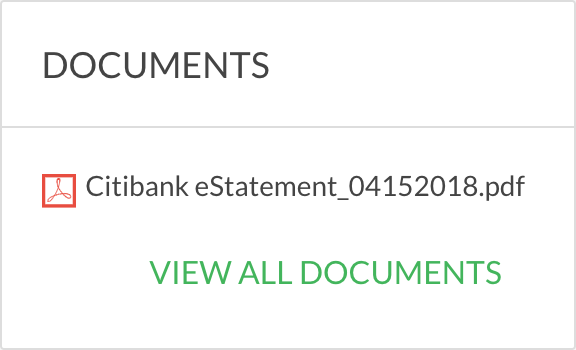
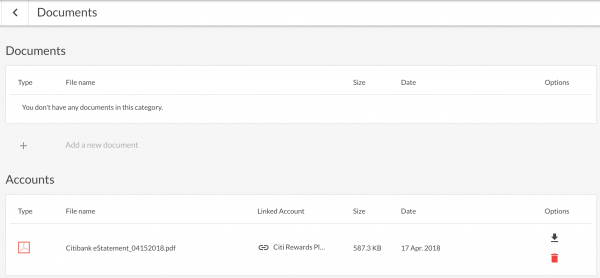
8. To navigate to the document or attachment you can either click on link or navigate to the documents tile which displays all your uploaded attachments. Documents and attachments are organised by association, whether associated to an account or not.
-
How do I link my other assets or liabilities?
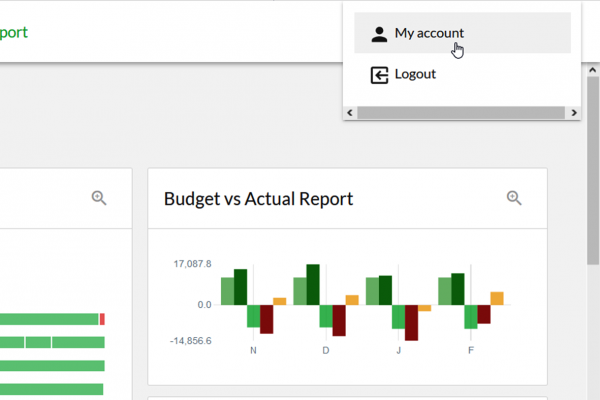
Financial accounts1. Click on your account name at the top right of the screen and select 'My Account'.
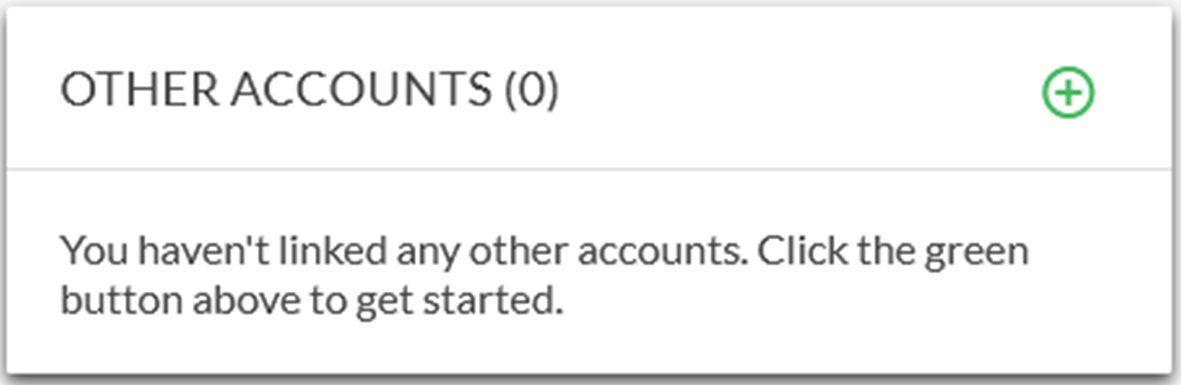
2. Click on the three dots at the top right of the 'Other Accounts' module and select 'Add Other Account'.
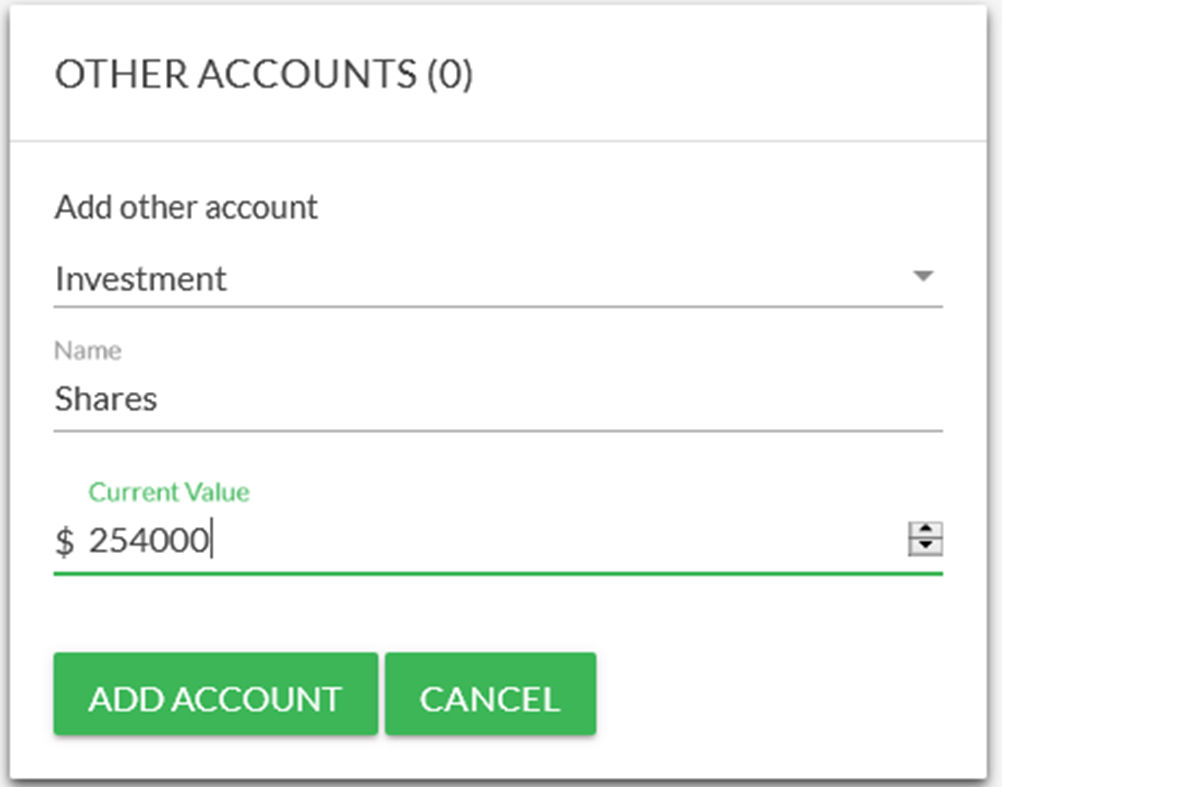
3. Set-up the account:
- Select the relevant account type from the first drop down menu
- Enter the account name
- Set the required value
- Click 'Add Account' to finish
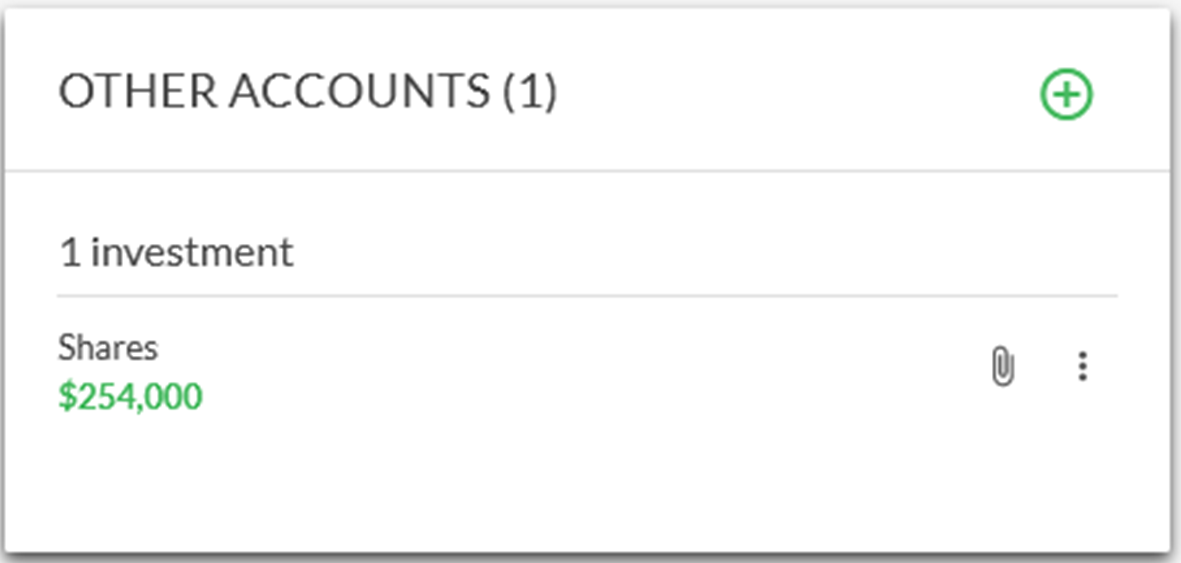
4. The new account will now appear in the 'Other Accounts' tile.
-
How do I link, edit and delete a property?
Financial accountsIn Moneysoft you can link, edit and delete properties from your account. This includes updating both manual and estimate valuations.
1. Click on the My Account from your profile icon
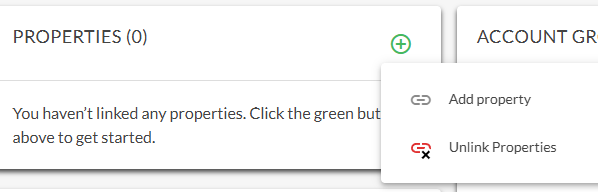
2. Click on the green '+' button at the top right of the Properties module and select 'Add property' to open the new Property window.
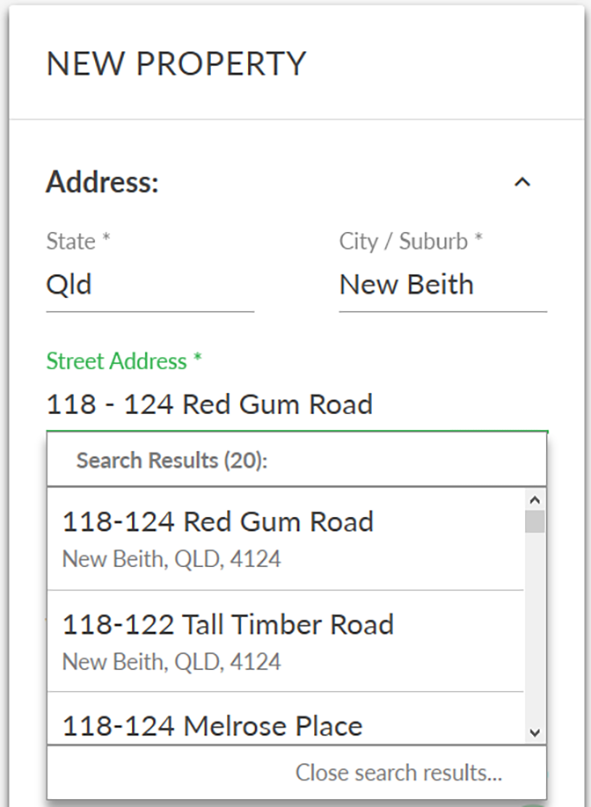
3. Click on the address down arrow and enter the address for the property you wish to add.
- If the property is available in the database, select the result from the returned addresses.
- Enter a nickname for the property if you wish to do so. This is the name that will be displayed for the property, instead of the address after it has been saved.
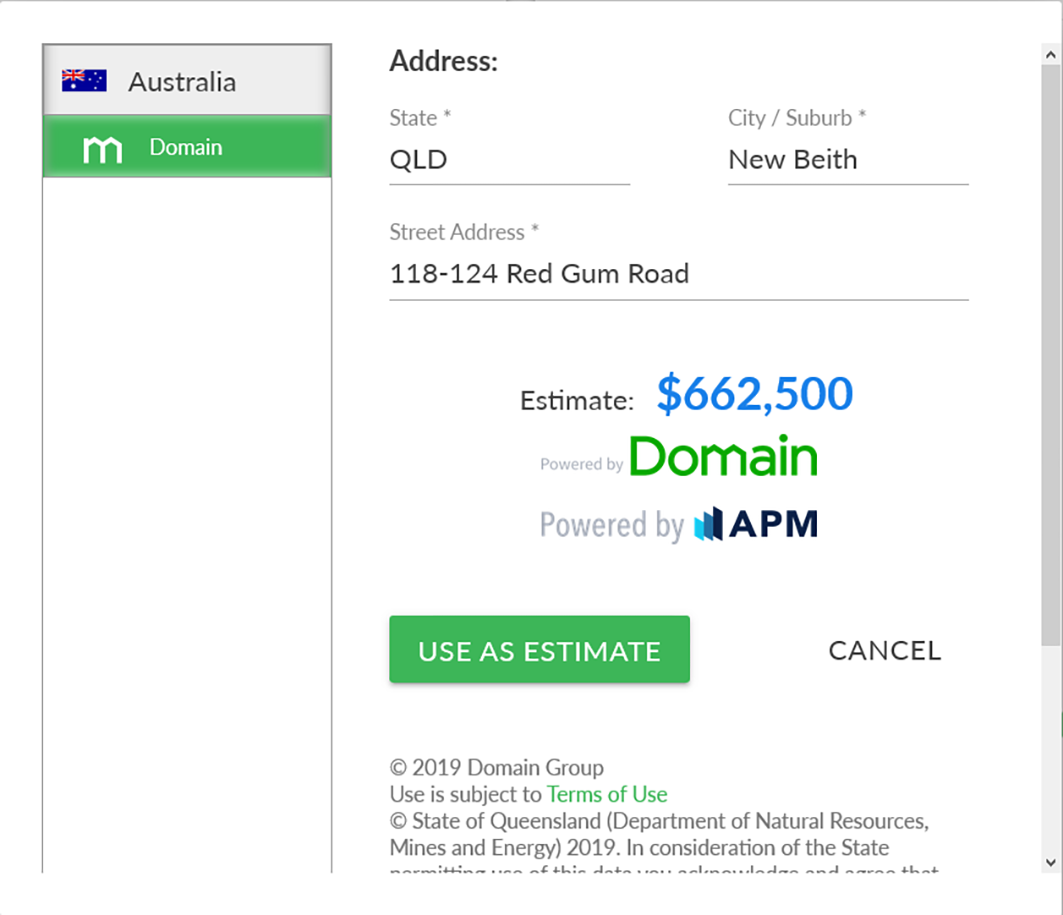
4. If the address was located for the property, click Get Estimate Value, then Get Valuation and select the address.
- An estimate valuation will be returned. To use this valuation, click Use as Estimate.
- If you do not wish to use the estimate value, select Cancel.
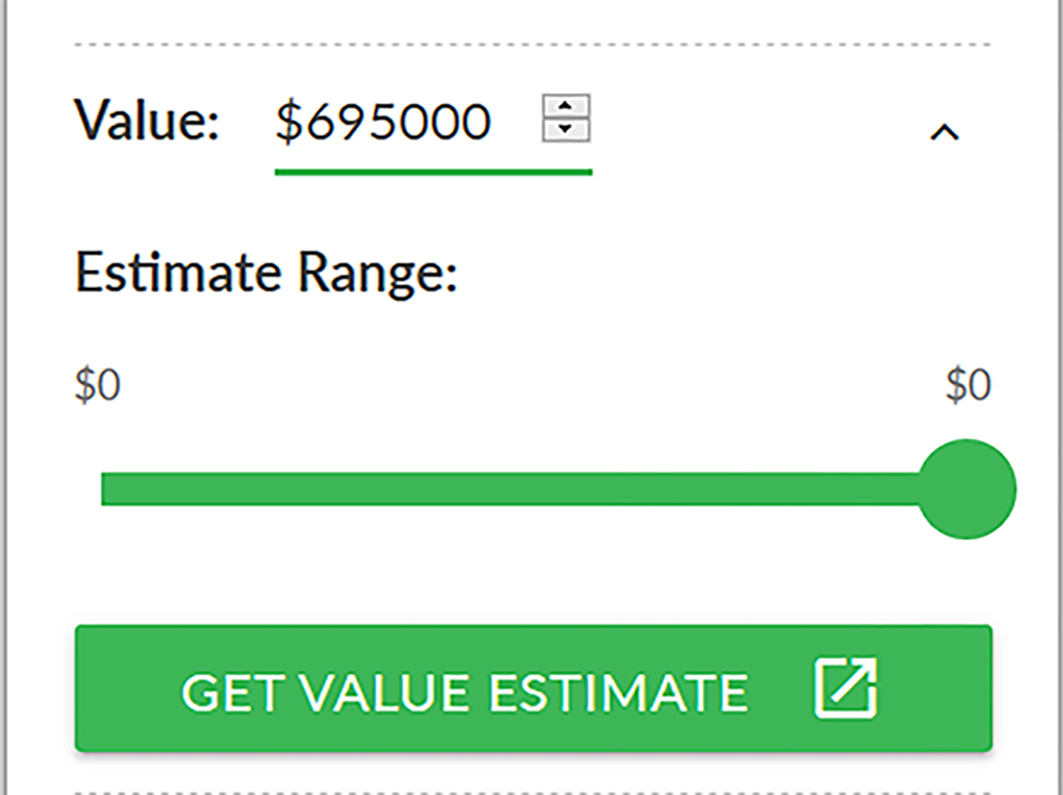
5. If the address was not located when being entered, or if you do not wish to use the estimate value enter your own value.
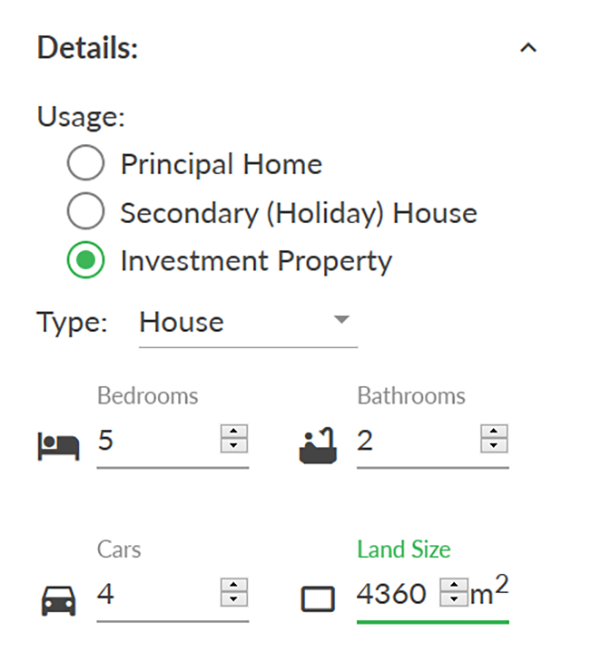
6. Click on the Details down arrow to enter the type of property, bedrooms, bathrooms, car spaces and land size.
7. When all data is entered for the property, click Save to add to your list of properties.
8. To edit a property, click on the three dot options menu and select Edit.
- This will open the properties window, where you can change the manual valuation, get a new estimate valuation (click on Get Estimate Value), change the nickname or any of the property details.
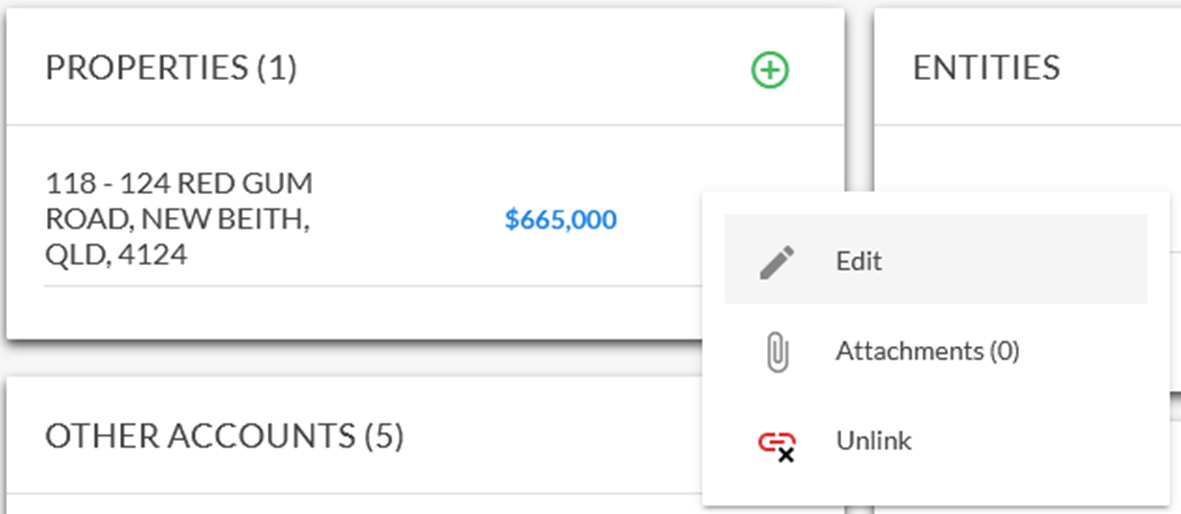
9. To add an attachment, such as a rates notice to the property, click on the three dot options menu and select Attachments.
- The number of attachments associated to the property will be displayed in brackets.
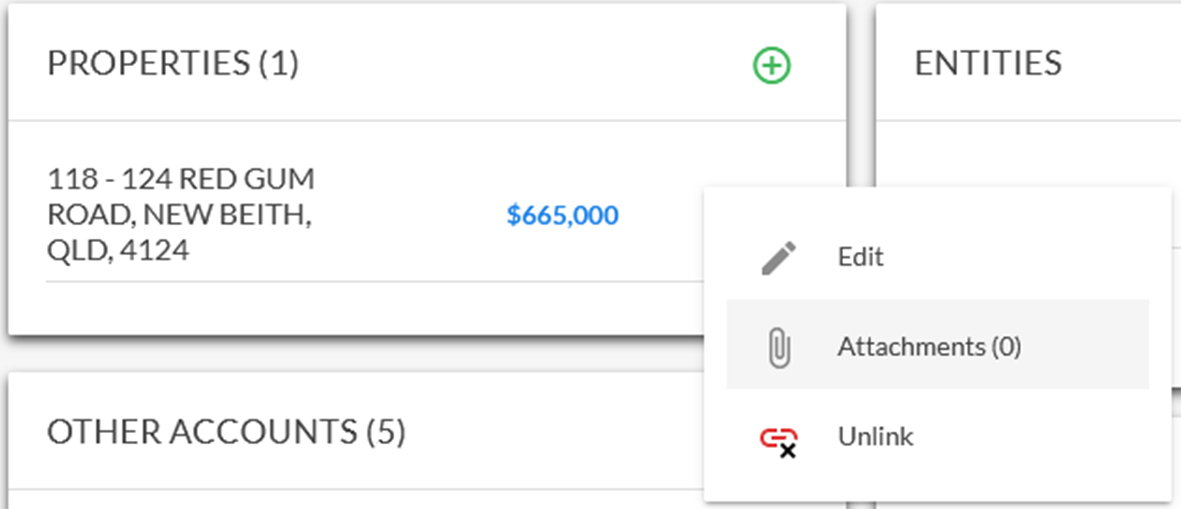
10. Upload the document via the Attachments pop-up window.

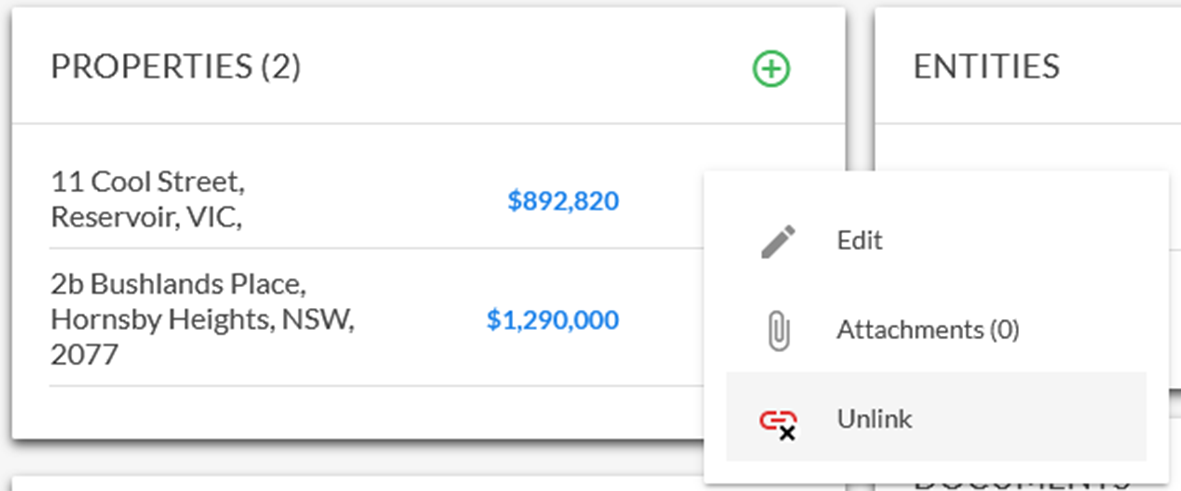
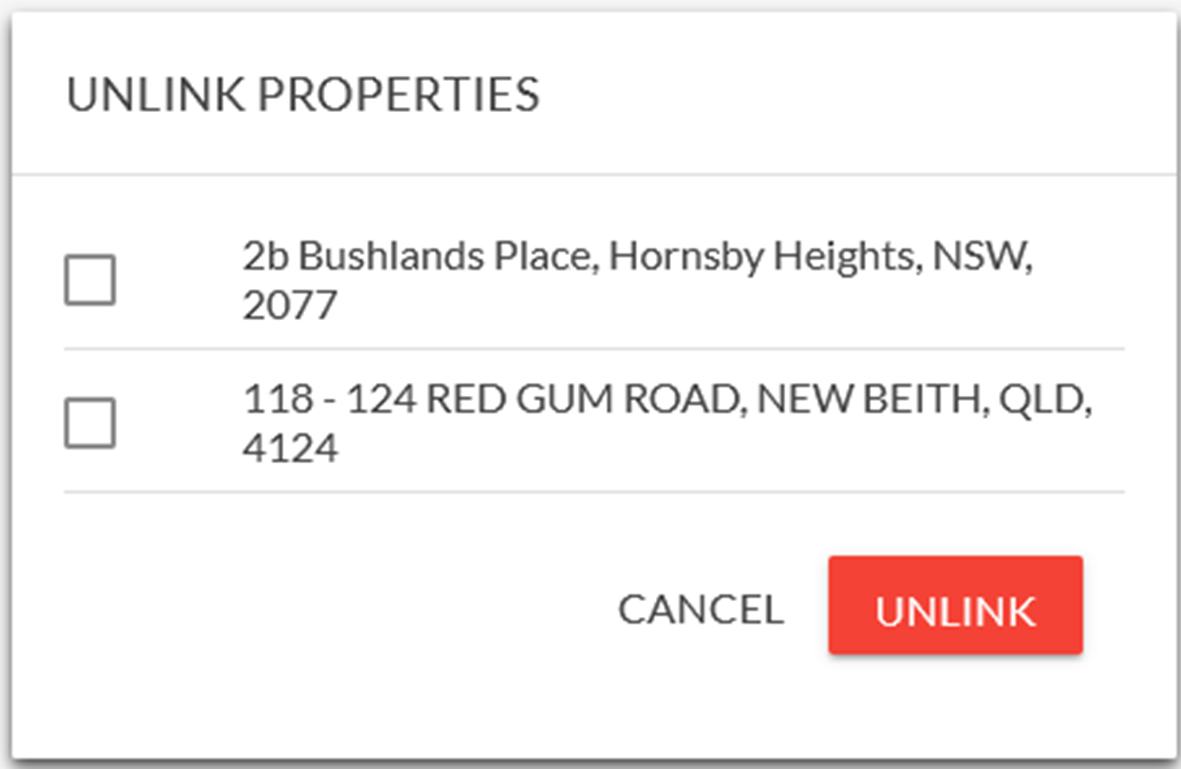
11. To unlink a specific property, click on the three dot options menu and select Unlink.
12. To unlink multiple properties, click the green + button at the top right of the Properties module and select Unlink properties.
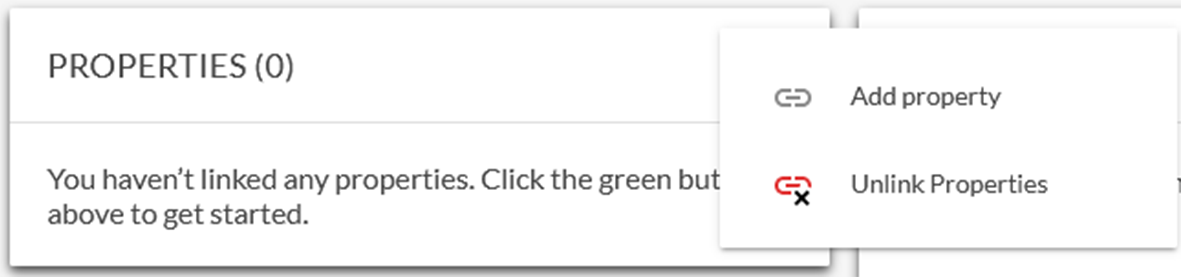
13. Select the properties to be removed then click Unlink.
-
Add a Goal
Goals1. Goals are linked to your budget. To access the goal menu and functions click on the 'Your Goals and Budget' tab at the top of the screen.

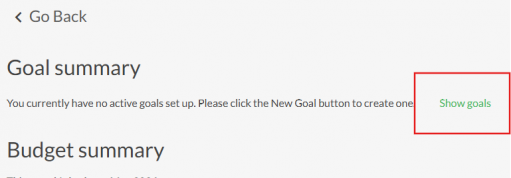
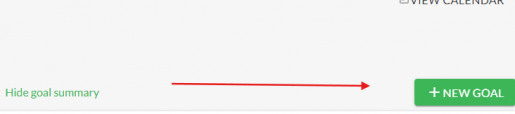
2. Next to the current goal summary, Click on 'Show goals', then '+ NEW GOAL'.
3. There are two types of goal options:
- 'Save Money' being account balance accumulation goals, or
- 'Reduce Debt' being reduction of account balance goals
Think about the type of goal you are creating. Are you working towards a future balance to increase (such as a saving balance) or are you contributing to reduce a balance (such as a loan)?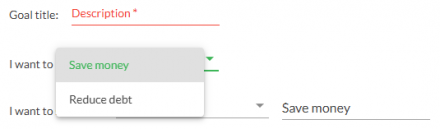
4. If you select “Save money” then you will be prompted to complete what you are saving for. Or if you are reducing debt, you will automatically be prompted to complete the description field.
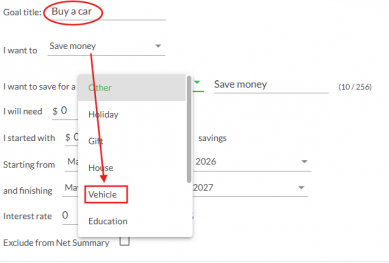
5. Complete the rest of the fields once you have selected the goal type and entered the goal description.
Note: You can start a goal at future date by selecting the starting date in the future. At all times your finishing date must be post the starting date.(If your goal is starting in a future month, it will not appear under "Scheduled Goals" until the start date is reached).
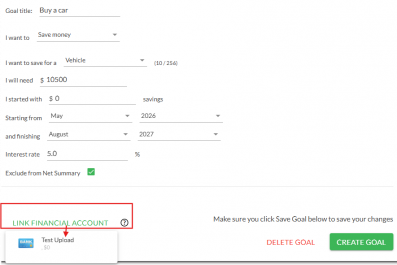
If your goal is explicitly linked to a particular account like a savings account, home loan or credit card, then select the 'Link Financial Account' option and choose from the list of financial accounts you have available. You can link more than one account to a goal if required.
The total linked account balance/s will be tracked against the goal, monthly.
Note: If you link account/s to the goal you will not be able to also use the manual contribution function, however any activity within the account will be calculated against the goal.7. Once you have verified all the details are correct, linked account etc., select 'CREATE GOAL'.
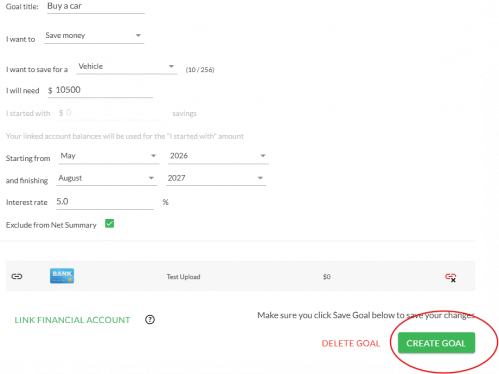
You will be prompted to save the goal, thereafter. This validates that your goal is created.8. Once your goal is created, it will appear in the 'Goals and Budget' Screen from then on as either:
- an 'Active Goal' (starting month reached and goal is neither 'Completed' or 'Expired')- a 'Scheduled Goal' (starting date is in a future month)
- a 'Completed Goal' (target balance is reached)
- an 'Expired goal' (the finishing month has passed)
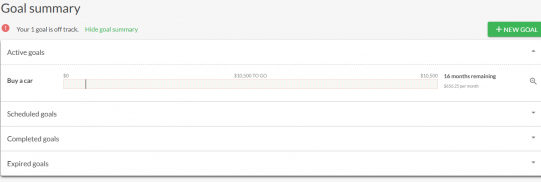
9.Note that goals are explicitly linked to the budget.
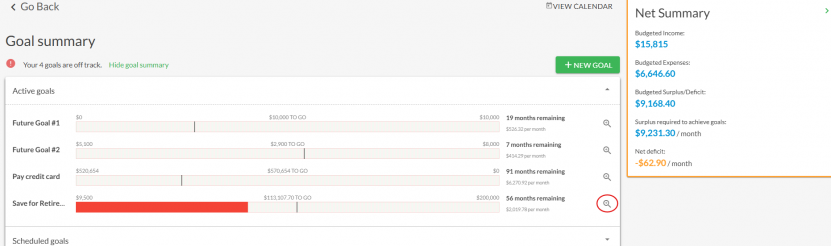
You will be presented with a high-level overview of your budget and the calculated requirements to maintain your goals. This can be found in the 'Net Summary' at the top right-hand corner of the 'Your Goals and Budget' page.
'Budgeted Surplus/Deficit' shows whether there is adequate cashflow against your budget.
'Surplus required to achieve goals' shows whether you have adequate cashflow against your budget to meet your goal(s). You would adjust goals accordingly to ensure they can be reached, such as extending the end date, reducing the goal balance etc. to reduce the amount monthly required.
Obviously, if you are in deficit this means you cannot reach your monthly goal provision, based on the current information.
Your options then are to edit your budget to reflect the changes you are going to make, to bring your monthly position back into surplus.
Note the example below. Clicking the magnifying glass icon next to a goal will allow adjustment of details.
-
Edit a Goal
Goals1. To edit a goal, click 'Show goals' on the 'Your Goals and Budget' page.
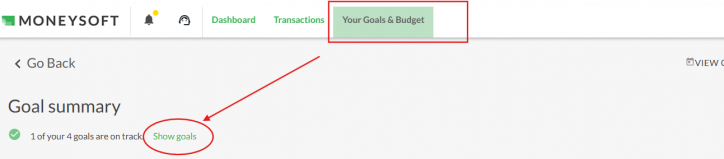
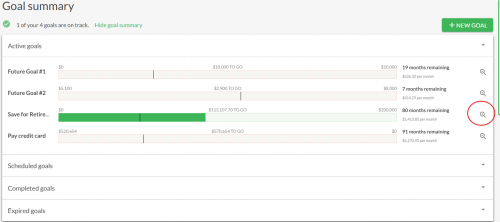
2. To edit, click on the magnifying glass icon at the right side of the selected goal.
3. You can edit any part of the goal from this screen including updating goal details, changing the accounts linked to the goal, and even uploading your own photo or picture for personal motivation (click 'Change Photo').
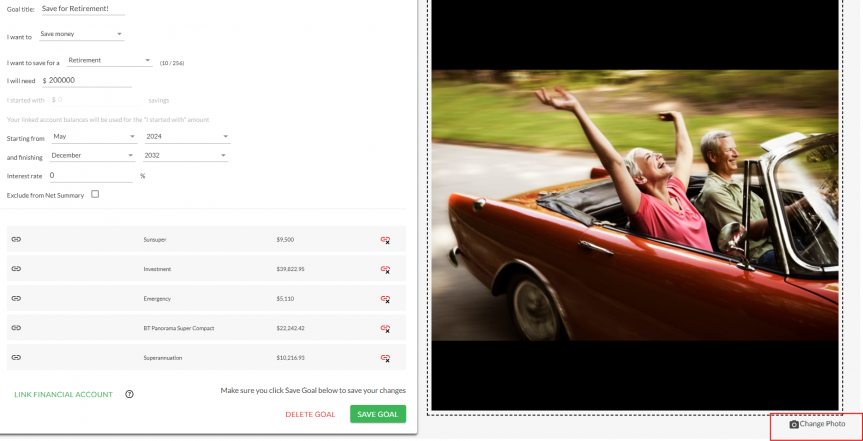
Note: Any changes to the goal details, calculations or linked accounts will update in the 'Goal Summary' graph and 'Monthly Goal Summary'. Scroll down the page to see this data.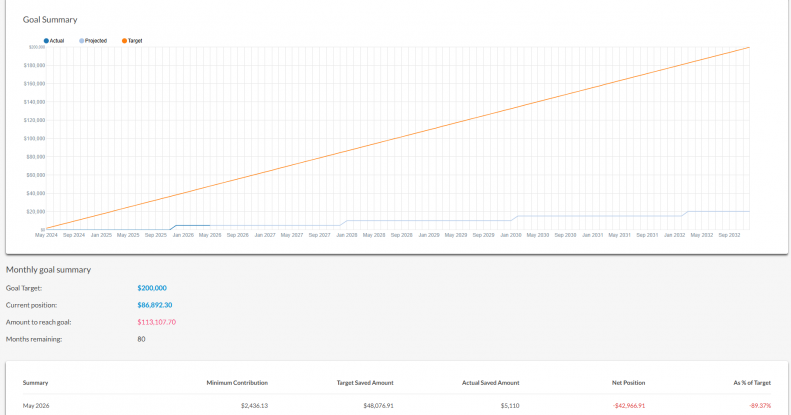
-
Upload an image to a Goal
Goals1. Click 'Show goals' on the 'Your Goals and Budget' page.

1. Click on the magnifying glass to the right of the selected goal and to the right you will see the goal image. There are default images that are pre-loaded from the system however you can upload your own.
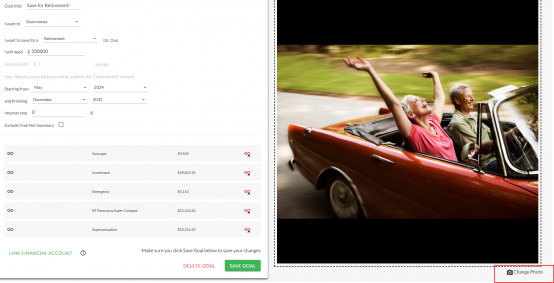
2. To change the image of a goal, select the “change photo” button below the image tile.
3. This will open your File Manager. Find and select the image you want to upload and click open. Your new image will automatically be uploaded.

4. Click 'Save Goal' to save the uploaded image.
-
Manually contribute an amount to a Goal
Goals1. To manually contribute to a goal, it must not be linked to a financial account. This means that you will need to manually assign transactions or contributions to it, as entries that will calculate the goal values over time. Click on 'Show goals' from the 'Your Goals and Budget' page.
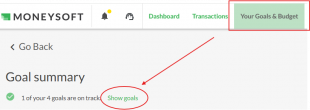
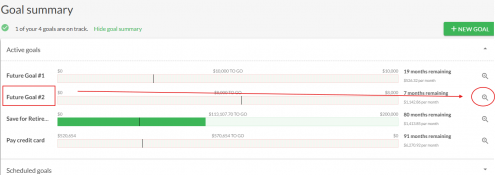
2. Select the goal you are contributing to, then click the appropriate magnifying glass icon.
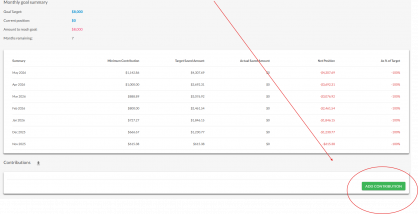
Ensure no financial accounts are linked and then scroll right down to the bottom, to click the 'ADD CONTRIBUTION' tab.
3. Enter the contribution amount in the value section. e.g. $1,000 and click 'ADD CONTRIBUTION'.

4. Your new contribution will be added and the goal calculations and values will be updated to reflect the contribution amount.

5. Note: TO REMOVE a goal contribution simply follow the above steps however add a minus sign (-) in front of the amount. This will reverse the initial contribution.
Your net position (goal net position) will also be adjusted accordingly.
6. You can also add a contribution via the transactions page. Locate the transaction you want to add and click on the three dotted option menu next to the transaction. A pop up will appear, then select 'Link to GOAL'
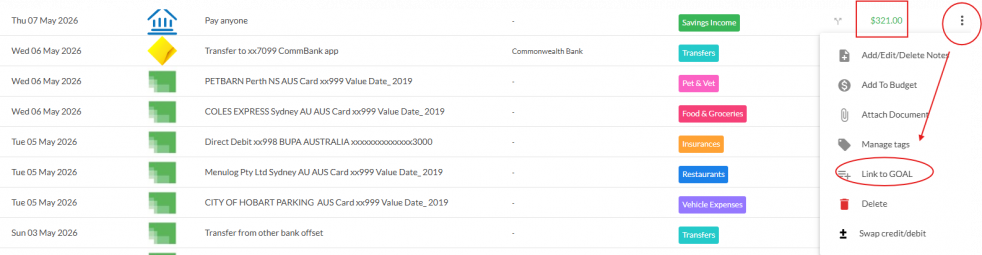
7. If you have more than one goal in your system you will be asked to select which goal to link the transaction to via the following screen. Select the goal and click link.

8. Your transaction will now have a symbol added which is the “Linked to Goal: symbol so you can easily identify

9. Your goal summary will also be updated after the new transaction is added. An unlink icon option is available to unlink the transaction, if added in error.
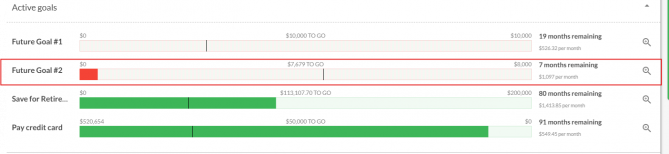
An option is available to unlink the transaction, if added in error.
There is also an option to export your manual contributions Click 'Contributions' to automatically download in either CSV or PDF format.

-
Allocate a transaction to a Goal
GoalsRefer to FAQ 'Manually contribute an amount to a Goal'
-
View all manual Goal allocations
GoalsRefer to FAQ 'Manually contribute an amount to a Goal' - Step 9
-
Link (or unlink) a Financial Account to a Goal
GoalsRefer to FAQs: 'Add a Goal' or 'Edit a Goal'
-
Forgotten password
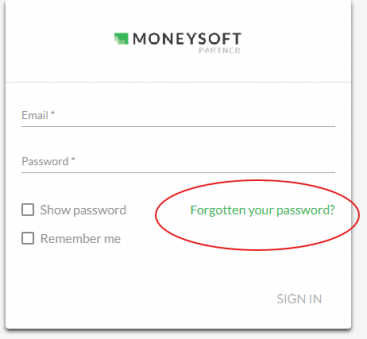
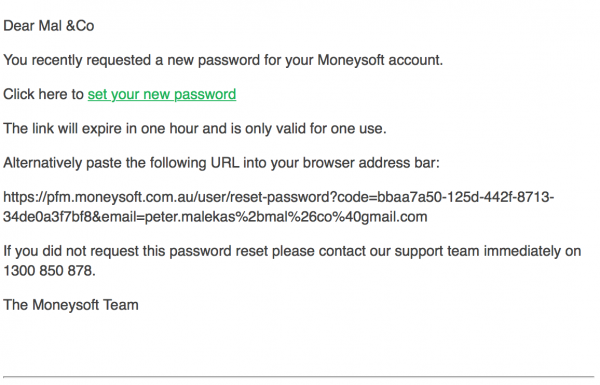
Manage my account1. If you forgot your password its OK, just click on the “Forgot Password” link from the login screen
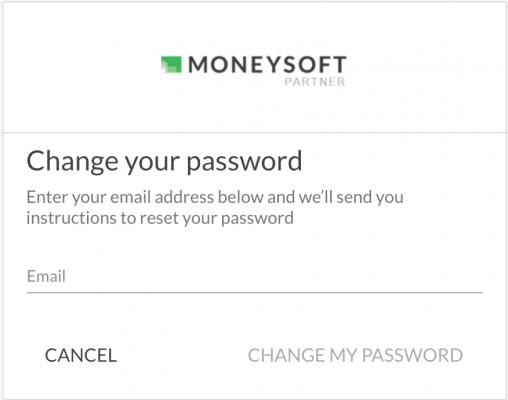
2. Enter the email address that you registered with. An email will be generated and sent to that address, for you to access. Then simply follow the prompts in the email to re-set your password.
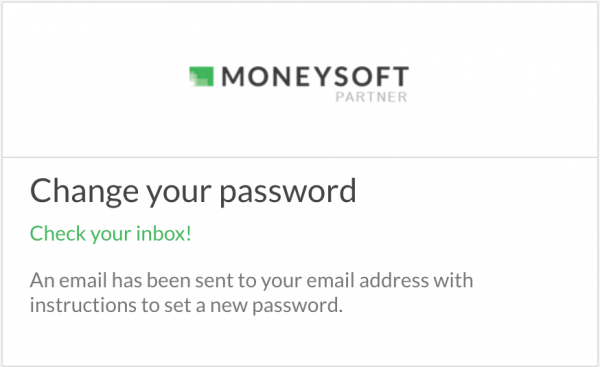
3. Check your inbox (if not in your inbox, check your junk mail folder) and follow the instructions to reset.
-
Change my log-in email address
Manage my account1. Click on your account name at the top right corner of the screen and select 'My account’
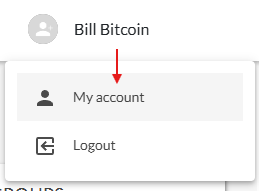
2. Click on 'Edit Profile' located on the left side of the page.
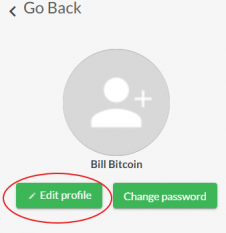
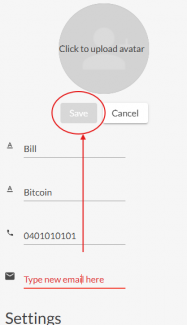
3. Type your new email address in the email address field. Click 'Save to confirm the change.
-
Change My Password
Manage my account1. Refer to the FAQ 'Forgotten Password', if you don't remember your password.
But if you can log in, you may just want to change/update the password. Click on your account name at the top right corner of the screen and select 'My account'.
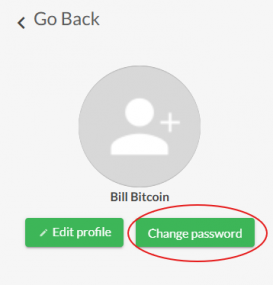
2. Click on 'Change password' located on left side of the page. A drop-down screen will appear.
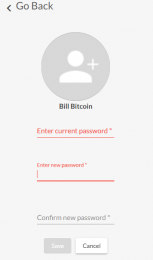
3. Enter the current and new password and confirm as prompted, then click 'Save'.
-
Cancel my Moneysoft Account
Manage my account1. If you wish to cancel a personal Moneysoft account, click on the account name at the top right corner and select 'My account'.
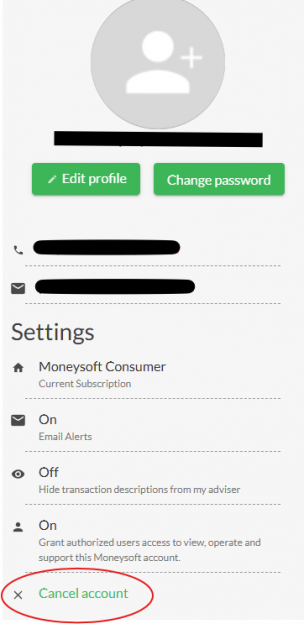
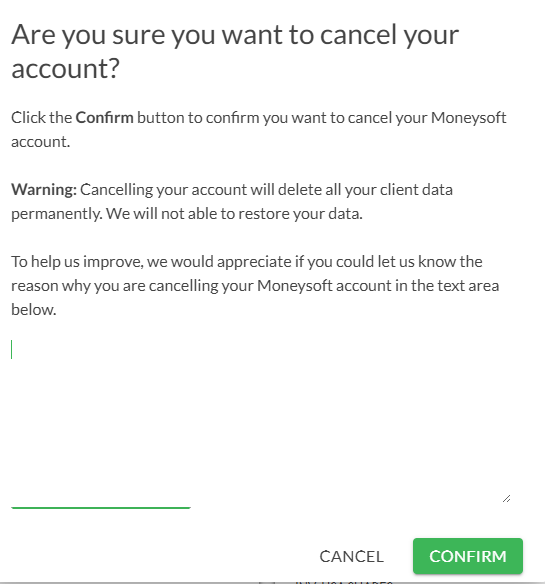
2.Scroll to the bottom left of the page and on the left, you will see a ‘Cancel account’ link. Click the link. A message confirming data deletion and requesting your feedback will appear. Click 'Confirm' to go ahead or 'Cancel' if you should change your mind.
-
Manage my information sharing permissions
Manage my account1. If you wish to amend your adviser information sharing permissions, then from the main screen, click on your account name at the top right corner of the screen and select 'My account’.
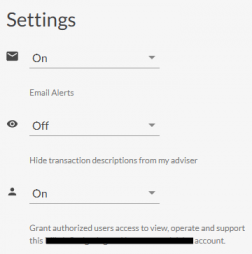
2. Click on 'Edit profile' to choose the sharing access, which are the last two ‘OFF-ON’ options
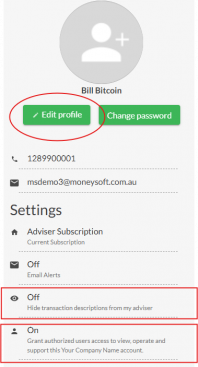
3. The options are:
- Hide transactions: you hide all transaction descriptions from your adviser by switching to 'ON'.
- Full access: you prevent adviser's full view, operation and support access by switching to 'OFF'.
-
Manage my Alerts
Manage my account1. If you wish to edit your alerts and communications options, then from the main screen, click on your account name at the top right corner of the screen and select ‘My account’.
2. Click on 'Edit profile' and select the 'Email Alerts'. Switch to 'ON' to enable or 'OFF' to disable Alert emails.
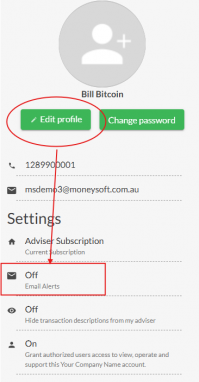
3. You can also access your alerts from the main dashboard by clicking on the 'bell' icon at the top left of the page.

4. A side panel will appear with a list of recent alerts generated. There are 'in-app' alerts that can be sent to you. Emails are also generated and sent to your inbox as a secondary communication.
Click 'Alert settings' to customize the amount and conditions by which emails may be sent to you.
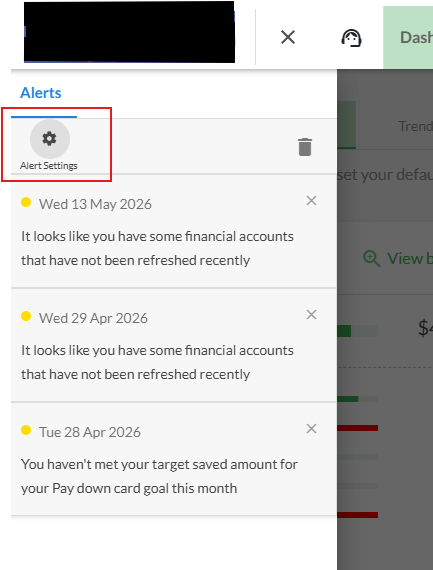
A description for each alert can be displayed by hovering the mouse cursor over the '?' symbol.
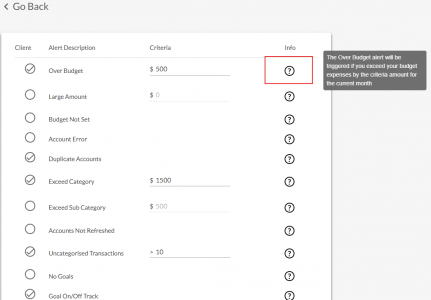
If you disable alerts under 'Edit profile' on your 'My account' page, you will not receive email alerts or in-app notifications.
-
Browser and App Support
Manage my account1. Moneysoft is fully tested on the below browsers:
- Google Chrome
- Edge
- Firefox
- SafariWe support the current version of each browser and the 2 previous major versions.
If you want to view your current browser version to go
https://www.whatismybrowser.com/ and your browser will be auto detected.
2. We also support mobile apps for both iOS and Android. Check the respective app stores

-
How do I view my Advisers?
Partner administration1. To view adviser status and underlying clients, you must have administrator access. Once you are logged in as administrator, from your dashboard, hover over and click on 'Individual advisers'.

2. You will be presented with a full list of your advisers and their underlying activity including:
- status
- last active
- number of clients
- type of account they have
Plus, you can view each of the individual clients listed under the associated adviser.
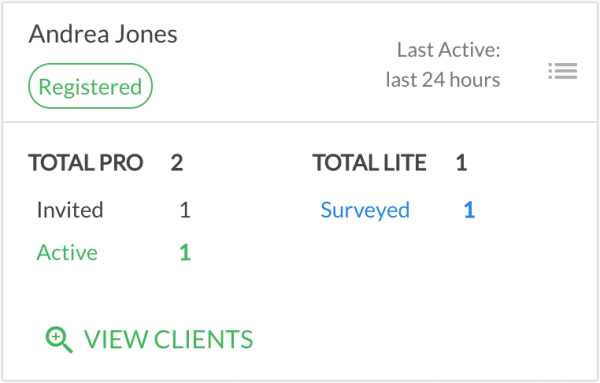
3. To view or change the individual adviser settings, click on the menu icon next to 'Last Active'.
-
How do I look at the clients of my Advisers ?
Partner administration1. To view all your advisers clients, you must have administrator access.
Once you are logged in as administrator, from the main dashboard, hover over and click on 'Individual clients'.
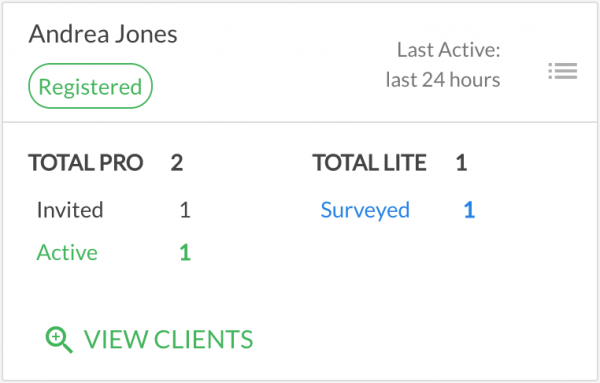
2. Alternatively, you can view an individual clients associated with an adviser by hovering over and clicking on 'View clients'. A tile list of clients will be presented.
-
Find Reports
Reports1. All reports are located from the main dashboard view.
The most common reports are available on the dashboard and clicking “View all reports” link will open up all reports available.
There are a suite of 11 standard Moneysoft reports available.
Although if you are associated with an adviser, the number and style of reports may differ.
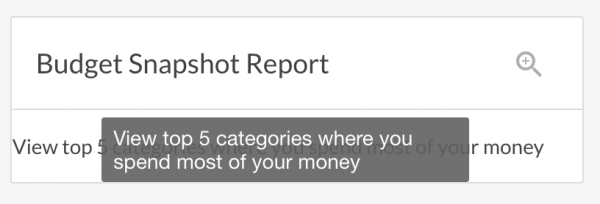
2. Some reports may need additional information for them to continuously update. For example, the 'Budget Snapshot' report needs inclusion of 5 chosen categories, before data can be represented.
-
Download or email Reports
Reports1. Once you have selected the correct report and data periods to be generated, click on 'Export'. You will be provided with the export format download options of PDF, EXCEL, and CSV.
Your report will be automatically downloaded thereafter.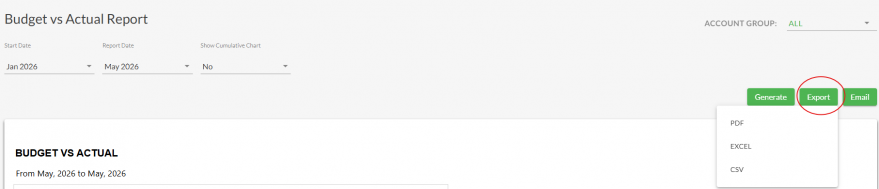
NOTE: Check your downloads folder on your computer if your report does not automatically open2. You can also EMAIL reports directly from the system by selecting 'Email' and following the prompts. Once you have selected the format and additional input fields click 'Email Report'.
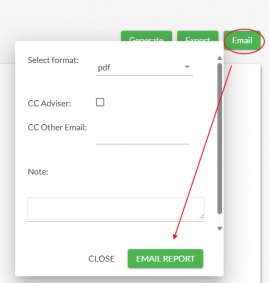
A generated email with the report attachment will be sent to the account holder's address, and any additional email addresses that are included. -
Pre-selected Reports
ReportsThere are 11 pre-selected reports available, based on user data representation demand and suggestions, which are part of the standard Moneysoft suite. The standard reports available are:
Budget remaining this month
Budget vs Actual Report
Budget Snapshot Report
Merchant Report
Net worth
Account Balance Report
Health Check Report
Saving Report
Cashflow Report
Expense Report
Spending Habits Report
-
Generate Reports
Reports1. To generate a report, click on the magnifying glass ion, for the report you wish to generate

2. The report will expand. Drop down date options will be available for Start date and Report date. Plus, any additional drop downs that are relevant to each report will be available.
NOTE: any changes to the report will require you to click on the GENERATE button for the updated information to be displayed.
-
Create a Rule
Rules1. The in-built rules engine is a way to make your categorising more efficient and personalised. Rules are ways in which you can tell the system to do something specific for a particular set of transactions.
Rules allow automatic assignment to a more personalised (custom) category, or simply to another standard category, for transactions that are in common by description.
Rules can be as broad or as specific as you like.
2. You can access the rules feature from the 'Transactions' page. Click on the transaction that you wish to set a rule for and then check 'Create a rule to do this automatically'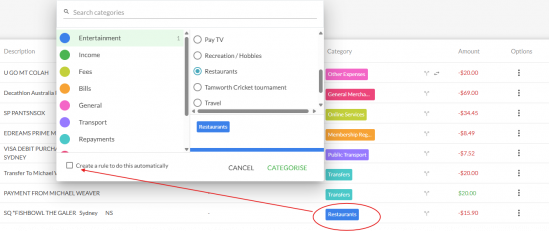
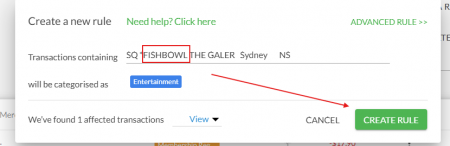
Then set the rule conditions. It's a good idea to truncate the description to a common word to ensure the rule covers all relevant transactions. i.e. you will increase the number of relevant transactions that the rule will apply to, by doing this.
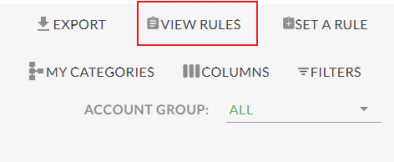
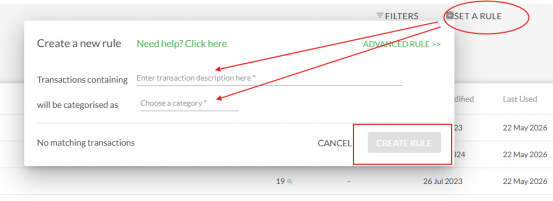
3. Alternatively, click 'View Rules' from among the options at the top of the 'Transactions' page, then click 'Set a Rule' (or simply click 'Set a Rule').
Enter the conditions for the rule before clicking 'Create Rule'.
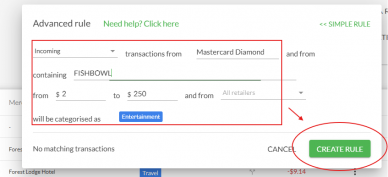
4. There is also an 'Advanced Rule' option, which allows more detailed rule conditions.
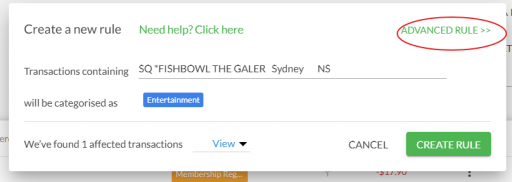
To set the rule conditions, click 'Create Rule'.
7. A list of all rules you create will be stored and can always be accessed via 'View Rules' on the 'Transactions page' . You can edit, delete and manage the rules from this list.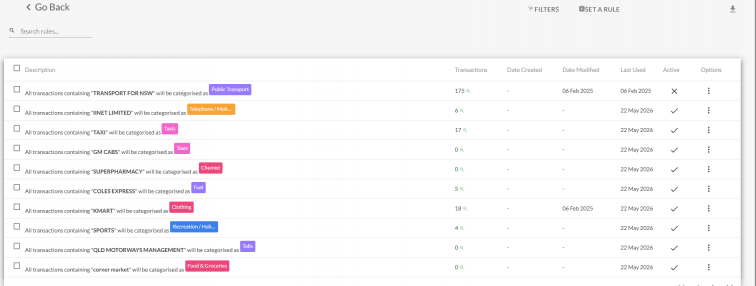
-
View and edit Rules
Rules1. You can access a list of rules via the 'Transactions' page. Click on 'View Rules'.
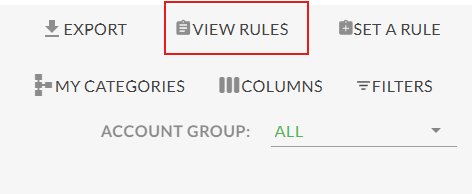
2. A list of rules will be provided for you to edit, delete and manage from this page.
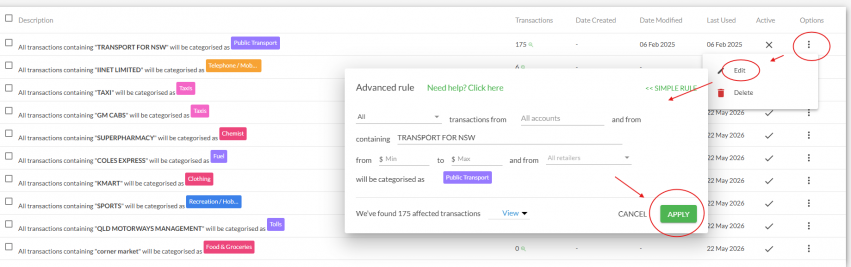
3. Click the magnifying glass next to a rule to check that the transactions that are captured by it are correct. Adjust the rule conditions if necessary.
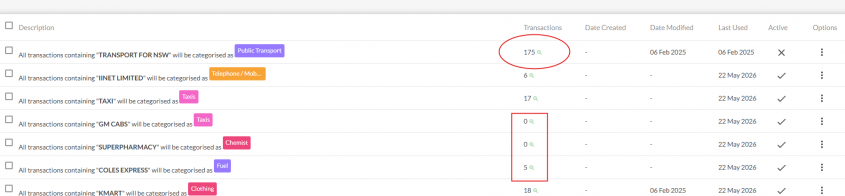
Note: Rules that have not captured many transactions over a significant time may need to be amended or deleted. Ideally, you should aim to have no more than 30 rules in total, to keep things manageable.
Bear in mind that a rule created more recently to cover the conditions of a previously created rule, will not always supersede the old rule in the system. So, in that case it's important to delete the redundant rule, to prevent it from applying inadvertently.
-
Filter the transactions list
Transactions1. To filter transactions, click on the filter tab from the transactions page.
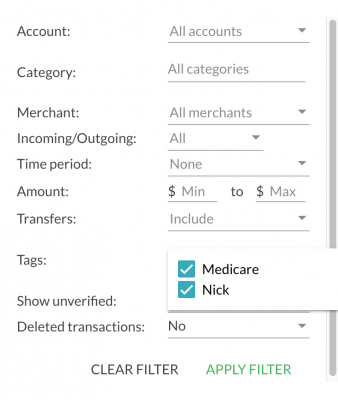
2. A pop up will appear with an advanced selection criteria of search or filter fields. You can search by 10 different filters and within filters are also additional filters so the filter options extend in the hundreds of combination types
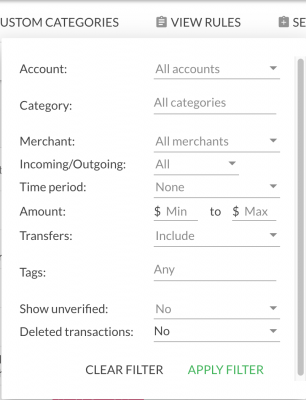
3. When you select your filter fields you will be directed to the transactions filter view after you click APPLY FILTER
Example;
I want to search for all cash withdrawals over the last 14 days from all accounts.
My filter options selection options are shown to the right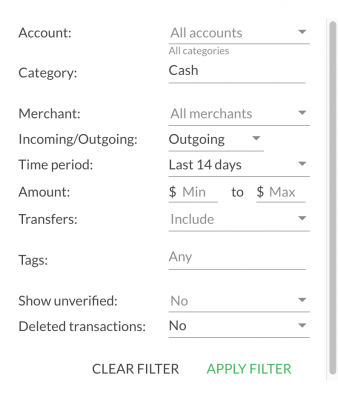
4. My transaction filter view after clicking apply would take me straight to the transactions that match my search filter
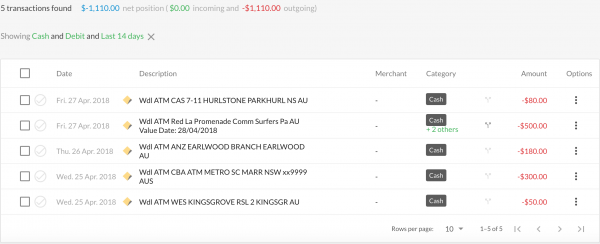
-
Recategorise a transaction
Transactions1. Find the transaction you would like to change. You can edit the category by clicking on the current category example ‘entertainment’ and a new pop up will appear. Locate the new category by either clicking through the category groups and then the sub-categories, or search the category by using the search function.

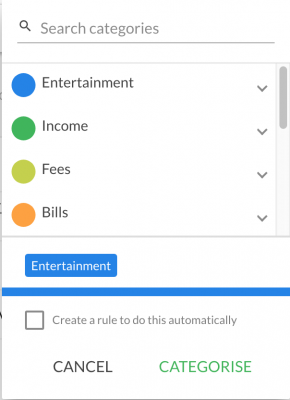
2. Once you have located the new category click CATEGORISE
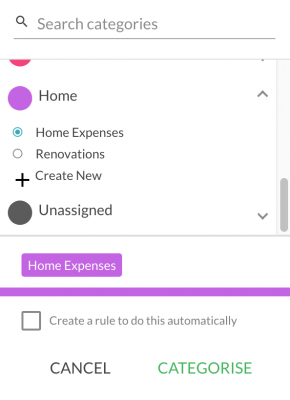
3. Your transaction will also be updated with the new category. Any reports, calculations, budget actuals, or data graphs will be also automatically updated.

-
Split a transaction
Transactions1. Ensure you are in the transaction page and locate the transaction (example; ATM withdrawal next to the category is a two-arrow symbol. Click on the symbol as this is the split transaction function.

2. A pop up box will appear. Click on the category group and locate the underlying category you wish to split the transaction into.
For example; if I withdrew $500 from an ATM and want to split $300 to entertainment and $200 to restaurants.
NOTE: amounts added to other categories will recalculate and the balance will be left in the original category if not balanced.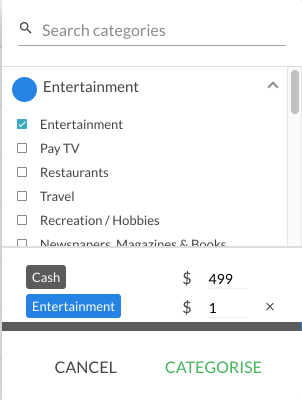
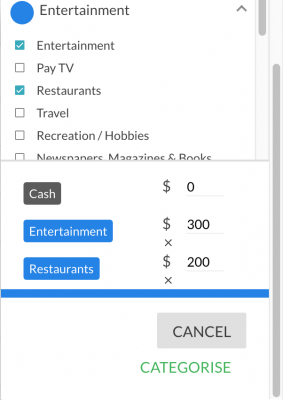
3. Once you are satisfied with the re-categorisation split, click categorise and the transaction line will be updated. All data including reports, graphs and budget actual calculations will be updated to reflect the revised amounts. The number of categorised chosen will also be reflected in the transaction line. Example +2 Others.

-
Add a note to a transaction
Transactions1. To add a note to a transaction, locate the transactions that you want to add a note to and to the right click on the options menu.
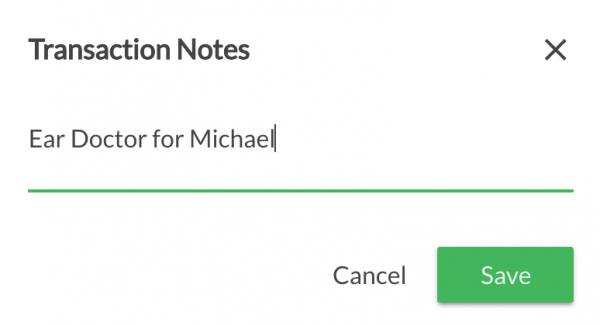
A pop-up will appear and select 'View / Edit Notes'.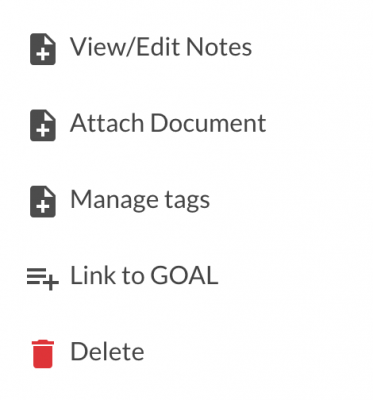
2. In the Transaction Notes text field type in your desired text or note and click SAVE
3. Your note will now appear in the transaction line with the note symbol

-
Tag or flag a transaction
Transactions1. Find the transaction you would like to tag or flag.
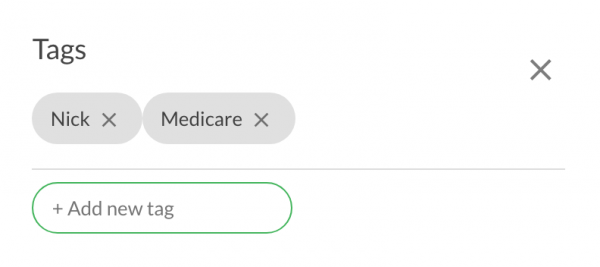
To the right of the transaction click on the options menu and select 'Manage Tags'
If this is your first time and you have no previous tags, then click on the oval text field to add a new tag, and begin the tag name.
A tag is like a reference beyond a category for ease reference or locating.
For example;
Tax related, event, like Christmas or birthday or associating same category to multiple children.
2. Once you have flagged or tagged your transaction it will automatically appear in the transaction line with a “tag” symbol

3. You can filter and find specific tags or transactions associated to a tag by clicking on the Filter symbol to the right of the transaction page. Scroll to tags and select which tags to you want to filter by and click APPLY FILTER.
-
Export transactions
Transactions1. Transactions can be exported by clicking on the downward arrow on the transactions page.
NOTE: What will be downloaded is what ever appears in the transaction page prior to clicking the download arrow. Therefore if you want to select a particular series of transactions then make sure you filter or search the transactions you are looking for before you download.
2. You will be prompted to select the export format in either CSV, PDF or Excel.
Your transactions will be automatically downloaded thereafter.
NOTE: Check your downloads folder on your computer if your report does not automatically open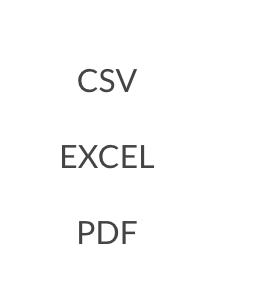
-
Reconcile Transfer transactions
Transactions1. Click the Filter by tab in the transactions page then select the "Find" option under the Transfers heading.
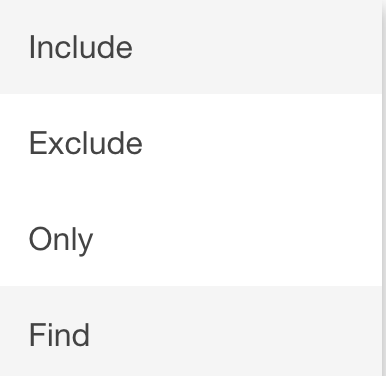
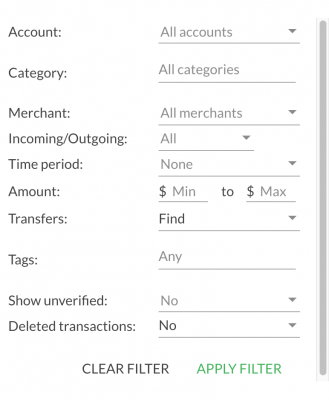
2. The system will match any transfers by if any are categorised as anything other than TRANSFER they will display the transfers symbol.

3. if there are any transactions which are not transfers you can remove these transactions from the list by clicking the "Transfer" symbol and then clicking the "Not a Transfer" button in the pop up that appears.
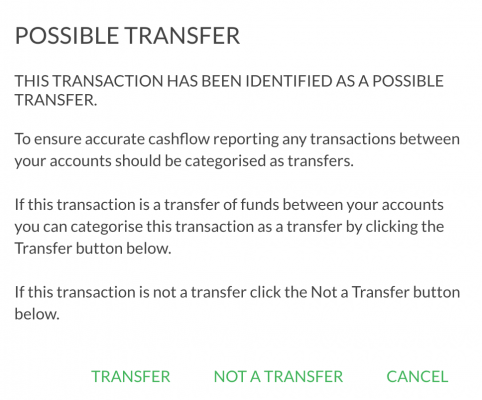
4. When you have checked all the displayed transactions and have verified they are all transfers they will all be displayed as transfers thereafter including in reports.
Transfers are excluded from incoming and outgoing reporting unless you select the 'Include Transfers' feature within the relevant reports.
NOTE: to double check whether transfers are all correct your balance of debits and credits in the results field should be $0.00., If the amount is not $0.00 then your income or expenses will be under / over stated.
-
Custom Categories
Transactions1. Custom categories allows you to personalise your categories.
You can easily create custom categories from the transaction line
NOTE: Categories are associated to Category Groups. Therefore, make sure you are in the right category group before selecting ‘Create New’ otherwise your new custom category will appear in the wrong section.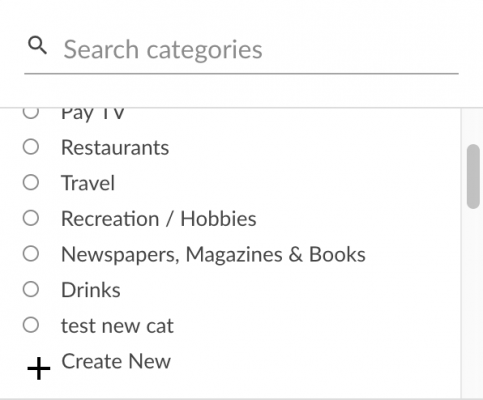
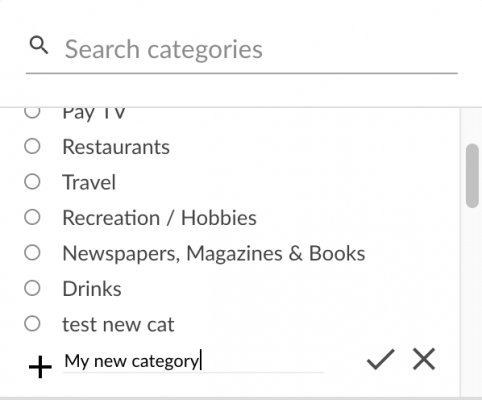
2. Alternatively, you can also add / edit and manage custom categories from the “Manage Custom Categories” button on the transactions page.

3. The 'Manage Custom Categories' page displays the custom categories you have created together with additional information such as the
- Group the custom category is associated to
- The custom category name
- The number of transactions listed with the category
- Whether its being used with associated rules, in the calendar or budget
4. If you want to remove a custom category, click on the recycle can symbol

5. If the trash can next to the category you want to delete is grey in colour you cannot delete.
NOTE: if you have custom categories that are being used in multiple places such as rules, calendar or in your budget you will be prompted with a message: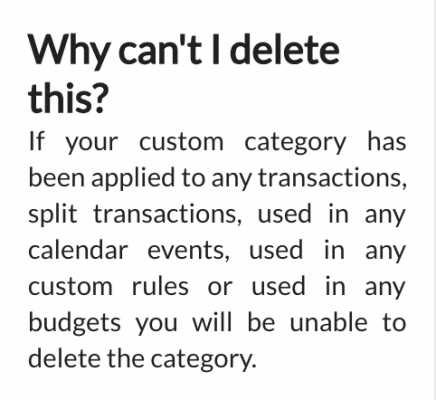

-
Add a Trend
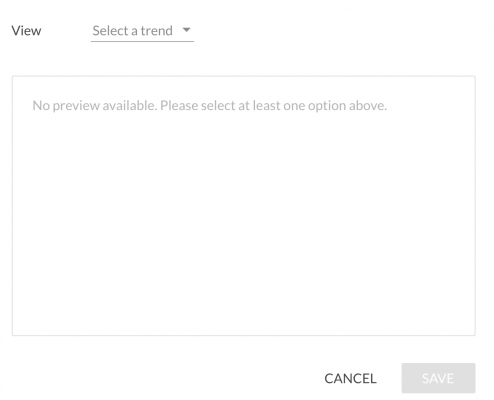
Trends1. Trends are quick graphical representation of data. Trends can be created from pretty much most data sets in the system and can be filtered to view further
Trends are located on your dashboard below reports. There are two pre-pinned trends and To add a Trend, click select the + box and the following pop-up window will appear that allows you to make your selection of data you wish to chart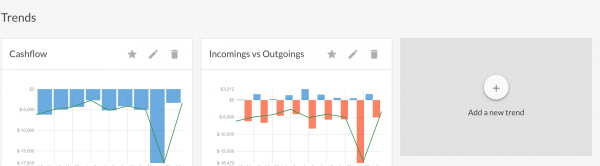
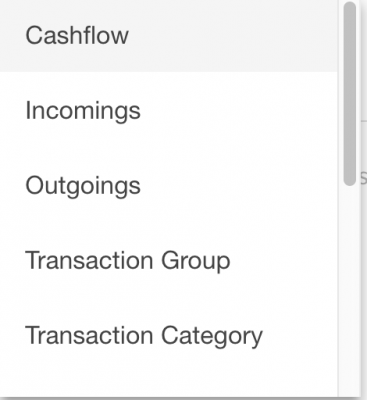
2. You can select from the pre-select options available or create your own
3. Example: Let's say you want to compare ALDI vs. Coles my trend inputs would looks like the attached.
When you have completed it and you want to make the trend an ongoing reporting trend click SAVE and the trend will also appear and pinned on your dashboard.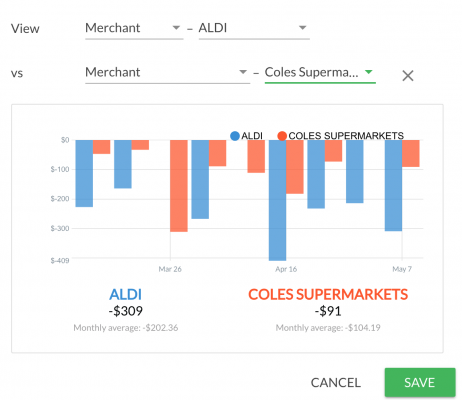
-
Edit a Trend
Trends1. To edit a trend, click on the pencil symbol on the trend graph. A pop will appear for you to make your necessary changes. Once complete click SAVE


2. You can else expand / reduce the trend the time scale by clicking on the + or – circles at the bottom right of any trend graph.

-
Delete a Trend
Trends1. To delete a trend, locate the trend graph you want to delete and click on the recycle bin symbol.

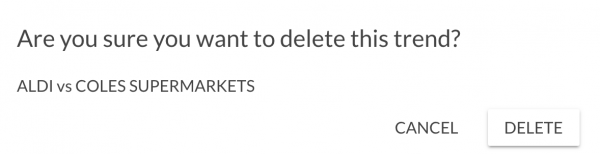
2. A confirmation message will appear to confirm and click DELETE. Your trend graph will be deleted from the dashboard.
-
Adjust the Trend Time Scale
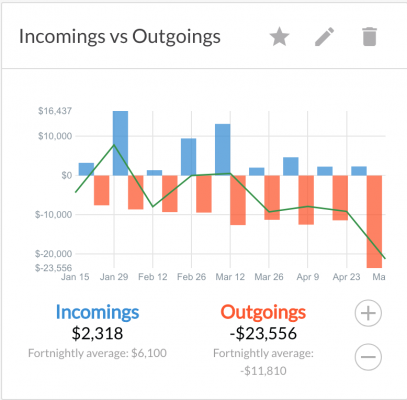
Trends1. You can else expand / reduce the trend the time scale by clicking on the + or – circles at the bottom right of any trend graph.

2. The time scales are set to averages in the following views; weekly, fortnightly, monthly, bi-monthly, quarterly, 6monthly, and yearly.
-
Why would you select balance only vs all transactions for an account (e.g. Investments / Super / Project)?
Financial accountsBalance only is generally used for accounts where the transactions are either inconsequential or do not relate to a client’s normal cash flow position. These accounts can include Investments, Superannuation or accounts created specifically to manage a dedicated project (building a house).
The balance only option is used to minimise the volume of transactions to be categorised, reduces complexity and ensures the data and reporting is more accurate.
Superannuation contributions, account fees and payments directly taken from a super or investment account or spending are not normally associated with a client’s cash flow position can distort their budget position and cause inaccuracies in the income and expense reporting.
Setting these accounts to balance only will hide the related transactions, removing them from the budget calculations, expense and budget reporting providing a more accurate view of your client’s cash flow and budget position.
The transactions are still retrieved for the account, just not displayed within the platform. If a client or the adviser wishes to review these transactions for any reason, the balance only option can be turned off and the transactions for the account will be displayed on the transactions page.
-
What is a Budget Rollback and how is it used?
BudgetBudget Rollback Feature Explained
The budget rollback feature helps advisers and clients improve the accuracy of financial reports after linking accounts to Moneysoft.
When a client first connects their financial accounts, the system pulls at least 90 days of transaction history. It then creates an initial budget by averaging these transactions and applying the result to the current month. Since this data may include partial months or irregular spending, the initial budget often needs manual adjustments.
Once the adviser or client updates the budget to better reflect actual income and expenses, they may want to apply these changes to previous months for consistency. This is where the rollback feature comes in—it allows the revised budget to overwrite earlier months, improving the accuracy of historical reporting.
Example 1
A client links their accounts in mid-February. The system uses partial data from February, full data from January - December and partial data from November to create a budget. After adjusting February’s budget, the adviser rolls it back to January and December, so those months reflect the same updated figures
Example 2
After reviewing the budget a month later, the adviser realises the original estimates were off. They revise the budget and use rollback to apply the new figures to earlier months, ensuring the reports are more accurate.
Note: Once a budget is rolled back, the original values are permanently replaced and cannot be recovered.
Rolling Back a Budget – Quick Guide
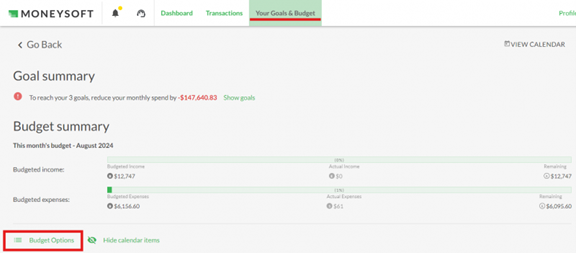
1.Go to Your Budget
- Click "Your Goals & Budget" at the top of the screen
2. Open Options Menu
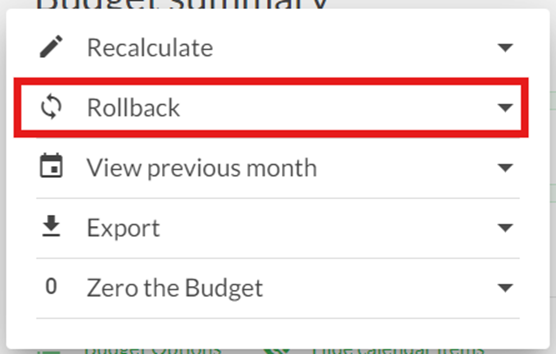
- Click "Budget Options" and select "Rollback".
3. Choose a Month
- Pick the month you want to roll back to from the dropdown.
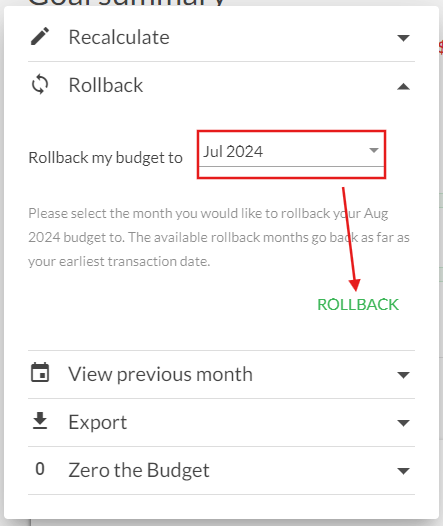
4. Confirm Rollback
- Click "Rollback"
- Moneysoft will apply that month’s budget to past months as set
- The previous budget values are permanently replaced
-
What should I do if my financial account balance sign is incorrect?
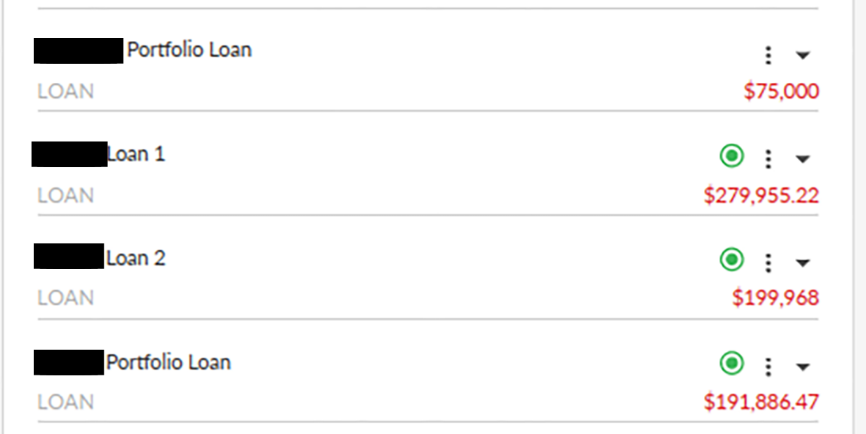
Financial accountsIn a situation where one or more of your financial accounts are displaying the wrong balance sign, causing an incorrect representation of your net worth in Moneysoft, you can quickly and simply fix change the balance sign.
For example:
Two portfolio account “Loans” are showing in the loan type with a Green value with a negative sign, which is incorrect. Moneysoft reports the amounts drawn down on a portfolio account not the amount available.
Therefore the two accounts in 'Loans' that are displaying in green are true loans.
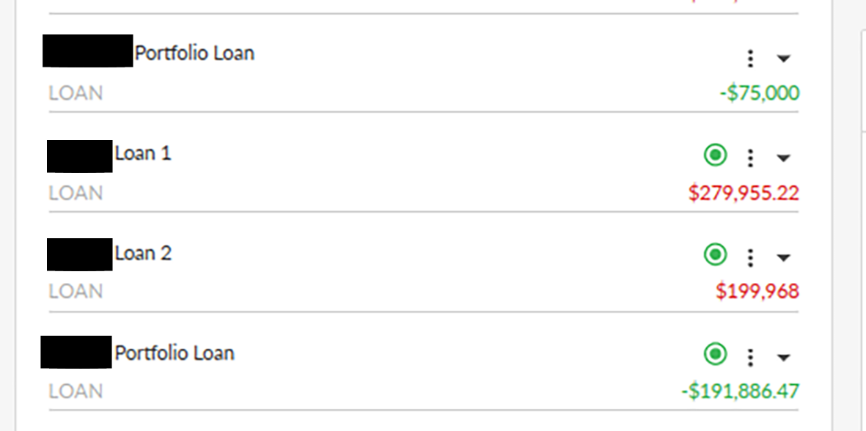
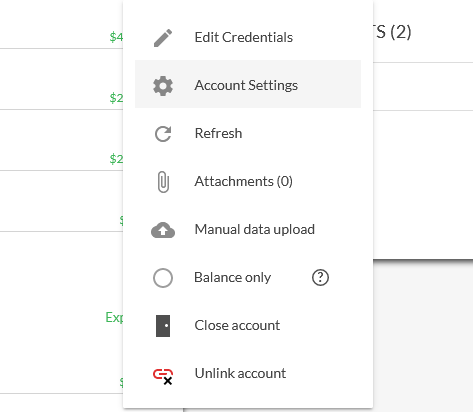
To change the account balance sign, click the three-dot options menu icon beside the relevant account and select 'Account Settings'.
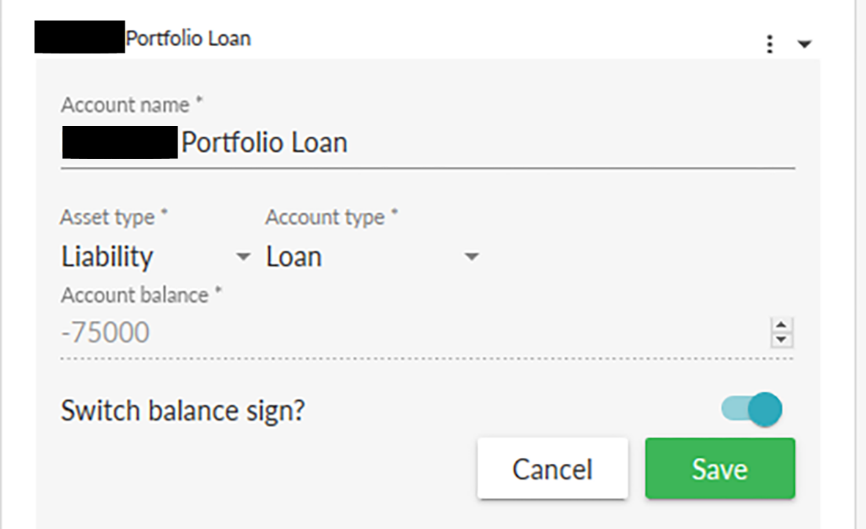
In the 'Account Settings' screen, click the 'Switch balance sign' toggle then click 'Save'.
The account balance sign for the account will now be displayed correctly and the net worth report on the dashboard will update accordingly.
-
How do I integrate my Moneysoft data with XPLAN IPS?
Adviser information -
How do I activate the Household Member feature for my clients?
Household Member1.
Log in to your Business Administrator or Adviser account.
2.
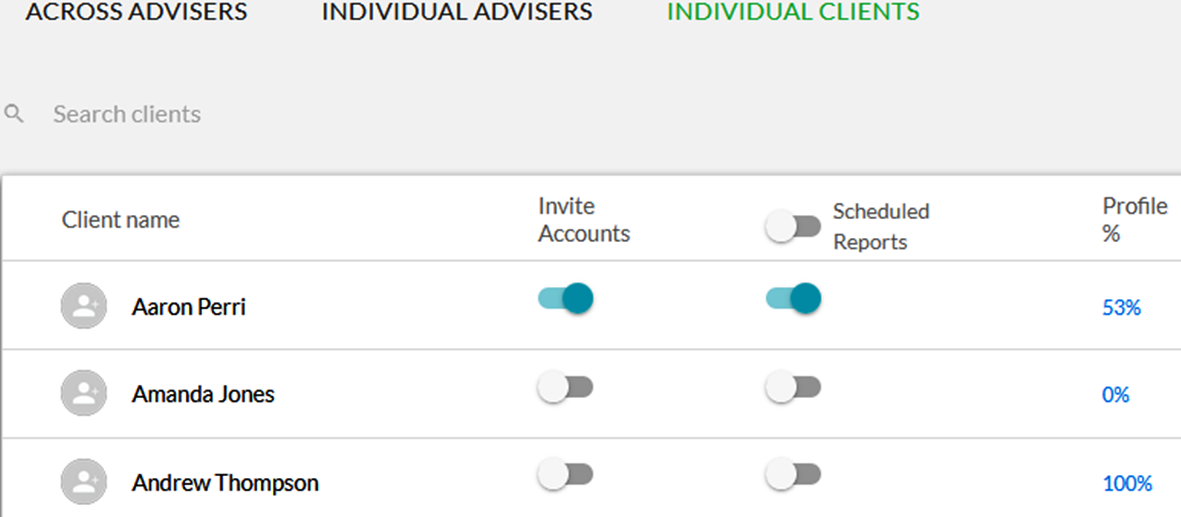
On the Individual Clients tab click on the slider to permit a client to invite a Household Member.
-
How do I invite a Household Member to my Client Account?
Household Member1.
To invite a Household Member into your Moneysoft PFM account, the feature must first be activated by your Financial Adviser.
Household Members may also be invited to share your Moneysoft PFM account by your Financial Adviser following these same steps.
2.
Login to your Moneysoft PFM account as the Primary Client.
3.
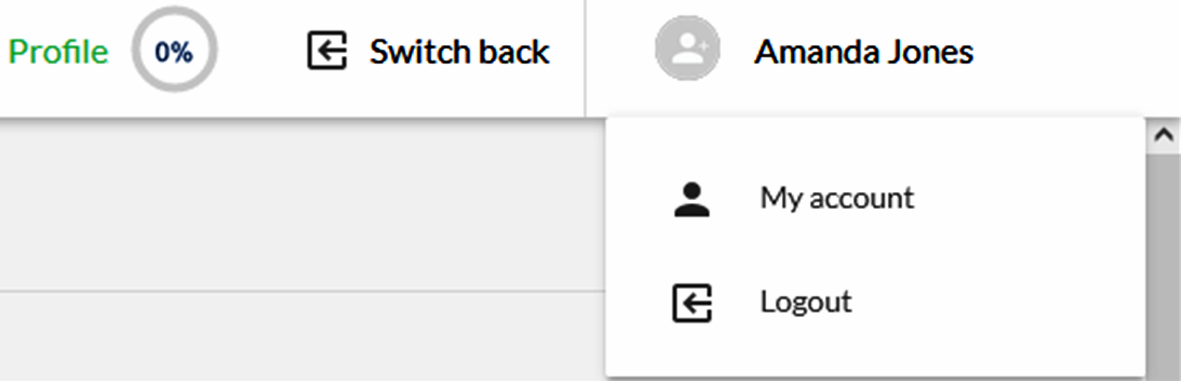
Click on your name in the top right corner and select My Account.
4.
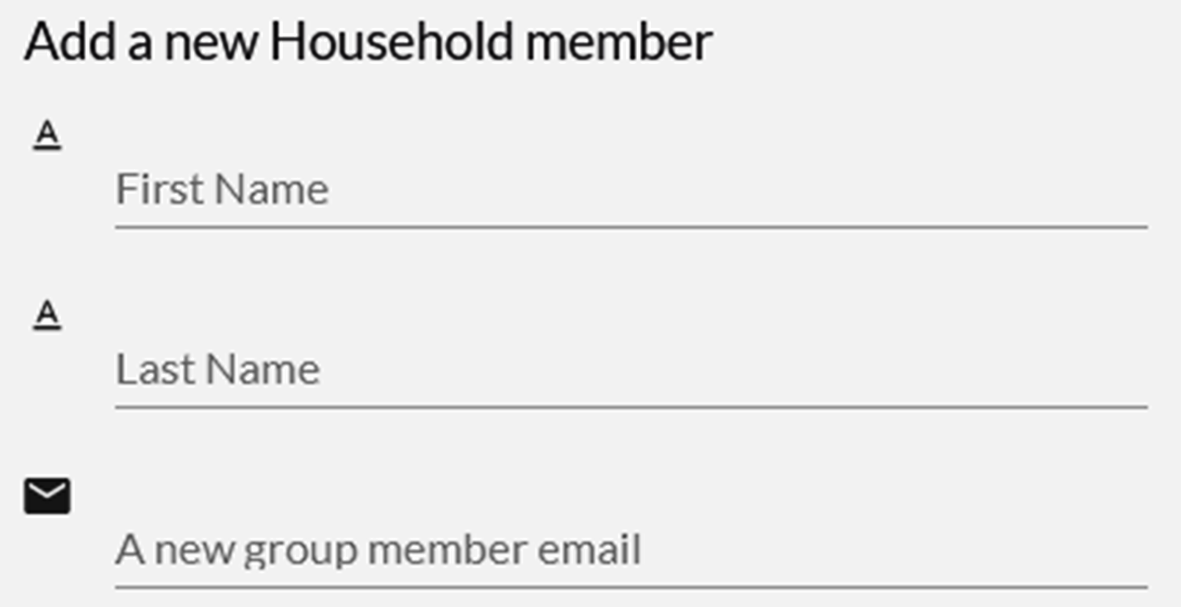
Locate the Add a Household Member module on the left side of the page, beneath the Profile module.
5.
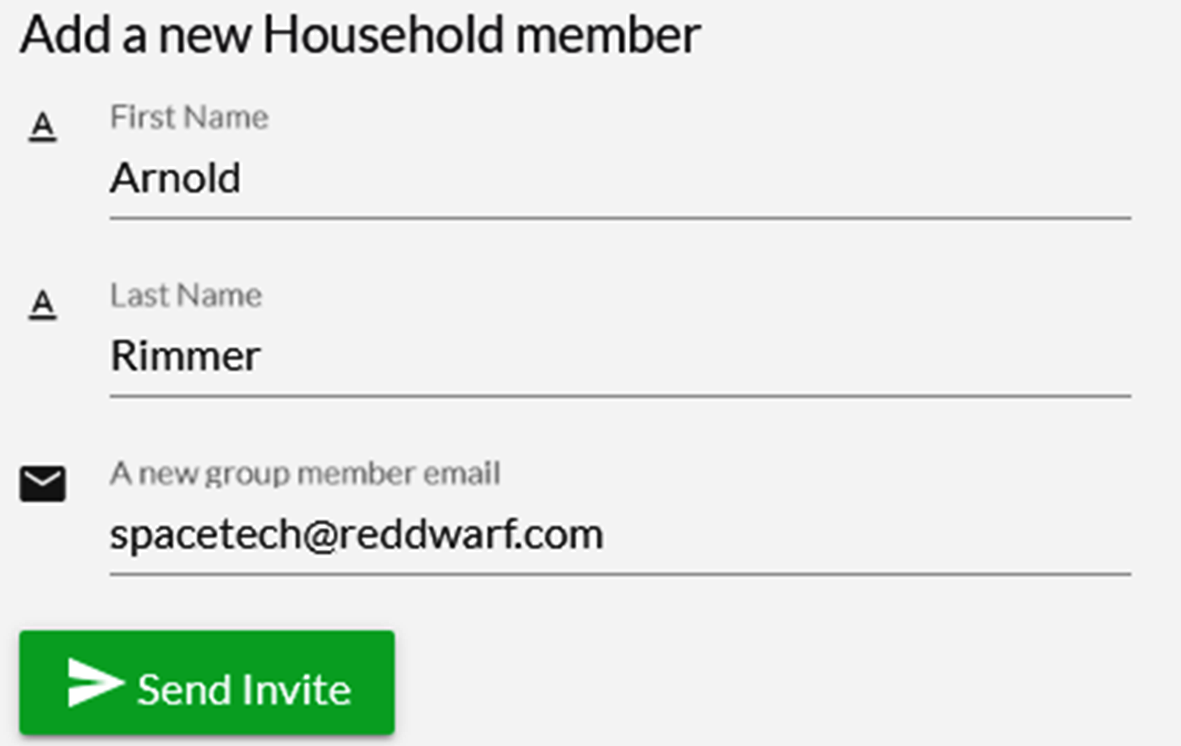
Enter the name and email address of the Household Member then click Send Invite.
· The Send Invite button will only appear once the details are entered into the fields
6.
The Household Member will receive an email inviting them to register. They must complete the registration to be able to log in to Moneysoft PFM.
7.
The feature is currently limited to one primary Client and one Household Member per Moneysoft PFM account.
-
How do I update Household Member details?
Household Member1.
Log in to Moneysoft PFM using your Household Member username (email address) and password
2.
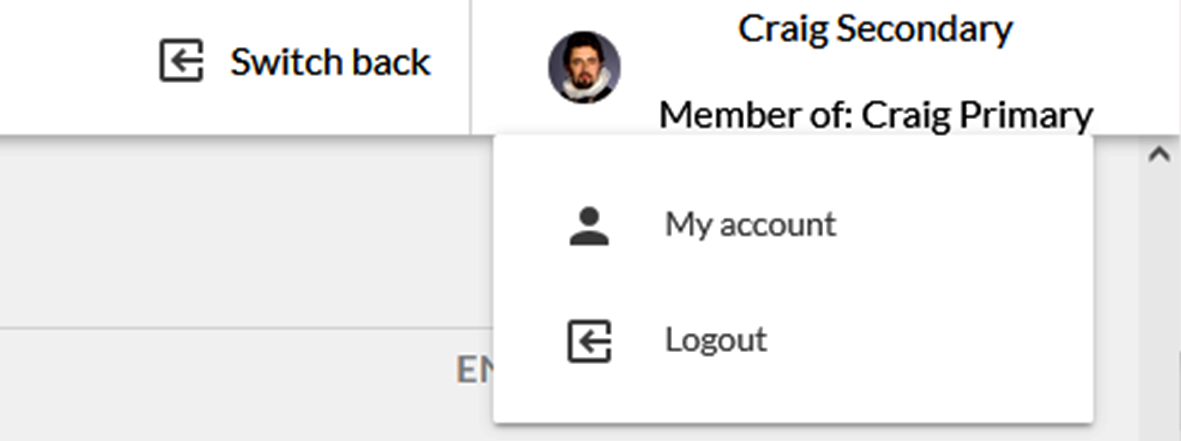
Click on your name in the top right corner and select My Account.
· This also shows the name of the primary Client, that the Household Member has been invited under
3.
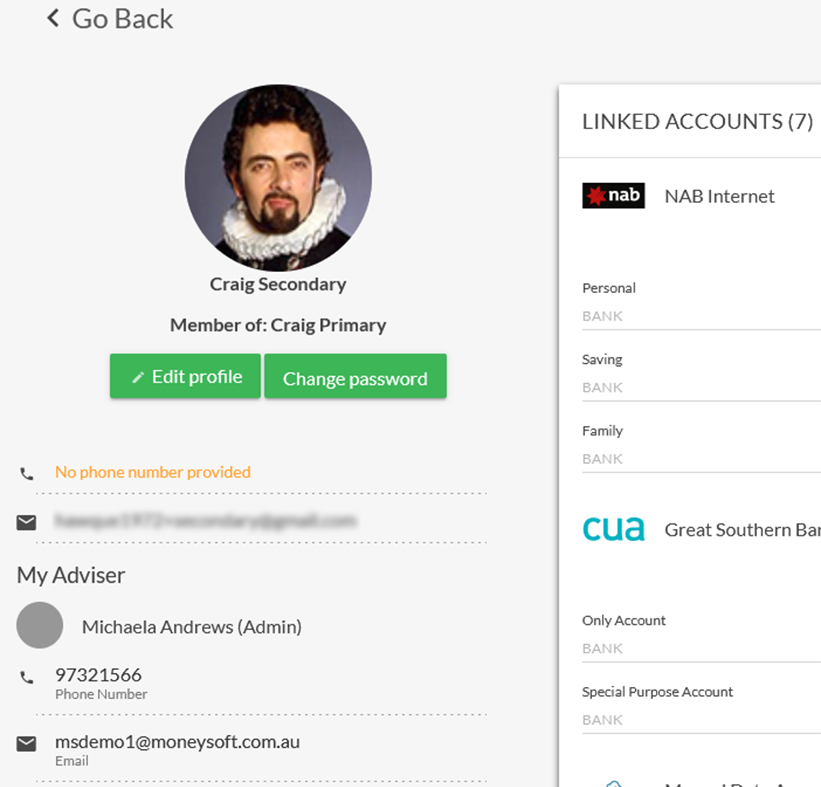
Locate the Profile module on the left side of the screen.
· The Household Member has a restricted profile view and cannot alter the adviser access or mask transactions
4.
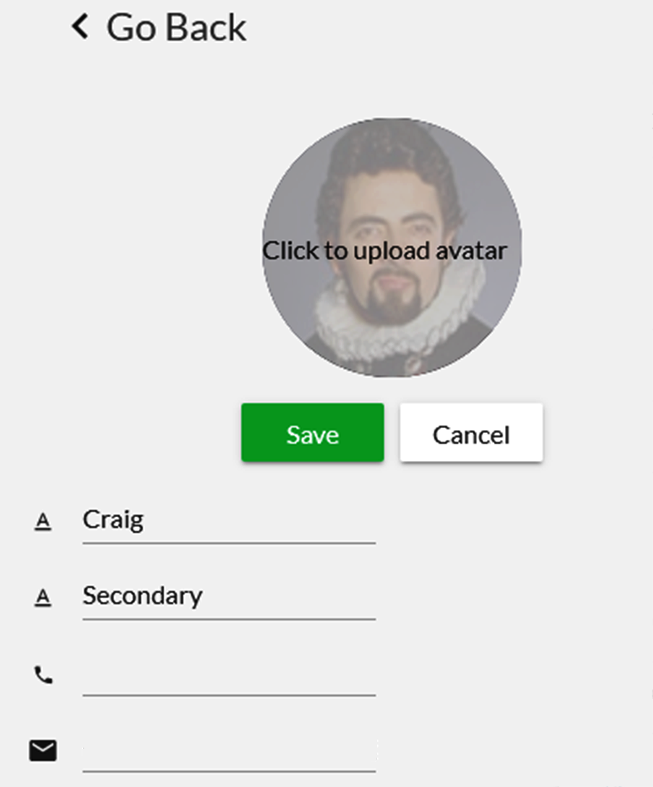
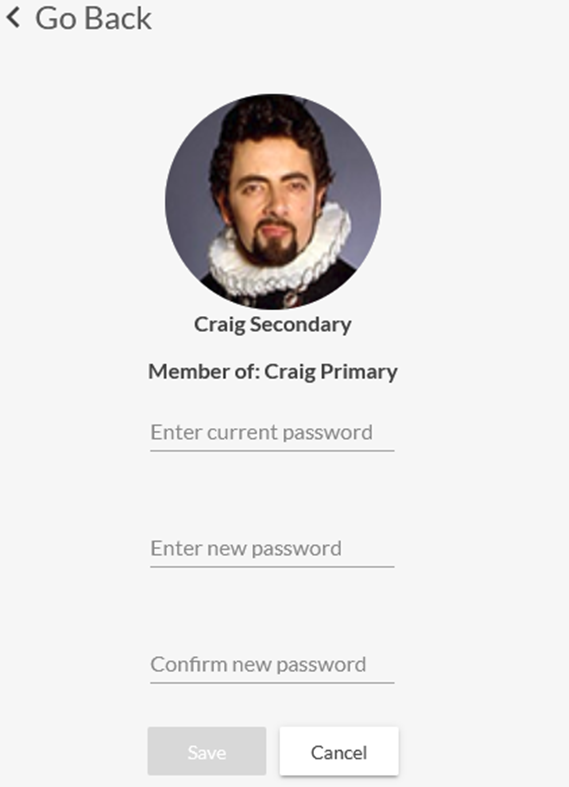
Click on Edit Profile to update your Name, Email, Phone Number or upload an Avatar.
· Note, your email is your Moneysoft PFM user name, so if you change it remember to use it the next time you log in
5.
Click on Change Password to update your Moneysoft PFM password.
-
How do I delete a Household Member account?
Household Member1.
Log into your Client Account.
2.
Click on your name in the top right corner and select My Account.
3.
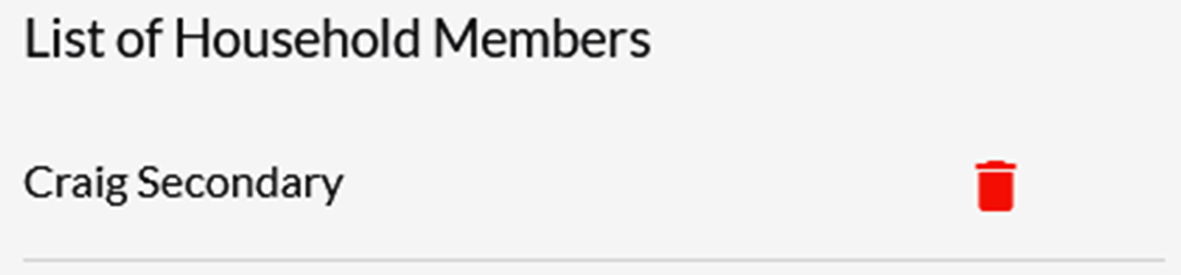
Locate the List of Household Members on the left side of the page, beneath the Add a New Household Member module.
4.
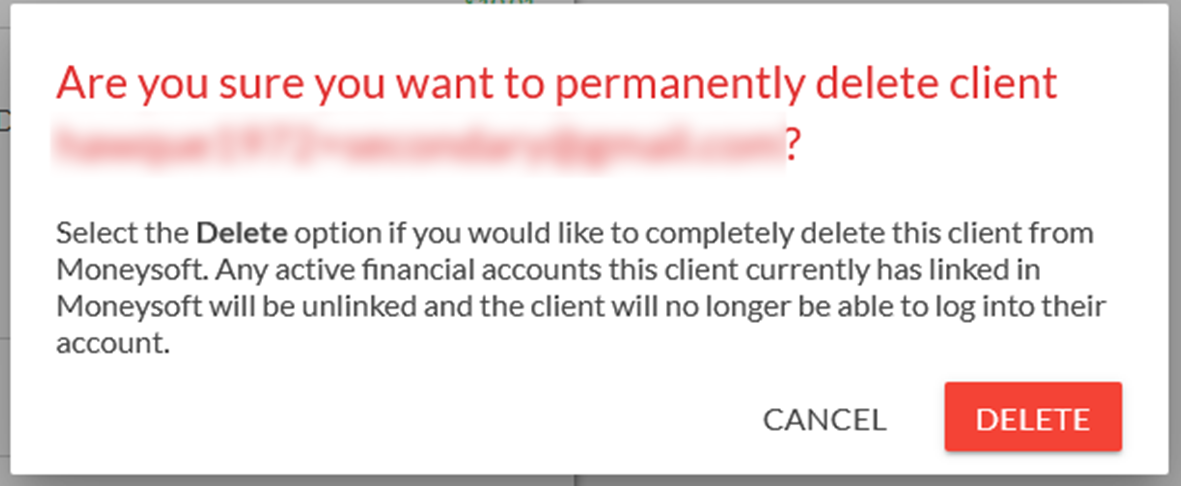
Click on the red trash can icon to open the account deletion confirmation window.
· Click Delete to permanently remove the Household Member
· Click Cancel to stop the deletion and return to the My Account page
5.
Deleted Household Members cannot be restored and all financial data associated to this client will be permanently removed from the client account.
-
What Financial Accounts Can I View and Edit as a Household Member?
Household Member1.
Both the Primary Client and the Household Member can see all the same details within the Moneysoft PFM account.
2.
For the budget, goals, transactions and reports both the Primary Client and the Household Member will have the same level of access and control over these items, i.e. they can view, delete and edit these.
3.
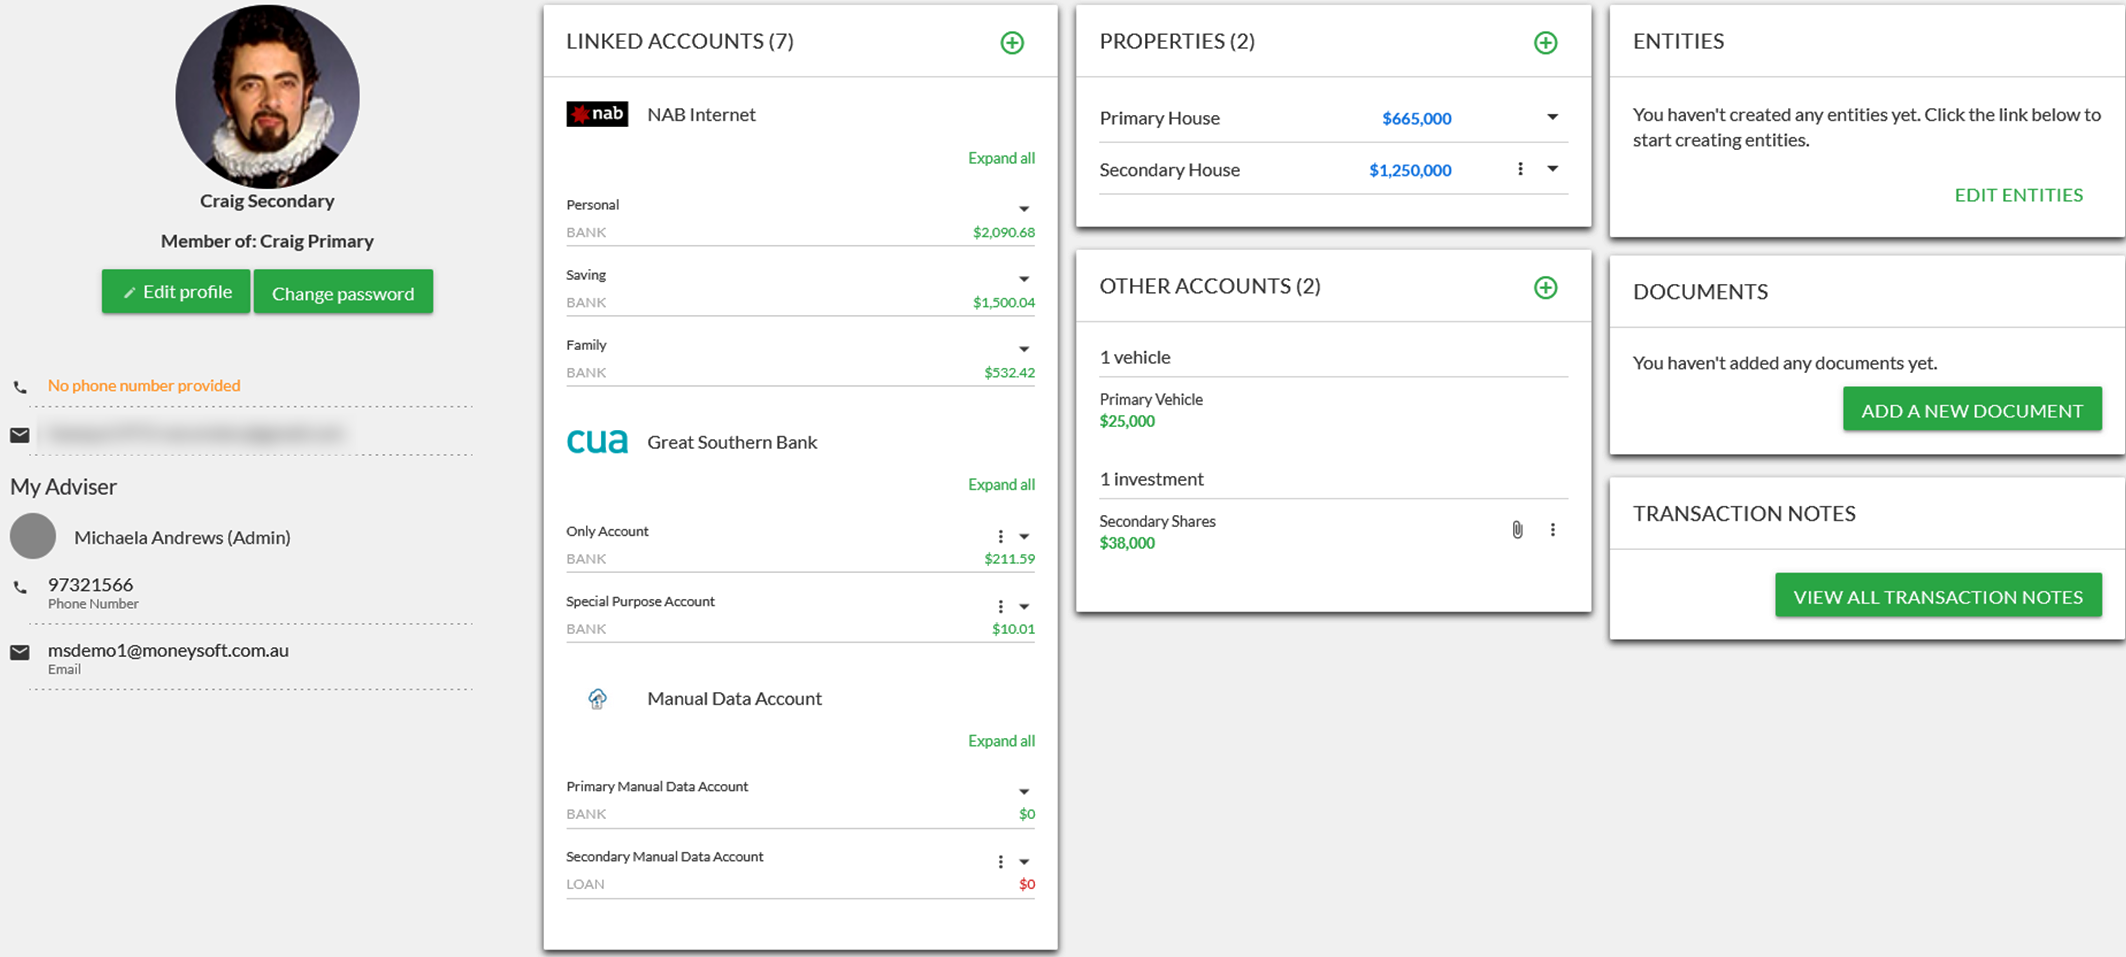
For linked accounts, the Primary Client and Household Member will be able to add their own Financial Accounts, Properties and Other Accounts.
4.
The Primary Client and Household Member will only be able to interact with the Financial Accounts, Properties and Other Accounts they have individually linked to the Moneysoft PFM account.
When the Primary Client is logged in, the three dot options menu will not be visible for any Financial Accounts, Properties and Other Accounts that were linked by the Household Member, and vice versa.
-
How do I search for Household Members?
Household Member1.
To invite a Household Member to share your Moneysoft PFM account, the feature must first be activated by your Financial Adviser.
2.
On the Individual Clients tab, type the first or last name of the Household Member into the search field
· This will return the Primary Client under which account the Household Member has been invited.
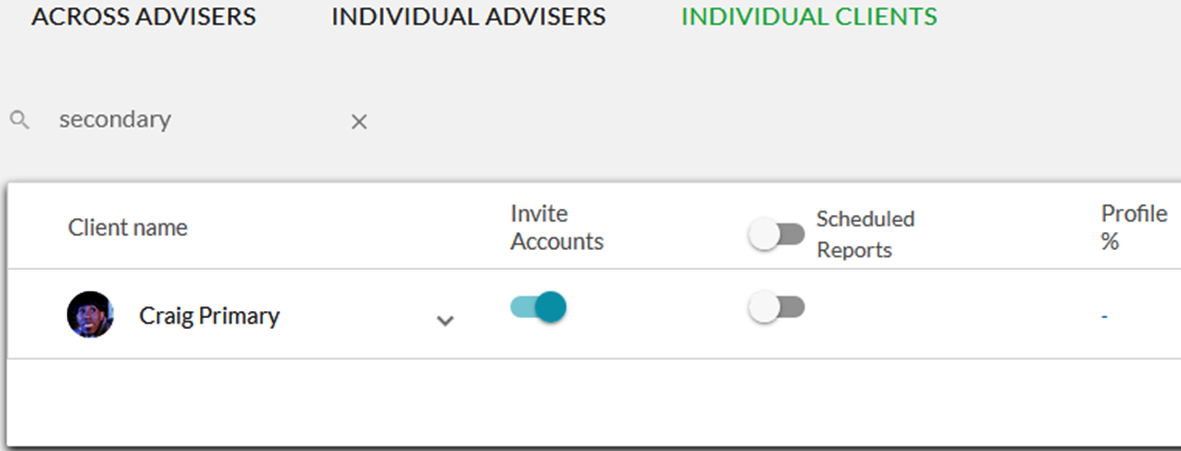
3.
Click on the down arrow to expand the Primary Client and view the Household Member.
· The Household Member’s name and current status will be displayed
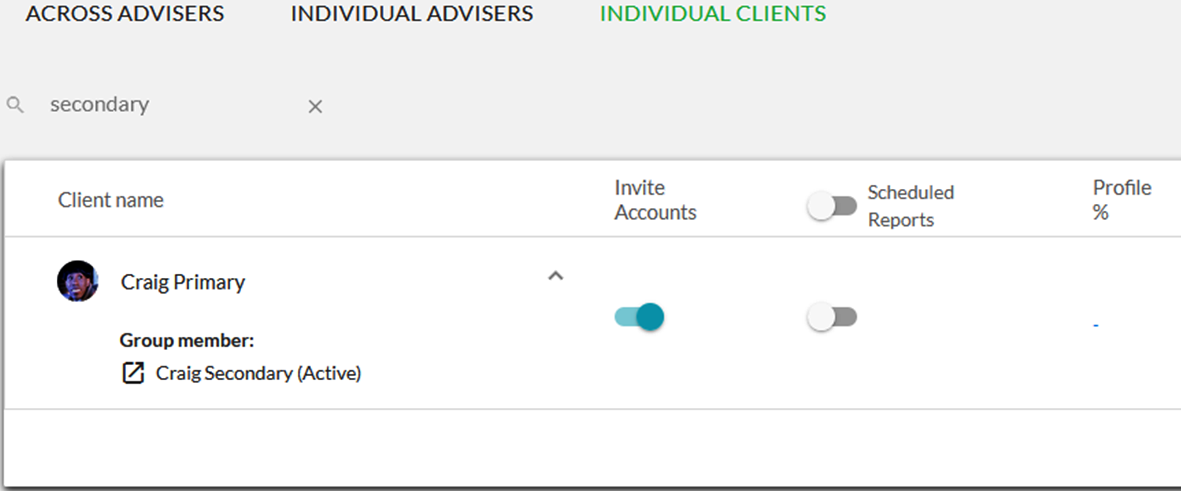
4.
Click on the icon to the left of the Household Member’s name to impersonate their Moneysoft PFM login.
-
Does Moneysoft support Open Banking and the Consumer Data Right?
Open Banking and Consumer Data Right (CDR)Yes! Moneysoft supports Open Banking in Australia and the USA and is a Participant in the Australian Consumer Data Right (CDR) through Yodlee Inc, the Accredited Data Recipient.
Moneysoft supports access to CDR data feeds for Personal and Professional Users (via the Trusted Adviser participation model).
For more information on Open Banking and how it works in Moneysoft, please visit our Open Banking web page.
-
How do I record my screen?
TroubleshootingNOTE: These instructions are for Windows 10 and 11 users. If you are on a Mac please see instructions here: https://support.apple.com/en-au/HT208721
1. Open the Snipping Tool
2.
a) Select the video camera icon to record
b) Click New
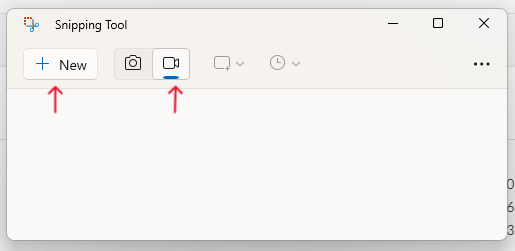
3. Then select the area of the screen you wish to capture4. Press the start button at the top of the screen to begin recording
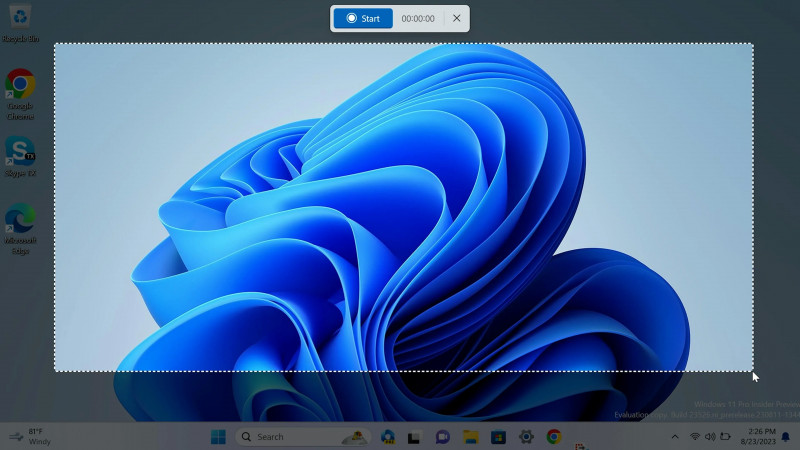
5. Press stop once you are done, this will show you Snipping Tool again where you can watch your recording

6. Make sure you save your video by clicking on the save icon in the top right corner
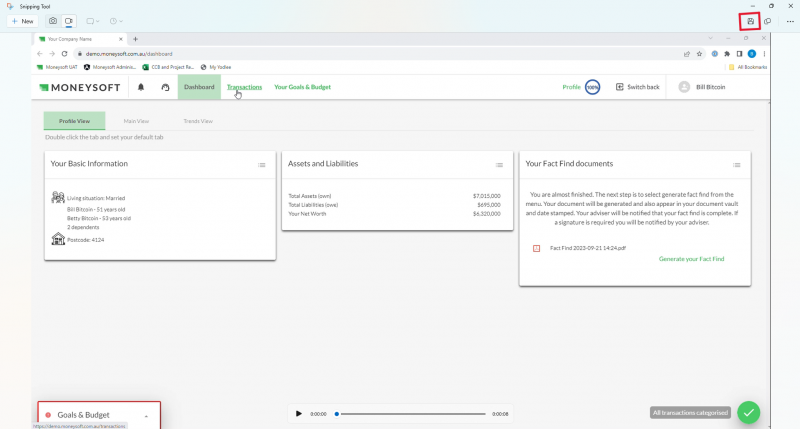
-
How do I reinstate lost data into Moneysoft?
Financial accountsMoneysoft is an approved data recipient only and data is made available under a Moneysoft personal subscription for users to manage their financial affairs. As such, the circumstances of historical financial account data being auto deleted from Moneysoft are when:
- the user cancels their subscription with Moneysoft, or
- the monthly subscription payment is not honoured
In the case where transactions are deleted permanently, the normal option available for users is to retrieve the transactions manually from the relevant institution in a CSV file, ensure it is saved in the required Moneysoft format, then manually add it back into Moneysoft.
- The CSV file used to import transactions must follow the standard format. Click here for the template.
- To import the missing transactions manually, select ‘Manual Data Upload’ from the account menu list
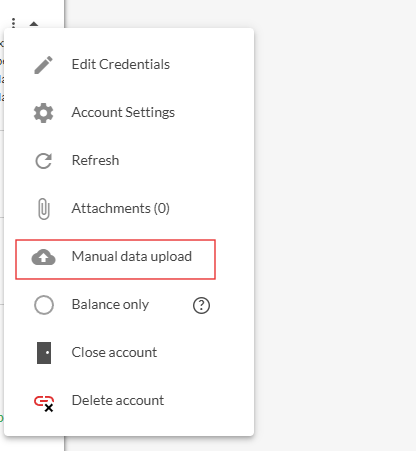
Users can save linked account transactions, generated reports and the like, obtained in Moneysoft, to their own personal files as a backup. Raw transaction data is not categorised, it is done via the software, so previously lost data retrieved to the system must be re-categorised accordingly.
As the personal subscription is user driven, the retrieval of lost financial data is not guaranteed when the required conditions of account status are not met.
-
How can I delete duplicate transactions?
Financial accountsDuplicate transactions can be caused under two scenarios:
The account has been duplicated:
If the account has been linked twice, this can cause duplicate transactions. You can confirm if this is the case by filtering transactions by account, which will show you where the overlap begins. To rectify this, mark the old account as closed, and remove the extra transactions from the new account. You can remove transactions in bulk by clicking the checkboxes and then clicking on the trash icon in the toolbar at the bottom of the page.The transactions have been duplicated at the data provider:
This could be caused by the data provider or the financial institution, where the transaction has been sent to Moneysoft twice. This can be specific to an institution or even specific to an account. This can either be handled manually by deleting the duplicate in Moneysoft. If you require assistance please send an email request to support@moneysoft.com.au -
Create and edit a ‘To Do’ Task
Calendar1. Select ‘View calendar’ from the ‘Your Upcoming tasks’ tile, located on the main dashboard.
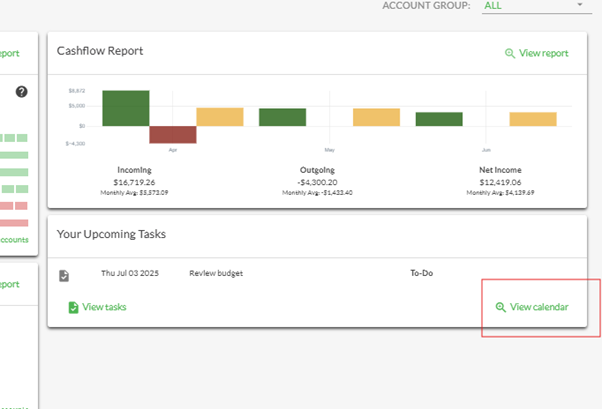
Default is set to the current month. Use the drop-down menus or the previous /next arrows to change the month and year if required
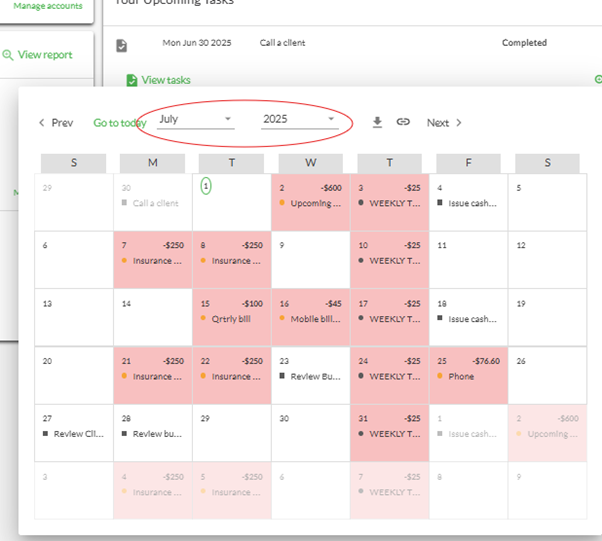
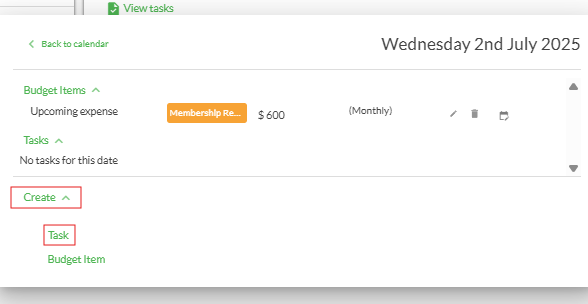
2. Select a day. From the pop-up box that appears, click on ‘Create’ and then ‘Task’
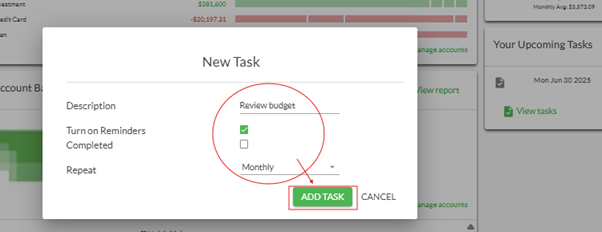
3. Give the task a name and check ‘Turn on Reminders’, if you wish to receive a reminder notice three days prior to the task date and a reminder one day after, if the task is not completed by then. Do not check if no reminder is required. Select repeat frequency if is a regular task, otherwise select ‘Do not repeat’ (first on list of frequency options) if is a one-off task to be completed.
Then click ‘ADD TASK’...
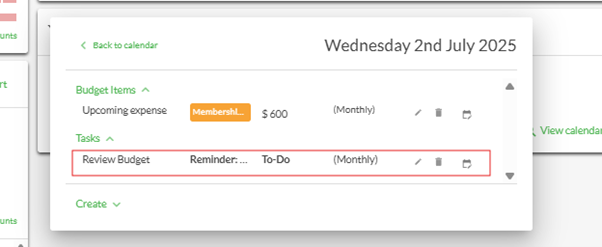
…the task will be created
4.The upcoming task, that is now set in the calendar for the month, will show on the dashboard tile.
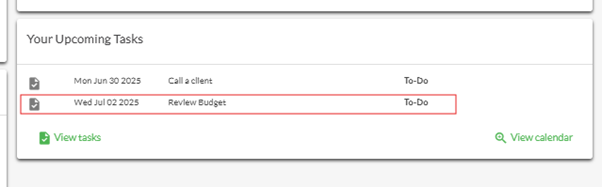
5. Let’s assume the previous task set on 30 June that still appears has been completed. To mark it completed, click on ‘Calendar’, go to the dated task and click the pencil icon to edit it.
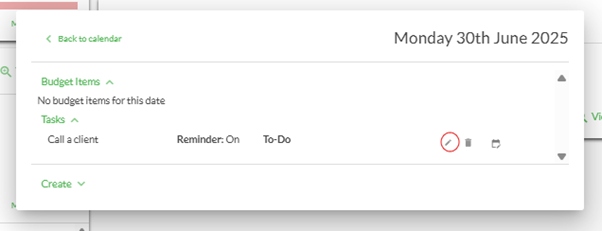
Check the ‘Completed’ box and then click on the tick icon to save this update.
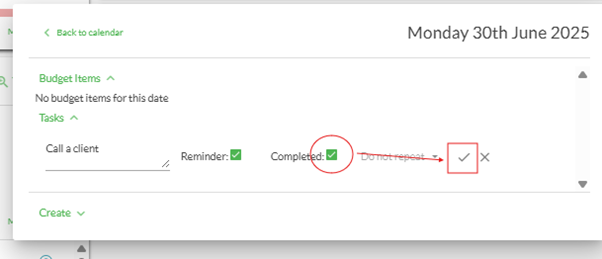
6. If the task is still recent enough to appear in the dashboard tile, it will now show as completed.
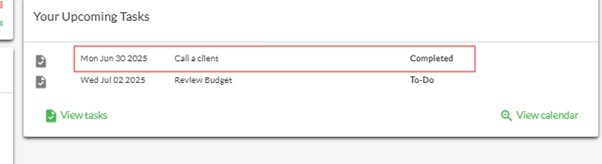
7. To change the date of the task, you must find it on the calendar, delete it and create a whole new task, via the steps shown above. To view all tasks, click ‘View tasks’ on the dashboard tile. Then you can easily mark any previous tasks as completed, as an alternative process to the above.
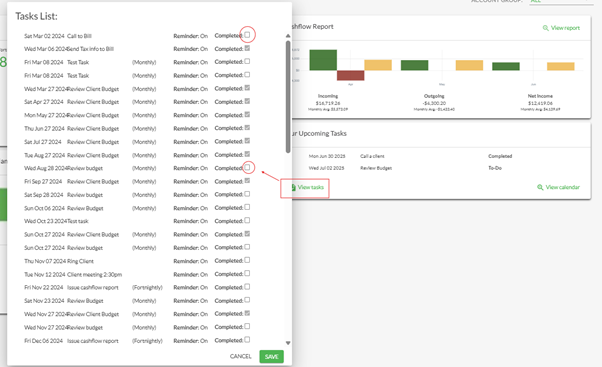

To re-consent to the data share, the user should take following steps:
Click on the plus sign and select ‘Open Banking Data Feeds’
Search for the CDR institution’s name and follow the steps to consent again
When consenting again, all accounts that you wish to have linked in Moneysoft should be selected, regardless of what accounts were consented to previously. The full 365-day consent period is recommended.
Tip: To avoid consent expiring again, use the 'Manage Open Banking Consent' option to note the end date and to extend (renew) the consent at any time prior to expiry.